One of the most popular javascript frameworks nowadays is Angular. Angular gives you the ability to make HTML content dynamic by using templates, components and services. However Angular does not have a suite of high-level UI components as ExtJS does.
In this blog post we are going to create an Angular component for our Ext Scheduler, which can be used in Angular templates as <scheduler> tags. After following the steps in this blog post, you will have a basic example with interaction between Ext Scheduler and Angular. Feel free to extend the example to suite your needs.
Prerequisites
This guide uses Angular with Typescript, but you should be able to follow it for the most part even if you use Dart or JavaScript.
1. Please check https://angular.io/docs/ts/latest/quickstart.html for Angular prerequisites (at least node v5.x.x and npm 3.x.x).
2. Make sure you have typescript installed, tsc -v. Otherwise install it with npm install -g typescript.
Create Angular project
We are going to follow a few steps from Angular Quickstart to get started quickly ![]() Please follow the steps below before continuing:
Please follow the steps below before continuing:
Step 1: Create and configure the project
Step 2: Our first Angular component
If everything went well you should now have a project structure like this:
app
  app.component.ts
  main.ts
node_modules
  [many folders]
typings
  globals
  index.d.ts
index.html
package.json
systemjs.config.js
tsconfig.json
typings.json
If the typings folder is missing then you can run:
./node_modules/.bin/typings install
To automatically track changes in your project files you can run:
npm start
This command will start a webserver and a browser, compile changes on the fly and update the browser.
Create the Angular component
Angular components (a directive with a template) can be used as tags in templates to add functionality. We want to use Ext Scheduler in Angular and are thus going to create a component for it. It will be called SchedulerComponent and have a corresponding <scheduler> tag. Attributes in the tag will be used as settings for the scheduler and we will also enable event binding.
Start by adding a file named scheduler.component.ts to your app folder. Add the lines listed below:
import {Component} from '@angular/core';

@Component({
    selector: 'scheduler',
    template: ''
})

export class SchedulerComponent { }
This gives us a component with the <scheduler> tag (line 4). In the end this will yield an empty div tag (line 5), to which we will render the scheduler. Now we modify app.component.ts to import SchedulerComponent:
import {Component} from '@angular/core';
import {SchedulerComponent} from './scheduler.component';

@Component({
    selector: 'my-app',
    template: `
        {{title}}
    `,
    directives: [SchedulerComponent]
})

export class AppComponent { title = 'Angular 2 demo'; }
An import-statement is added (line 2) to include the new component. The template is modified to include the component on page (line 8) and finally a directive is added to tell Angular which tags are valid (line 10).
Add the scheduler
Now we are going to include the required files for the scheduler and create an instance of it. Modify index.html and add the following to the <head> section:
In scheduler.component.ts we create the scheduler, but not before the template is applied. We do not yet know where to render the scheduler since our container element <div id="scheduler"> is not yet added to the DOM. We need to hook into a suitable moment in our component life cycle. Change scheduler.component.ts to match the lines below:
import {Component, AfterContentInit} from '@angular/core';

@Component({
    selector: 'scheduler',
    template: ''
})

export class SchedulerComponent implements AfterContentInit {
    ngAfterContentInit() {
        // this is where we will create an instance of Ext Scheduler
    }
}
Because of TypeScript being more typesafe than JavaScript we need to declare a couple of global variables to handle the scheduler, or else we will get compilation errors. Add the following lines after the import statement:
// global variables for imported js libraries
declare var Ext:any;
declare var Sch:any;
The next step is to create an instance of the scheduler. Add the following lines to the ngAfterContentInit function:
var eventStore = Ext.create('Sch.data.EventStore', {
model: 'Sch.model.Event',
proxy: {
type: 'memory'
}
});
var resourceStore = Ext.create('Sch.data.ResourceStore')
var scheduler = Ext.create('Sch.panel.SchedulerGrid', {
width: 1000,
height: 600,
renderTo: 'scheduler',
columns: [
{header: 'Name', sortable: true, width: 160, dataIndex: 'Name'}
],
resourceStore: resourceStore,
eventStore: eventStore
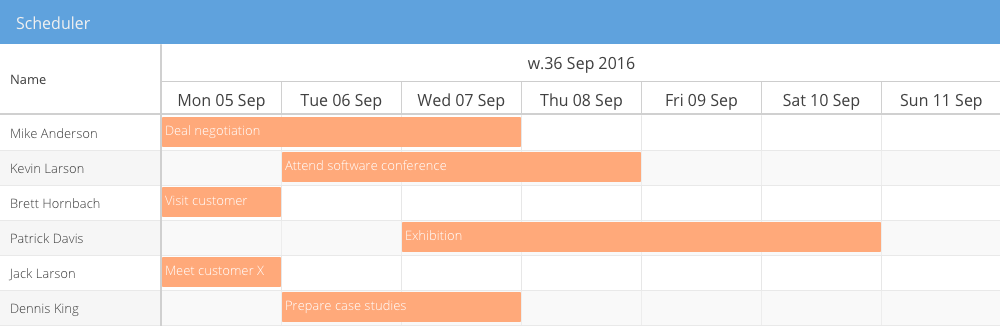
});By now we have done most of the heavy lifting and have an empty scheduler displayed in your Angular project. But empty is kind of boring so let’s load some data.
Loading data
In a real world application we would load the data from a database, but in this sample we’ll just use dummy data from a JS file. Create a folder named data in the root of your project, add a file data.json with the following content:
{
    "events" : [
        {"Id" : "e10", "ResourceId" : "r1", "Name" : "Deal negotiation", "StartDate" : "2016-09-05", "EndDate" : "2016-09-08"},
        {"Id" : "e22", "ResourceId" : "r2", "Name" : "Attend software conference", "StartDate" : "2016-09-06", "EndDate" : "2016-09-09"},
        {"Id" : "e43", "ResourceId" : "r3", "Name" : "Visit customer", "StartDate" : "2016-09-05", "EndDate" : "2016-09-06"},
        {"Id" : "e210", "ResourceId" : "r4", "Name" : "Exhibition", "StartDate" : "2016-09-07", "EndDate" : "2016-09-11"},
        {"Id" : "e222", "ResourceId" : "r5", "Name" : "Meet customer X", "StartDate" : "2016-09-05", "EndDate" : "2016-09-06"},
        {"Id" : "e243", "ResourceId" : "r6", "Name" : "Prepare case studies", "StartDate" : "2016-09-06", "EndDate" : "2016-09-08"}
    ],

    "resources" : [
        {"Id" : "r1", "Name" : "Mike Anderson" },
        {"Id" : "r2", "Name" : "Kevin Larson" },
        {"Id" : "r3", "Name" : "Brett Hornbach" },
        {"Id" : "r4", "Name" : "Patrick Davis" },
        {"Id" : "r5", "Name" : "Jack Larson" },
        {"Id" : "r6", "Name" : "Dennis King" }
    ]
}
The file contains data for both the event-store and the resource-store. We can use Angulars http library to load it into the stores. Add two imports to schedule.component.ts below the other imports:
import {Http, HTTP_PROVIDERS} from '@angular/http';
import 'rxjs/add/operator/map';
Then add a provider to the @Component decorator:
@Component({
    selector: 'scheduler',
    template: '',
    providers: [HTTP_PROVIDERS]
})
Now inject the Http class into the SchedulerComponent class by adding a constructor:
export class SchedulerComponent implements AfterContentInit {

    constructor(private http:Http) { }

    ngAfterContentInit() {
        // existing code untouched...
    }
}
Finally, use http to load data.json and populate the stores by adding the following lines at the bottom of the ngAfterContentInit function:
this.http.get('data/data.json')
         .map(r => r.json())
         .subscribe(
             data => {
                 resourceStore.loadData(data.resources);
                 eventStore.proxy.data = data.events;
                 eventStore.load();
             },
             err => console.error(err)
          );
Add input property bindings
It would be nice to be able to configure the scheduler by using attributes in the <scheduler> tag, something that is called Property Binding. We will create an example binding for the title of the scheduler. This is done by adding fields to the SchedulerComponent class and decorating them with the @Input directive.
First, import the Input directive by changing the first import to:
import {Component, AfterContentInit, Input} from '@angular/core';Secondly, add a field at the beginning of the SchedulerComponent class:
export class SchedulerComponent implements AfterContentInit {
    @Input() title:string;
    // existing code untouched
Third, alter the code that creates the scheduler in the ngAfterContentInit function:
var scheduler = Ext.create('Sch.panel.SchedulerGrid', {
    title: this.title,
    // existing code untouched
});
Finally, add a property binding to the <scheduler> tag in the template in app.component.ts:
@Component({
    selector: 'my-app',
    template: `
        {{title}}


        `,
    directives: [SchedulerComponent]
})
Those are the basic steps for adding property bindings. If you download and look at the demo that belongs to this blog post you can see that we have added a few other useful properties. You can find the download link at the bottom of this post.
Add output property bindings
Angular supports output of values from a component to another components template, by decorating fields in the class with the @Output directive. We can use this to display information from the scheduler. For example we can display the number of loaded events in the main template.
First, import the Output directive by changing the first import to:
import {Component, AfterContentInit, Input, Output} from '@angular/core';Secondly, add a field at the top of the SchedulerComponent class:
@Output() eventCount:number;
Third, assign a value when the data is loaded. Alter the http call in the ngAfterContentInit function:
resourceStore.loadData(data.resources);
eventStore.proxy.data = data.events;
eventStore.load();
//new line:
this.eventCount = eventStore.getCount();
Finally, modify the main template in app.component.ts to match the following lines:
@Component({
    selector: 'my-app',
    template: `
        {{title}}
        Number of events: {{scheduler.eventCount}}


        `,
    directives: [SchedulerComponent]
})
By specifying #scheduler on line 7 we assign a variable, called a template reference variable. This variable can be used in the template to access the output values. It is then used on line 5 to display the eventCount.
Add event bindings
Event bindings are not that different from property output bindings. We are going to add an event for when the user selects an event in the scheduler. For this we need an EventEmitter in the ScheduleComponent and then do event binding in the main template.
First, import EventEmitter by changing the first import to:
import {Component, AfterContentInit, Input, Output, EventEmitter} from '@angular/core';Secondly, add an EventEmitter to the top of the SchedulerComponent class:
@Output() onEventSelect = new EventEmitter();
Then add a listener to the scheduler to catch the event and emit it. This listener is set in the config for the scheduler:
// last line of existing code in config object
eventStore: this.eventStore,
// add below
listeners: {
    eventselect: function(em, eventRecord) {
        this.onEventSelect.emit(eventRecord);
    },
    scope: this
}
Lines 4-9 contains the listeners configuration. Line 6 emits the event, enabling us to catch it outside the SchedulerComponent.
Now bind to the event in the main template. Alter the scheduler tag (in app.component.ts) to match the following lines:
@Component({
    selector: 'my-app',
    template: `
        {{title}}
        Selected event: {{eventTitle||'None'}}


        `,
    directives: [SchedulerComponent]
})
Line 5 will be used to display the title for the selected scheduler event. Line 8 is the event binding. When the scheduler emits an event the binding will call an onEventSelect function with the eventRecord passed as an argument. Add the onEventSelect function to the AppComponent class:
export class AppComponent {
    title      = 'Angular 2 demo';

    onEventSelect(eventRecord:any) {
        // event selected in scheduler, display its name
        this.eventTitle = eventRecord.get('Name');
    }
}
Accessing the scheduler from another class
In the section “Add output property bindings” above we created a template reference variable to access SchedulerComponent output in the template. Unfortunately we cannot use that variable to access the SchedulerComponent from the main class of the application (AppComponent). Instead we have to inject the SchedulerComponent as a ViewChild in AppComponent. Follow the steps below to modify app.component.ts:
First, import ViewChild by altering the first import to:
import {Component, ViewChild} from '@angular/core';Secondly, add a @ViewChild field somewhere at the top of the AppComponent class:
@ViewChild(SchedulerComponent) schedulerComponent:SchedulerComponent;
Congratulations! If you reached this point you can access the scheduler by using this.schedulerComponent anywhere in AppComponent.
Download the example
View live example: http://www.bryntum.com/playpen/angular2
Download source: http://www.bryntum.com/playpen/angular2.zip
Code away!