Quantcast
Channel: Bryntum
Viewing all 370 articles
Browse latest View live

Bryntum Calendar 1.0 is available

$
0
0

We are excited to announce the release of Calendar 1.0. Since the first 0.9 version was released, we have added lots of functionality to create a flexible calendar suite which you can easily add to your web application. Let’s walk through the main changes in the 1.0 release.

New agenda and year views

Calendar now comes as a pre-configured Container with 5 different view modes: day, week, month, year and agenda. The month view is active by default and you can navigate through views by using the navigation bar at the top. In the navigation bar you also see a title showing the current date range.

Month view

The agenda view is new, and shows you all your tasks in a flat list grouped by date. To activate this mode, you can use the toolbar button or by setting the agenda programmatically:

var calendar = new Cal.panel.Calendar(...);

calendar.setMode('agenda');

Screen Shot 2017-12-11 at 13.12.50

In this release, we also added the new year view which shows you a heatmap style calendar for each month of the year. Activate it programmatically by setting the year mode on your calendar.

var calendar = new Cal.panel.Calendar(...);

calendar.setMode('year');

Screen Shot 2017-12-11 at 13.52.15

Minimal configuration

To create a Calendar it’s enough to specify a few different configuration properties. Set a height/width and provide the stores for your events and resources.

var myCalendar = new Cal.panel.Calendar({
    renderTo : document.body,
    height   : 500,
    width    : 800,
    mode     : 'day',
    date     : new Date(2017, 9, 14),
    eventStore    : {
        type : 'calendar_eventstore',
        data : [
            // events go here
            {
                Id         : 1,
                StartDate  : "2017-10-14T08:00:00",
                EndDate    : "2017-10-21T21:00:00",
                Name       : "Hackathon 2017 in Split, Croatia",
                ResourceId : "bryntum"
            }
        ]
    },
    resourceStore : {
        type : 'calendar_resourcestore',
        data : [
            // resources go here
            {
                Id    : 'bryntum',
                Name  : 'Bryntum team',
                Color : '#249fbc'
            }
        ]
    }
});

Configuring the available modes

With the new configuration options in 1.0, you can easily control which Calendar modes will be available. If you want to switch off a mode, it’s enough to set it to false using the modes config:

{
    xtype         : 'calendar_panel',
    eventStore    : {...},
    resourceStore : {...},
    mode          : 'agenda', // Agenda view will be activated after render (month by default)
    modes         : {
        agenda : true,  // Can be omitted since true by default
        year   : false, // Year view is off
        week   : false, // Week view is off
        day    : false, // Day view is off
        month : {
        	// Mode specific configuration goes here
                .....
        }
    },
}

SASS based theming

All styles are SASS-based which gives you the option to use all its variables for easy theming. The main color variables are placed together and color variables of subcomponents extend those. You can find out which variables to use by looking in the SCSS docs:

Screen Shot 2017-12-11 at 17.27.25

Summing up

With the addition of Calendar 1.0 to our component suite, we now offer a very powerful scheduling UI for working with your tasks. Try the examples below and see the many different views to visualize your data:

Feature wise, we’re not done yet. Plenty of features are already planned for 2018, so keep in touch and please let us know which features matter the most to you and your business!

Additional Resources


Adding A Powerful Gantt Chart To A SharePoint Site

$
0
0

In the recent months we have received multiple requests for a guide showing how to embed our components into a Microsoft SharePoint site. We are happy to announce that we have created a guide and a new example in the format of a Visual Studio Solution, showing how to create a basic SharePoint add-in for our Gantt component.

With this solution as a base you can deploy any of our components to your SharePoint Site and map it to any data source in your SharePoint domain.

We have created a small Ext JS based proxy for this purpose. This proxy is able to perform CRUD operations. This will allow you to populate the deployed chart with any data and you are able to save changes by using it’s configured proxies. The proxy could be used for any data source in SharePoint, like for example resources and items from any list.

A few prerequisites…

Before you start, make sure you have gone through the list below to get you setup:

  • Having Visual Studio installed with Sharepoint project templates.
  • A Sharepoint Developer Site, optionally combined with an App Catalog Site in which you can deploy your packages. Or an installed SharePoint server on a local or remote machine (Microsoft has some pre-installed Azure images for this purpose, they are freely available when you have a Microsoft Developer Account). For our demo, we used a Microsoft Office 365 Business Premium account. This link would be a good entry point to set it up.
  • Within our product, in this case the Ext Gantt Pro package, which you have copied to your locale machine, you will find the SharePoint solution in the examples/sharepoint folder. All instructions to set it up are explained and included in the guide section of the docs
  • And at last you need some data from a list in your SharePoint domain. In our setup we used the default Task app which you can add to your SharePoint Site

    tasklist

The Solution

When you open the solution in Visual Studio, start by adding your SharePoint Developer Site to the project and log in to the site.

seturlsite

Booting the site up

In the Default.aspx page we have embedded our Ext JS application. There we add the RestBatchExecutor for making CRUD operations in Sharepoint. This BatchExecutor is created by Steve Curran and is a very easy library to use for handling multiple updates in a single request via the ODATA protocol.

<script type="text/javascript" src="../Scripts/RestBatchExecutor.js"></script>

Then we add the microloader.

<script  id="microloader" data-app="5b8dd3ff-bbc3-4020-af48-6f8b54ee24e9" src="./Gantt/microloader.js"></script>

And we set the placeholder to where the chart is rendered to.

<div id="ganttplaceholder" class="scheduler">
</div>

Application classes

We have app.js and view/Application.js as application classes which will boot up the application.

app.js

launch: function () {
    window.ExecuteOrDelayUntilScriptLoaded(this.loadRequestExecutor.bind(this), "sp.js");
}

Within the SharePoint scope we have to load RequestExecutor.js, before rendering the application, to be able to make REST api endpoint calls within the SharePoint domain.

loadRequestExecutor : function (){
    this.hostWebUrl = this.getParameterByName("SPHostUrl");
    this.appWebUrl = this.getParameterByName("SPAppWebUrl");
    $.getScript(this.hostWebUrl + "/_layouts/15/SP.RequestExecutor.js", this.initializeApp.bind(this));
}

When the RequestExecutor is loaded we are at the stage we can launch our main view.

view/Application.js

initializeApp: function () {

    this.chart = new SPGnt.view.main.Main({
        renderTo: 'ganttplaceholder',
        height     : '100%',
        width      : '100%',
        taskStore : {
            type        : 'gantt_sptasks',
            autoSync    : true,
            proxy: {
                type        : 'spproxy',
                api: {
                    create  : "web/Lists/getbytitle('Tasks')/items",
                    read    : "web/Lists/getbytitle('Tasks')/items?$select=Id,GUID,Title,StartDate,DueDate,Status,PercentComplete,ParentIDId&",
                    update  : '',
                    destroy : ''
                },
                hostWebUrl  : this.hostWebUrl,
                appWebUrl   : this.appWebUrl
            }
        }
    });
    
    this.getUserName();
}

We only need to set an endpoint for the create and read operation while endpoints for update and a destroy operation are set in the meta data of the retrieved items. You can read more about this in our guide.

The property renderTo is set to ganttplaceholder, this is the DIV we have added in Default.aspx (production) and in index.html (development).

The height and width we set both to 100% since we want to make the Gantt chart responsive. We do this by applying a piece of CSS in the Main.scss file

view/main/Main.scss

.scheduler {
    position   : absolute;
    right      : 20px;
    top        : 150px;
    width      : calc(100% - 40px);
    height     : calc(100% - 150px);
    min-height : 343px;
    background : #f0f0f0;
    border     : 2px solid #d0d0d0;
}

Time To Deploy

When you have modified your application according to your needs and have built it with Sencha cmd you are almost ready to deploy. First open the AppManifest file.

appmanifest

There you can set your permissions for the application. When hitting deploy, the previous deployed application (if any) will get uninstalled and the Add-In will be added to your SharePoint Site.

deployprogress

This progress can take some minutes. For that reason we recommend to have a developer setup to be able to work with sencha app watch in a local environment. In the solution we provided some dummy data and we made some switches to be able to run the application outside context of the SharePoint Site as well.

TrustAddIn

That’s it!

When done you will get prompted to trust your application. Don’t forget to hit that “Trust It” button and enjoy the result.

ContextMenu

You can add basically any plugin, component or Ext JS widget to SharePoint following this procedure. Like we added the taskeditor plugin which gives you a far more advanced editing facility for your TaskList items in SharePoint.

editor

Conclusion

With the solution above, we’ve showed that you can easily get a very powerful Gantt chart embedded in your SharePoint environment to replace the basic version that ships with SharePoint. You can extend this solution any way you want to add custom columns or views. For each data store you use you can make use of the proxy we have defined in this example. It basically all comes down to writing queries for the REST endpoints.

We hope you found this guide useful, and that you’re able to add any Bryntum component to your SharePoint site. If you encounter any issues setting up your Gantt chart, please post in our forums and we’ll assist you. https://www.bryntum.com/forum/.

Siesta 4.4.0 Released With Headless Testing Support

$
0
0

Today we are pleased to announce the Siesta 4.4.0 release. This is a fully backward-compatible release which brings support for the newest versions of Chrome and Firefox, and contain some important features affecting the performance of your test suites. Below are the major highlights from the changelog.

Support for headless testing with WebDriver

Siesta now supports a new headless mode of the latest Chrome (>=60) and Firefox (>=57). To enable it, provide the --headless switch to the WebDriver launcher.

This feature is more important than it might seem, as headless mode provides isolation for every browser process. This solves the “focus fighting” problem you run into when running multiple tests in parallel. So in headless mode, it is safe to use the --max-workers option, launching several parallel execution threads. This in turn results in almost linear speed increase of test suite execution.

We definitely recommend you to experiment with the headless mode + “max-workers” combination. In our experience you can safely specify 3-5 workers (depending on how powerful your server is naturally).

However we noticed that on Windows 7, the headless Chrome runs much slower than “normal” Chrome. There’s no such effect on Windows 10. Please experiment and provide your feedback to our forum.

Deprecating the PhantomJS launcher

phantomjs-logo

PhantomJS was pioneering the landscape of headless browsers and it did an excellent job. However, the architecture of the project was always a bit questionable. The version of WebKit it used was tied to the Qt library and not to Chromium or Safari code bases. As a result, PhantomJS was never truly a real browser and many of you probably noticed this. Certain tests behaved differently in Phantom vs real Chrome. Now it’s time for it to retire – the last release was on January 23, 2016. We’ve deprecated this launcher and removed it from the documentation (it will still remain the Siesta package for some time). All PhantomJS users are strongly advised to switch to another headless launcher, thankfully there’s plenty of options now.

Puppeteer launcher

puppeteerTo replace PhantomJS we’ve added a new launcher based on Puppeteer. Feature-wise this launcher is pretty much on-par with WebDriver and it is running in headless mode by default.

In addition to the above, as always a few issues have been fixed and a few minor improvements made. If you feel that your favorite feature is missing in Siesta – please let us know and we’ll try to implement it.

Happy testing!

Filtering Resources And Tasks In Ext Scheduler

$
0
0

Filtering is a critical feature in any data table or scheduler component where you want to work with large data sets efficiently. In our Scheduler component you would typically want to filter resources or their tasks but you can even filter the TimeAxis. To show how easy it is to filter your ResourceStore or EventStore, we built a small sample:

Screen Shot 2018-02-12 at 23.24.16

In this sample you can try resource filtering as well as both filtering and highlighting tasks. The magic is done purely by the powerful Ext JS Store class which offers a filter method that is used in the demo. You can filter by any field/value in your model, or use the filterBy method to provide a filterer function. The filter fields you see in the demo are simple Ext JS TextFields which are fed the target store as a config property:

Ext.define('Sch.examples.filtering.view.FilterField', {
    extend : 'Ext.form.TextField',
    xtype  : 'demofilterfield',

    enableKeyEvents : true,
    store    : null,
    property : '',

    initComponent : function () {
        this.store = Ext.StoreMgr.lookup(this.store);
        this.callParent(arguments);
    },

    onKeyUp : function (e) {
        var value = this.getValue().toLowerCase();
        var store = this.store;

        if (e.getKey() === e.ESC) {
            store.clearFilter();
            this.setValue('');
        } else {
            store.filter([
                {
                    property : this.property,
                    value    : value,
                    anyMatch : true
                }
            ]);
        }
    },

    listeners : {
        keyup : 'onKeyUp'
    }
});

We hope you download our latest version to try out the filtering demo, and please let me know if you’d like to any other feature showcased in our demos. Happy filtering!

1

Gantt 5.0 + Scheduler 5.0 + Calendar 0.9.0 Released

$
0
0

After a long development push during the past two months, we’re finally able to announce Scheduler 5.0.0 and Gantt 5.0.0 as well as the initial 0.9.0 release of our new Calendar. We also took some time to clean up and remove deprecated API members. We recommend you to go through the “Breaking Changes” section to see if there are any changes that could affect your code base. If you’re using an API that is marked as deprecated, please take the time to update/replace it according to the changelog. Let’s dig into the details to see what’s new!

Ext Scheduler 5.0

This release is the largest we ever made for our Scheduler product. To allow for easier browsing of our many examples, we made a new kitchen sink.

Screen Shot 2017-08-15 at 12.25.52

We also fixed numerous bugs and added some new important features:

  • New EditorWindow plugin which shows the event editor form in a window popup
  • Support for creating dependencies in the Scheduler, as supported previously only in the Gantt chart
  • New Resource name column, included by default showing the name of your resources
  • Styling is now SASS based as in Ext JS, making it much easier to theme the scheduler.
  • New split grid demo showing how you can split the scheduler into two vertical sections
  • New ‘render to div’ demo showing how to integrate the Scheduler into a basic HTML web page
  • New ‘scheduling suite’ demo showing how Scheduler, Task board and Calendar can share and visualize the same store data
  • Updated styling to be consistent for all samples

Below you can see the new experimental demo of the split section feature:

Screen Shot 2017-08-15 at 13.08.35

For a full list of changes, news and updates of the release, please refer to the changelog.

Ext Gantt 5.0

For Ext Gantt release is the largest we ever made for our Scheduler product. On a high level here’s what’s new:

  • As with Ext Scheduler, all our component styling is now SASS based.
  • New flag autoCalculateLag on the DependencyStore which calculates and set the lag of new task dependencies
  • New ´readOnly´ config available on Gnt.panel.Timeline. Set it to ´false´ to enable drag drop of tasks in the timeline (true by default)
  • New demo showing the Scheduler using the Gantt task store to schedule tasks and take calendars / dependencies into account.
  • Normalized styling of all samples

Below you can see the new combination demo of the Gantt task store used in Ext Scheduler:

Screen Shot 2017-08-15 at 13.23.42

For a full list of changes, news and updates of the release, please refer to the changelog.

Bryntum Calendar 0.9.0

Screen Shot 2017-08-15 at 13.50.05

We’re happy to announce the initial release of our latest UI component – the Bryntum Calendar. This was very often requested in the past and with this component, our scheduling suite gained a new vital piece. It contains the essential calendar day view, week view and month views (agenda + year view are both in progress). The data integration is very easy if you have worked with our other products or Ext JS data stores in the past. The Calendar includes various examples to get you started, and as with all our products it ships with its own Siesta test suite, so you can assert the quality of each release yourself.

With the arrival of the Calendar component, you can now schedule and manage tasks in any way you want, horizontal/vertical resource view, day/week/month view, Kanban view and Gantt view. The Calendar component integrates nicely with our other components, showcased in our new ´scheduling suite´ demo.

Screen Shot 2017-08-15 at 14.43.19

Summing up

If you want to try out or new releases, just head over to the sample pages of the respective product (listed below). We hope you’ll like our new releases and please let us know us of any feature or bug you would like to see prioritized. We’re trying hard to be as customer driven as possible. Happy scheduling!

Additional Resources

Roadmap for Ext Gantt/Scheduler 6.0

$
0
0

It’s been about 15 months since our last major Ext Scheduler/Gantt release, so it’s time to start revealing the plans for our upcoming 6.0 release. Since the 5.0 release, we’ve received lots and lots of feedback, bug reports and feature requests – which we’re very thankful for. Please keep it coming so we know which features are important to you. Let’s dive into the details of our next major release!

Ext Gantt 6.0

The biggest Gantt feature in 6.0 is backwards scheduling, which was requested many times over the years. We’re super happy to finally be able to deliver this feature. If you haven’t heard about backwards scheduling before, here’s a brief introduction:

Backwards scheduling

Backwards scheduling is a method of planning where you start from the project due date and go backwards, scheduling the tasks based on that fixed date. All tasks in this mode are scheduled as late as possible by default. The project start date is flexible and calculated based on the project tasks. This method allows you to estimate the latest possible date the project could start without missing the deadline. So, if we compare to forward scheduling which tells you: “When will the project finish?”, backwards planning instead tells you “When does the project need to start?”. This can be especially useful in production planning to simplify resource allocation and increase efficiency. We’ve created a new demo too where you can try the two different planning modes.

Screen Shot 2018-03-13 at 19.13.36

There’s of course more in the 6.0 package, here’s a few additional improvements we hope you will like:

  • Ext JS high contrast theme support
  • Group task store by custom field
  • Dependency hover tooltip is now supported and inherited from Ext Scheduler, enabled by default
  • ASP.NET + Java versions of export scripts
  • Dropped support for IE8-10, legacy code cleaned up

Apart from the items in the list, you will also find a number of bug fixes and minor improvements. As usual, you’ll find all the details in the release change log.

Ext Scheduler 6.0

The two largest features in Scheduler 6.0 are the recurring events and the all-day event header. With the arrival of recurring events, you can now schedule events on a repeating basis, and not have to manually create each weekly task. And with the all-day event header bar, you can now keep the main schedule area tidy and not have multi-day events occupy all the space:

allday

Here’s the list of major improvements and updates planned for Scheduler 6.0:

  • Recurring events
  • Support for a header bar containing All Day events in week view / day modes
  • New summary row plugin (previously demonstrated in ColumnSummary demo)
  • Split view plugin promoted to a fully supported plugin
  • Dependency tooltip now supported and enabled by default
  • New undo & redo demo
  • New demo showing collapsible resource rows
  • ASP.NET + Java versions of export scripts
  • Dropped support for IE8-10, legacy code cleaned up

Important: Updated IE version support

Microsoft announced end of support for older IE versions (IE 8-10) in 2016, and we’ve decided to drop support for such legacy IE versions in our 6.0 release (IE11 will be the minimum requirement). If you’re intending to keep supporting IE8-10 in your web application, you cannot upgrade to the coming 6.0 version. You can however still use the Ext Scheduler/Gantt 5.x releases as they will continue to support legacy IE versions.

We will provide more details about the release as we get closer to the launch date (6.0 is planned for May 2018).

1


Debugging memory leaks in web applications using iframes

$
0
0

Many of our customers use popular third party javascript frameworks inside an iframe as a part of a larger application. Typically, each “sub-page” in this type of application is implemented in its own iframe that is part of the top HTML document. In most cases this works well, but in some cases it causes major memory leaks as iframes are added and removed repeatedly. We were recently asked to assist a customer with a memory leak problem in their application and below we are sharing what we learned along the way.

The problem

In the application we debugged, a common scenario was for users to open and close multiple iframe pages in the application over an extended period of time. Each time a user opened a view, a new iframe was created and when the view was closed the iframe was removed from the page. The problem was that sometimes after removing the iframe the memory used by it was still retained by the browser. After using the application for a couple of hours the browser would run out of memory and crash. It was apparent that in some way the browser was unable to release iframe memory. Our plan was to help our customer to find the leak by looking for known causes for iframe memory leaks using heap dumps and by doing code review.

Common causes of iframe memory leaks

Normally, removing an iframe allows the memory used by it to be garbage collected and released without any need of internal cleanup. But if an object outside of the iframe has a reference to an object inside the iframe, the iframe cannot be garbage collected. Common cases preventing garbage collection include:

The outer window has a reference to an object in the inner window, which might be set from the inside:

window.top.innerObject = someInsideObject

Or from the outside:

innerObject = iframeEl.contentWindow.someInsideObject

You could also add an event listener from the inner scope to the outer scope:

window.top.document.addEventLister(‘click’, function() { … });

This type of code is surprisingly sometimes even seen in framework code, as in JqWidgets.
 

Chrome Developer Tools to the rescue

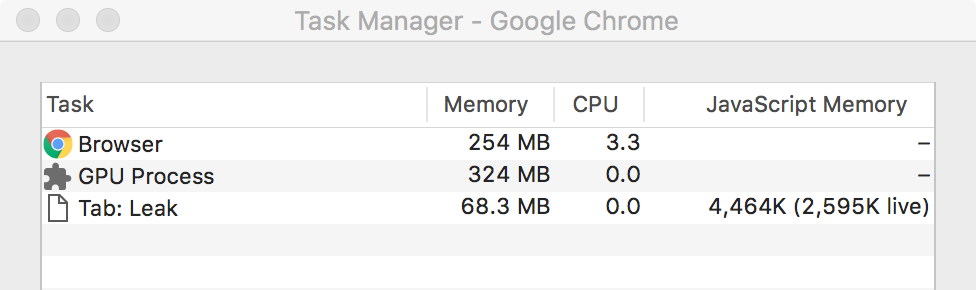
Chrome has a few really nice tools built into it to aid in debugging memory leaks. First of all, by using the Chrome Task Manager you can quickly determine if there is a suspected memory leak. If the memory usage value keeps going up in your app, and never returns back to the initial memory footprint– you have an issue. Be sure to enable the JavaScript Memory column:

taskmanager

Console memory API

The values displayed under JavaScript Memory in the task manager can also be obtained through the console memory API. By default, this API does not provide any useful metrics. But if you start Chrome with the command line switches found below, it gives you the same numbers as the Task Manager:

--enable-precise-memory-info --js-flags="--expose-gc"

The second switch on the line enables the gc API, for forcing garbage collection programmatically. Below is a small snippet which shows the current memory usage in the top right corner of the browser window (very useful when debugging):

var div = document.createElement('div');
div.style.cssText = 'position:absolute;top:0;right:0;background:rgba(255,255,255,0.5);padding:10px;pointer-events:none;z-index:10000';
document.body.appendChild(div);
setInterval(function () {
    div.innerHTML = (Math.round(console.memory.usedJSHeapSize / 1024 / 1024 * 10) / 10) + ' / ' + (Math.round(console.memory.totalJSHeapSize / 1024 / 1024 * 10) / 10);
    gc();
}, 250);


Memory profiling

With the help of the Memory tab in Chrome Developer Tools (previously named Profiles in Chrome < 58) you can confirm whether it really is a leak or not. By recording an Allocation timeline you get a visual representation of when memory is allocated. It shows allocations as blue bars, and when the allocated memory is garbage collected the bar turns gray. Below is a recording with easily spotted memory leaks. An action is repeated three times, each time a new blue bar is displayed and it never turns gray:

snapshot

By clicking a bar Chrome displays the allocations made at that time. Be sure to force garbage collection by clicking on the trashcan icon, or else the blue bars might be memory that will be released.
It is also useful to capture and compare heap snapshots, which shows you everything on the heap at that point in time. For detailed information on how to debug memory issues in Chrome, there is a good article here https://developers.google.com/web/tools/chrome-devtools/memory-problems.

Our approach to finding the leaks

Every time we reopened an iframe, the memory usage grew and forcing garbage collection did not make it drop. Initial state memory footprint:

taskmanager2

After a few additional open/close actions:

taskmanager3

By capturing heap dumps we could also see that it was the iframe being retained. We looked for objects we knew belonged to the iframe, and when we found them in a heap dump captured after the iframe was removed we knew for certain that it was retained. Also, looking at the number of window instances in the dump indicates that the iframe is still there.
In the image below objectInsideIframe exists inside the iframe. Since it shows up in the heap dump taken it indicates that the iframe is retained:

leak

Our next step was to review the code to find all usages of window.top, window.parent and try to identify which of those was causing trouble. As it turned out, it was not an easy task.
The code base was very large and consisted of multiple third party frameworks. We managed to narrow the leak down to one specific function, but it was not obvious how it could cause the leak.

Looking deeper

We now knew how to reproduce the leak, but all attempts to use heap dumps and code review to discover why it was leaking had failed.
We needed another approach and decided to do a deep scan of the topmost window for any references to objects not created in its context. We suspected that references to such foreign-window objects were the root cause of the leak. To test our hypothesis, we wrote a small script that deeply verifies that each window property stems from the top window.Object constructor:

function scan(o) {

    Object.keys(o).forEach(function (key) {
        var val = o[key];

        // Stop if object was created in another window
        if (typeof val !== ‘string’ && typeof val !== ‘number’ && typeof val !== ‘boolean’ && !(val instanceof Object)) {
            debugger;
            console.log(key);
         }

         // Traverse the nested object hierarchy
    });
}

Running it on the page with the leak we saw in the heap dump above exposed the leak clearly:

console

The innerobject variable was not created in the top window context. Searching for innerobject in the code revealed a reference on the top level window to objectInsideIframe, which as we saw further up is an object inside the iframe.
Using this approach, we were able to identify why the iframe was retained. It turned out to be JQuery from the top context keeping references to objects inside the iframe. The offending code line looked like this:

window.top.jQuery.data(window.top.document.body, { foo : “bar” });


Fixing the leaks

In our case, the identified leak was quickly fixed by not using JQuery from the top context. If the “cross context” reference between objects is done on purpose and needed for the application to work as intended, you have a couple of choices:

  • Store a copy of the foreign object in the other window instead of a reference to it
  • Or be sure to set all “cross context” references to null when closing the iframe.
  • Also unregister any “cross context” DOM event listeners

But the best approach and our recommendation to our customer, is to decouple the iframe from the outer context completely. The iframe should ideally not directly reference anything in the parent and vice versa. This can be achieved using window.postMessage to send messages between the different windows.

Do you have any additional tips or tricks to share when it comes to debugging memory leaks in web apps? Please share your experience in the comments or our forums. Best of luck with avoiding iframe memory leaks in the future!

1

Loading non-critical third party javascript

$
0
0

When building a web site or app these days, there are infinite amount of third party javascript libraries and SaaS services to help you. These tools can seriously accelerate your development since you don’t have to constantly reinvent the wheel. But unless you are careful, you could also introduce risk of reduced uptime of your web app due to scripts not loading correctly.

A few examples of different javascript APIs, services and tools:

  • UI components (Kendo, Ext JS)
  • Chat services (Intercom)
  • Error monitoring (Sentry, RootCause)
  • Web analytics (Google Analytics)
  • Social APIs (Twitter, Facebook)

Overall, the tools in this list have very little in common apart from the fact that you need load them somehow. Overall, we can divide them into two distinct categories: page-critical scripts and “the rest”.

Application critical scripts

Scripts that are critical for your page to function will of course always have to be loaded on page load. This is typically done with a good old script tag, which either includes your full application or a bootstrap JS loader that fetches the required application parts. If you build your application on Kendo or Ext JS, then you’ll definitely need to load that framework script before any other application code runs.

<script src="../../../extjs-6.5.0/build/ext-all-debug.js" type="text/javascript"></script>
<script src="app.js" type="text/javascript"></script>

or

<head>
    <title></title>
    <link rel="stylesheet" href="styles/kendo.common.min.css" />
    <link rel="stylesheet" href="styles/kendo.default.min.css" />
    <link rel="stylesheet" href="styles/kendo.default.mobile.min.css" />

    <script src="js/jquery.min.js"></script>
    <script src="js/kendo.all.min.js"></script>
</head>

The rest – non critical scripts

Any scripts that don’t fit into the critical category above can be seen as ‘nice-to-have’ scripts. If the chat service or error monitoring service that you use are unavailable (for whatever reason) – your application should still function normally. This means we should not load such scripts the same was as our critical scripts. An example, if you simply add a script to your page for a third party error monitoring service, you could just load it using a regular script tag:

<script src="https://cdn.trackjs.com/releases/current/tracker.js">
</script>

This is actually a real example from an error tracking service. Using it this way, you have now made your site vulnerable to server outage of the third party CDN. If you run an online web shop, surely you never want your shop to be offline just because the error monitoring service isn’t functioning. A better example of how to load non-critical scripts is the Google Analytics bootstrap code:

<script type="text/javascript">

  var _gaq = _gaq || [];
  _gaq.push(['_setAccount', 'UA-XXXXXXXX-X']);
  _gaq.push(['_trackPageview']);

  (function() {
    var ga = document.createElement('script'); ga.type = 'text/javascript'; ga.async = true;
    ga.src = ('https:' == document.location.protocol ? 'https://ssl' : 'http://www') + '.google-analytics.com/ga.js';
    var s = document.getElementsByTagName('script')[0]; s.parentNode.insertBefore(ga, s);
  })();

</script>

This assures the script is loaded async, and the site will continue to function even if the Google Analytics server would be hacked, DDoS’ed or just simply be non-responsive.

Loading scripts async

For scripts that aren’t required to bootstrap your application, you can use the ‘async’ attribute of the script tag. This will avoid the script from blocking the page load process. If you need to run code after an async script has loaded, use the script ‘load’ event:

<!-- COOKIE CONSENT -->
<script>
    window.initCookieConsent = function(){
        window.cookieconsent.initialise({
            "palette": {
                "popup": {
                    "background": "#eee", 
                    "text": "#999"
                },
                "button": {
                    "background": "#bbbbbb",
                    "text": "#ffffff"
                }
            },
            "theme": "classic",
            "content": {
                "message": "This website uses cookies to ensure you get the best experience."
            }
        })
    };
</script>
<script async onload="initCookieConsent()" src="//cdnjs.cloudflare.com/ajax/libs/cookieconsent2/3.0.3/cookieconsent.min.js" crossorigin="anonymous"></script>
<!-- EOF COOKIE CONSENT -->

Testing your site with broken scripts

If you’re not sure how your website will react to script X not being served, you can use the great Chrome Dev tools to block it. Open the Network tab in Chrome, and right click the script and select “Block request URL” then reload the page.

Now when the page is reloaded, you’ll see the script being blocked and you can inspect your page to make it still functions normally.

As we use RootCause to monitor bugs in all our javascript products, we tested all our sites to assure they would still be running even if there was some server outage. We hope you found this post useful, and please let us know if you have any feedback or additional tricks to make web pages load faster.

Introducing RootCause – Next Generation Error Handling For Web Apps

$
0
0

A few weeks ago we did a soft launch of our new javascript error monitoring and debugging tool called RootCause. As web developers, we face bug reports with very varying quality and content. Sometimes we receive bug reports saying “Feature X doesn’t work” and other times we get a nice error message and call stack. The time it takes for a developer to fix a bug is proportional to the quality of the bug report. If a clear test case is provided, it will be much faster than if the developer has to play detective and manually try to reproduce the bug.


First generation error monitoring tools

There has been multiple Error-Logging-As-A-Service tools around for a very long time. They are primitive and typically provide you with error message, call stack and some meta data about the error, user and application. This gives a product owners increased awareness of the health of a web application. But for developers, the information logged is rarely enough to be able to reproduce and fix an issue. Let’s consider a call stack of a real issue I just fixed in our Gantt chart code base:

With just the message, line, call stack it’s impossible to locate the source of this error.

Second generation tools

During 2016 we saw a few new tools being released offering additional debugging context, not just text information but also videos showing the error. Video recordings like this monitor the DOM for mutations which enable the tool to replay the error as it happened. This is pretty cool, and it definitely helps a developer to see the user’s actions to get ‘in context’. This approach will likely work fine in a basic web site but can severely affect performance in a large web application.

The RootCause approach

RootCause instead focuses on recording user, browser and console activity. With this information errors can be replayed in the Replay Studio, meaning you will have the exception live – ready to debug in your browser. This automates the tedious process of locating the error and trying to reproduce it. As developers, the ultimate scenario for fixing an unhandled exception is to see it as a live breakpoint in your own browser. The Maximum callstack exceeded bug mentioned above was reproduced in about one minute, and I was able to fix it in the next 10 minutes. This is really a paradigm shift, when you compare to manually searching for the error using only the call stack and message.

Resources

To learn more about RootCause and how it can help you debug errors more efficiently, please check out these links. Happy debugging!

Speeding up our releases by writing minified code

$
0
0

A few months back we achieved a nice speed boost of our release procedure, and today we’re happy to share with you how we did it. As part of every nightly build and release, we run a minify step that minifies all our CSS and JS resources. This step typically takes around 10 seconds depending on the size of the resource being minified. In our new and improved build process, we no longer require this minifying step. How did we do it? By writing minified code.

Less is more

We realized that if we write code in the minified format produced by our minifying tool, we could skip the minification script completely. Instead of having a verbose, disk space consuming code format such as:

findClosestSuccessor: function(event, events) {
    var timeAxis = this.timeAxisViewModel.timeAxis,
        tickIndex = Math.floor(timeAxis.getTickFromDate(event.start)),
        tick = timeAxis.getAt(tickIndex);

    for (var i = 0, length = events.length; i < length; i++) {
        if (events[i].start >= tick.getEndDate()) {
            return events[i];
        }
    }
}

…we could optimize things and instead write things in a more compact way. We call this new methodology Minification Driven Development™. With MDD, you just write the above in one line (saving tons of screen real estate):

findClosestSuccessor:function(e,b){var c=this.timeAxisViewModel.timeAxis;var d=Math.floor(c.getTickFromDate(e.start));var f=c.getAt(d);for(var a=0,g=b.length;a<g;a++){if(b[a].start>=f.getEndDate()){return b[a]}}}

Using the MDD code style brings numerous advantages:

  • Less keyboard wear and tear since we hardly ever use annoying keys like ENTER or SPACE
  • Less typing, saving precious finger energy for our developers
  • Less characters to read, increasing speed of reading
  • Faster build, no need for fancy minifying tools – saving 10 seconds on every build
  • More code fit on the screen. With regular code formatting, reading a 3000 line function is hard due to all the
    white space and comments. With the minified format, you can see the entire function in view.

After introducing this new way of coding, developers now feel much more fresh and energized during work hours as they are typing less and reading less. The numbers back it up too, according to a recent employee satisfaction report we did – our staff is clearly more happy when typing less.

chart

This sounds too good to be true, any drawbacks?

The only slight drawback we’ve noticed is that understanding the intent of the minified code is a bit harder. Usually though, you can kind of understand what the code is doing and worst case you can just guess and hope for the best, which works most of the time. Sort of.

What are your favorite tips & tricks to keep your developers motivated? Please let us know!

Bryntum and GDPR – Privacy Policy Updated

$
0
0

As you may have already heard, there is new data protection legislation being introduced in the EU called “General Data Protection Regulation” (GDPR). The new set of laws come into effect on May 25 2018. The main purpose of the new GDPR laws is to give citizens a better understanding of how/where their data is being used, and to have more control over the data. After the laws come into effect, you can request to obtain, correct, or delete any personal data held collected by companies you communicate or do business with. We take your privacy seriously and we have updated our Privacy Policy for you to review. As always, if you have any questions for us on our Privacy Policy please contact us. For more information about GDPR, please click here.

Click here to read our updated Privacy Policy

Siesta 5.0 released

$
0
0

We are very excited to announce the new major release of Siesta – v5.0. While being new and shiny it is also very backward compatible, something we at Bryntum consider very important. Most of the changes are hidden behind the high-level API, you should be able to upgrade to Siesta 5 with very minimal code changes. In this post I will highlight the most important API changes and parts of the new functionality. Let’s dig in!

Modern browsers

Siesta 5 drops support for legacy browsers IE9 and IE10. This just means we will stop running Siesta’s own nightly test suite in those browsers. IE11 is still supported, but we are very interested in hearing your opinion about it – do you still support IE11 in your applications? We would like to make a mini-survey and kindly ask you to post a comment in this blog post, with the list of the browsers you run your tests in. Thanks a lot in advance.

Harness renamed to Project.

We found that the “project” term makes much more sense for the “harness” file. The purpose of the “harness” was to store the configuration information about your test suite. “Project” feels like a more natural term for this.

The documentation and examples have been updated to use the new name. We also reworked and updated the documentation along the way. You will find that it is now easier to find the relevant information.

NodeJS support

Siesta now supports running tests in NodeJS. It supports running both sandboxed (each test running in a separate Node process) or shared (multiple tests in a single process). Parallel execution (`–max-workers` command line option) is supported as well. This is naturally the fastest execution engine for Siesta, as there is no overhead of starting the browser process.

It is a different environment for writing tests as well. When writing tests for NodeJS, you just write your test as usual:

StartTest(t => {
    t.it("Ok assertions", t => {
        t.ok(true, 'True is ok')
        ...
    })
    ...
})

The test can be directly launched by passing its filename to the `bin/nodejs` launcher, which also accepts glob patterns:


Alternatively you can create a project file as before (the “harness” file):

const Siesta      = require('../../siesta/folder');
const project     = new Siesta.Project.NodeJS();

project.configure({
    title               : 'Awesome NodeJS test suite',

    autoCheckGlobals    : true
});

project.planDirectory(__dirname);

project.start();

Then simply launch the project as a regular Node.js script by passing its filename to the Node executable:

> node path/to/siesta/project.js

Please refer to this introductory guide for details.

Adopting Promises

All methods that simulate user actions now return Promises. For example, it is now possible to “natively” chain the types/click actions like this:

t.type(userNameField, 'username').then(() => {
    return t.type(passwordField, 'secret')
}).then(() => {
    return t.click(loginButton);
});

For this specific use case, the `chain` method still looks leaner though:

t.chain(
    { type : 'username', target : userNameField },
    { type : 'secret', target : passwordField },
    { click : loginButton }
);

A Promise can be returned from the test itself (Siesta waits until it is resolved):

t.it('Doing async stuff', t => {
    return someAsyncOperation().then(() => {
        t.is(res, 42, "Async stuff finished correctly");
    });
});

Combined with the `async/await` it becomes even cleaner:

t.it('Doing async stuff', async t => {
    let res = await someAsyncOperation();
    t.is(res, 42, "Async stuff finished correctly");
});

Similarly, Promises can now also be returned from a chain step:

t.it('Doing async stuff', t => {
    t.chain(
        // function step that returns a Promise (sugared with async/await)
        async () => {
            return await someAsyncOperation(t)
        }
    )
})


Native event simulation

Siesta 5 adds support for one more user action simulation mode – native events. Native events are “real” OS-level events which produce exactly the same actions as when performed by a real user. Here is a few examples of what this means:

  • When a test issues a `moveMouse` command, an actual OS cursor will be moved on the screen.
  • When the cursor is over a DOM element, its CSS `:hover` styles will be triggered
  • For the `rightClick` test action, a real browser context menu will be opened (if there’s no `preventDefault()` call in the event handler)
  • Simulating “CTRL+F” may start a “search on the page” action. This is in Chrome, in other browsers it can be different shortcut. This action will steal focus and any further key strokes will be delivered to the search widget instead of the test.

Native event simulation can be very useful if you need to test some intrinsic browser behavior, which synthetic simulation can not reproduce (despite our best efforts to make it as close to native behavior as possible). Such scenarios might include testing SVG documents, tooltips, native drag and drop etc. However synthetic simulation will likely run faster and you will have to decide yourself which mode that is best suited for a particular test.

For more details please refer to the documentation.

Siesta Lite published in Npm

Siesta Lite can now be installed from the npm package repository:

> npm install siesta-lite --save-dev

Internally, Siesta now looks a lot more like a any other “normal” JavaScript package. It was trivial to publish it in Npm, and we hope this will make it easier for users to get started with Siesta.

New React example

We have added a new example demonstrating how to test a sample React application – GFontsSpace.
It mostly involves patching / cloning existing Webpack configuration files.


All details are described in this guide. You can follow the same approach in your project even if it is not based on the “react-scripts” as GFontsSpace.

Conclusion

Siesta 5 is focused on the modern JavaScript ecosystem. We would be very happy to learn more about your specific testing needs in this area. Please just drop us a few lines in our forum and send us an email. Happy testing!

Download in customer zone


Integrating The Bryntum Scheduler With Ext JS Modern

$
0
0

My name Is Nigel White and I have been involved with Ext JS since its inception in 2007. I was part of the core development team from the start of the Sencha corporation until it was acquired by Idera. I then joined Bryntum to help with the development of a completely new Bryntum Scheduler component that could integrate into any javascript environment including Ext JS Modern.

The Ext JS Modern Grid, while excellent in approach, does not yet support locking columns which is a critical requirement when making any type of scheduler or Gantt chart. At Bryntum, we decided to develop a new grid architecture with the concept of buffered rendering, recycled DOM and support for multiple side-by-side grids all built into the design.

What is the new Scheduler?

The new Bryntum Scheduler which is built upon the Bryntum Grid is a ground-up reimagining of our industry leading Ext JS-based Scheduler component using pure web technologies with no proprietary libraries. Bryntum Scheduler uses ECMAScript, transpiled as needed to support whatever browsers the host application supports. It uses CSS3 layouts to run seamlessly inside whatever containing element the application may place it in.

Easy integration with Ext JS remains a core part of our design strategy. Many concepts will be already familiar to Ext JS developers, such as data stores which are linked to URLs which provide data services. Stores contain records which are encapsulations of business entities such as scheduled events. Records contain fields which in the Bryntum Scheduler are implemented as direct properties rather than being behind getter and setter methods. So an Event record will have startDate, endDate and name properties among others.

In this blog post we will examine the “Scheduler inside an Ext JS Modern Panel” example from our public examples page.

How to get a Scheduler into your Ext JS Modern application

In the simplest case, instantiating a Scheduler object configured with appendTo specifying the host element will get a Scheduler up and running in a simple web page. In the case of an Ext JS application, there will be a hosting Component who’s initialization process will render a Scheduler into the Component’s own element. We will want any properties of the Scheduler to be bound to data properties of the application’s ViewModel.

We also would like to have events fired by Bryntum Scheduler’s event firing mechanism to be relayed using Ext JS’s event firing mechanism so they can be handled in the usual way – by methods inside a ViewController. The solution which provides these facilities is to encapsulate the Bryntum Scheduler inside a special Ext JS Panel subclass, Bryntum.SchedulerPanel.

SchedulerPanel Implementation.

The first task is to render the scheduler within the Panel’s body element. We do this by implementing the initialize method, and simply render the Scheduler when the Panel has performed its first layout. To do this we listen for the Ext JS Component painted event:

initialize : function() {
    var me = this;

    me.on({
        painted : function() {
            me.getScheduler().render(me.bodyElement.dom);
        },
        single : true
    });

    me.callParent();
}

The getScheduler method instantiates the Scheduler on demand. It imports config properties passed into the SchedulerPanel to configure the Scheduler. The configs available for a Bryntum Scheduler can be found here. One important part of this process is that the Scheduler has the 'x-layout-fit-item' class added to it, so that Ext JS’s CSS3 layout system applies styling to it which makes it always fit inside the SchedulerPanel’s body element.

Scheduler events

To export the events that the Scheduler fires, we listen for the catchAll pseudo event from the Scheduler, which is fired when any event is fired, and relay the passed event using the fireEvent method which SchedulerPanel inherits. Note that events from the Bryntum Scheduler system are objects containing informational properties. The firing object is included as the source property.

Binding to the ViewModel

ViewModel bindings operate on getters and setters which are usually injected into an Ext JS class by the config system. In this case, we export properties from the encapsulated Bryntum Scheduler by generating getters and setters which proxy through to those properties. In the example, the ViewModel’s rowHeight property is bound to a NumberField in the Ext JS part of the UI and also bound to the rowHeight property of the Scheduler.

bind : {
    rowHeight : '{rowHeight}'
},

Loading data into the Scheduler.

A Bryntum Scheduler is configured with a resourceStore and an eventStore which are configured in a similar way to Ext JS Stores. They are configured with URLs for the CRUD operations, and they read (and potentially update) your schedule data:

eventStore : {
    readUrl : 'data/events.json',
    autoLoad : true
},

resourceStore : {
    readUrl : 'data/resources.json',
    autoLoad : true
},

Editing tasks in the Scheduler

By default, the EventEdit feature is present in a Scheduler. It listens for editing gestures, ENTER on a focused event, or double tap on an event, or an invocation from the event context menu. It then provides its own editing UI to edit the properties of the event. In the example app, we listen for the beforeeventedit event which is fired before the default editing UI is shown. If we return false, then the default editing is vetoed, and we can use the application’s own UI to do this job. The event object signature is as follows:


The resource for an event is provided in a separate property because if the EventDragCreate feature is being used, a new event will not have been linked to the resource record yet.

  • It is important to note that Scheduler features fire their events through the owning Scheduler, though the events are documented within the feature that triggers the event.

In the example app, an Ext JS Dialog subclass is implemented called EventEditor. This contains a form which is loaded with the data from the event.

The ComboBox uses the same URL to read resources as was provided to the SchedulerPanel’s resourceStore. When editing is finished, a ViewController method is invoked to save the data which updates the event record from the form’s data:

editor.getEvent().set(values);

The set method of a record sets properties in the record from the passed object.

Conclusion

The new Bryntum Scheduler will integrate easily into any modern web application environment, and the similarity in concepts to Ext JS mean that Ext JS developers should find it very easy to make a Scheduler a seamless part of their Ext JS Modern applications. Over the coming weeks we will introduce you further to the Scheduler component and write more blog posts showing integration with other frameworks like Vue, Angular and React.

We very much look forward to seeing what you can do with it, please join the discussion in our forums and share your thoughts!

Try Ext JS Modern integration demo

Announcing Ext Scheduler & Ext Gantt 6.0

$
0
0

We are very happy to announce the Ext Scheduler & Ext Gantt 6.0 release. With this release we have dropped support for IE8, IE9 and IE10 and we have added support for Ext JS version 6.6. If you missed our previous roadmap update, here’s a list of what you can find in the new version.

Gantt: Backwards scheduling

By default tasks are scheduled as early as possible but as of v6.0, you can also schedule projects backwards. In this mode, tasks are scheduled from the project end date and they begin as late as possible. Enable this mode by setting the scheduleBackwards boolean to true.

Screen Shot 2018-03-13 at 19.13.36

Gantt: Ext JS high contrast theme support

We now support the Ext JS Aria theme, which you can try out here:

Gantt: Dependency hover tooltip

By default, the Gantt chart now shows a tooltip when hovering a dependency line. The contents of the tooltip can of course be customized fully.

Gantt: New Angular demo

Angular is a very popular JavaScript application framework these days, so we decided to make an integration demo with Angular 5. Try it out by clicking the image below.

Scheduler: All day event header bar

With the new all-day event header bar, you can now keep the main schedule area clean and not have multi-day events occupy all the space. This feature is now enabled by default in week view and day view modes.

Scheduler: Recurring Tasks

You have most likely used this feature already in other calendar software already, such as Google Calendar or Outlook. We are happy to announce that you can now schedule your tasks on a repeating basis in Ext Scheduler and use any type of recurrence pattern, demonstrated in this demo:

Scheduler: New demo with collapsible resource rows

This demo was the result of recent consulting work for one of our clients. And we liked the result so much we decided to make a demo out of it. The option of having rows being collapsible makes it easy to get a quick overview and when you need to see the exact layout you just expand the row:

Scheduler: New undo & redo demo

Undo and redo is such a popular feature that we decided it should have its own demo:

Scheduler: Summary row plugin

This feature was previously just demonstrated in our column summary demo but this has now been promoted to a fully supported feature. Demo below:

There is also a more visual version of this demo, showing a histogram type view:

Scheduler: Split view plugin

The ability to split a scheduler into two separate scroll synced views was previously shown in a demo but has now been promoted to a fully supported Sch.plugin.Split plugin. Demo below:

Summing up

The 6.0 release contains lots of new features and demos and we really hope you will find the new additions useful. If you have any feedback for us, please write a comment or post in our forums. Full change logs can be found here:

Happy coding! 🙂

Announcing Our New Component Suite

$
0
0


We are very happy to announce the new Bryntum Grid and Bryntum Scheduler, the first two components in a brand new suite of UI components created by the dev team at Bryntum. The main goals for this new suite are: Should work with any popular framework like React, Angular and Vue. Minimal or no external […]

Getting Started With The Bryntum Scheduler

$
0
0


The Bryntum class system and configuration system is very simple. To instantiate any class, such as a Scheduler, just pass an object containing the configuration properties to its constructor. The properties in the configuration object are applied to the class’s properties, and it initializes itself as instructed. First, you must include the Scheduler classes, and […]

Integrating Bryntum Scheduler with Angular

$
0
0


The Bryntum Scheduler is written in plain JavaScript, it is not based on any framework. This means it can be used with any Angular version and ships (starting with upcoming version 1.0.3) with demos for Angular 1, 2, 4, 5 and 6. This blog post describes how to integrate it with Angular 6, but also […]
Viewing all 370 articles
Browse latest View live