Quantcast
Channel: Bryntum
Viewing all 370 articles
Browse latest View live

Ext Gantt & Ext Scheduler 3.0 GA Available

$
0
0

We’re excited to announce the 3.0 GA release of Ext Scheduler & Ext Gantt. This release marks a great milestone and we’ve added lots of new functionality that we think you will find useful. The main new big features are found in the Gantt chart, where we’ve added a CrudManager, constraints support and task split support. We also upgraded our export feature to handle buffered rendering, meaning exporting really large data sets is no longer an issue. If you target touch devices, we’re happy to report that both the 3.x versions of the Gantt and Scheduler components are compatible with such devices. You can now drag drop, resize, set up dependencies using touch interaction.

Full download from our customer zone
Download a 45-day trial

Let’s take a look at some of the more interesting features of the new release first.

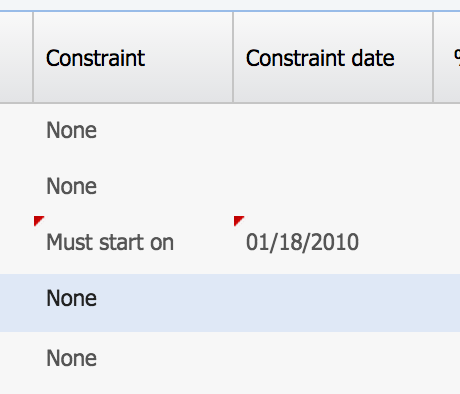
Gantt: Task Constraints

Task constraints allow you to specify scheduling rules to a task, defining how it should behave when being rescheduled. The updated Ext Gantt 3.0 supports 6 types of task constraints:

  • Must-Start-On (alias muststarton)
  • Must-Finish-On (alias mustfinishon)
  • Start-No-Earlier-Than (alias startnoearlierthan)
  • Start-No-Later-Than (alias startnolaterthan)
  • Finish-No-Earlier-Than (alias finishnoearlierthan)
  • Finish-No-Later-Than (alias finishnolaterthan)

You can try this out in the updated Advanced sample. Please see the new constraints guide for further details.
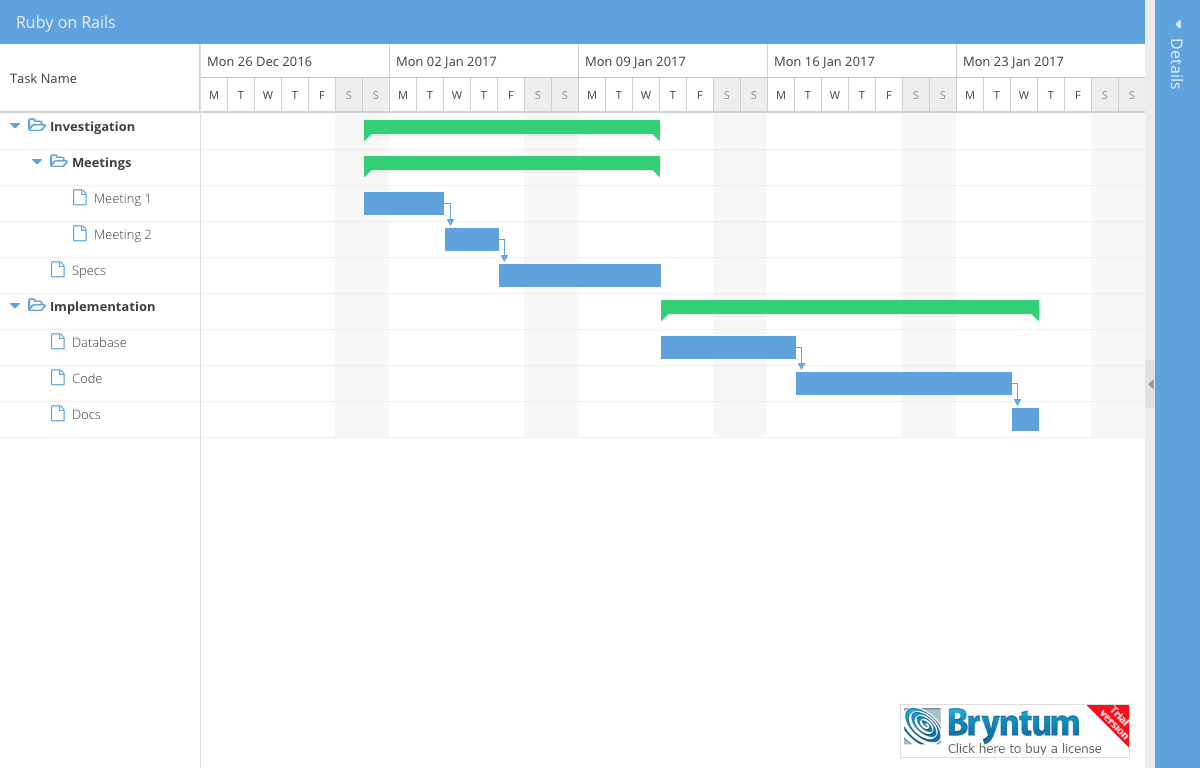
Screen Shot 2014-11-07 at 12.37.52

Gantt: Split Tasks

One of the most requested features over the years has been the split task feature. We’re really happy to say that it’s now supported. You can split tasks easily using the context menu:

Screen Shot 2014-11-07 at 09.16.41

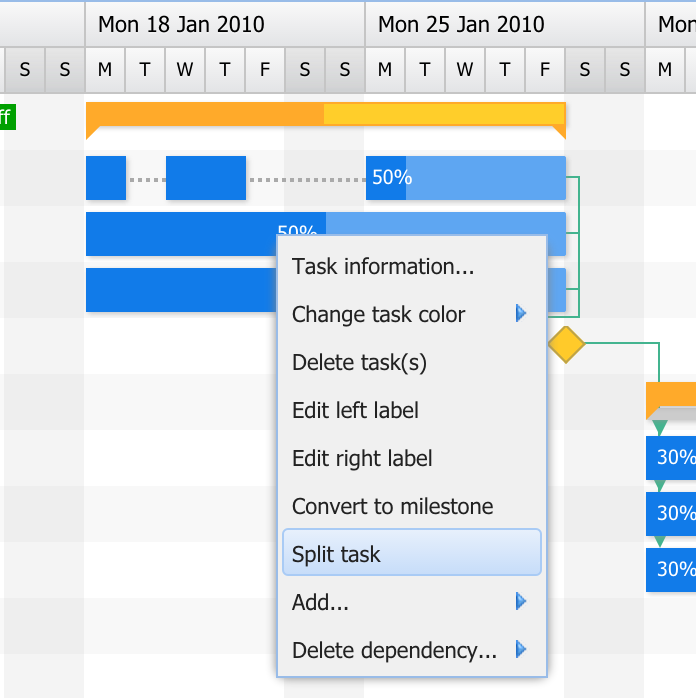
…or do it programmatically yourself:

var taskStore = new Gnt.data.TaskStore({
        root : {
            children : [{
                Id        : 1,
                StartDate : new Date(2014, 10, 3),
                Duration  : 4
            }]
        }
    });
    var task = taskStore.getById(1);

    // Will split the task in two segments, 1 day + 3 days
    task.split(new Date(2014, 10, 4));

    console.log(task.getSegments().length) // => 2 segments now
    console.log(task.getSegments()[0].getDuration()) // 1
    console.log(task.getSegments()[1].getDuration()) // 3

Try splitting a task in the updated Advanced sample.

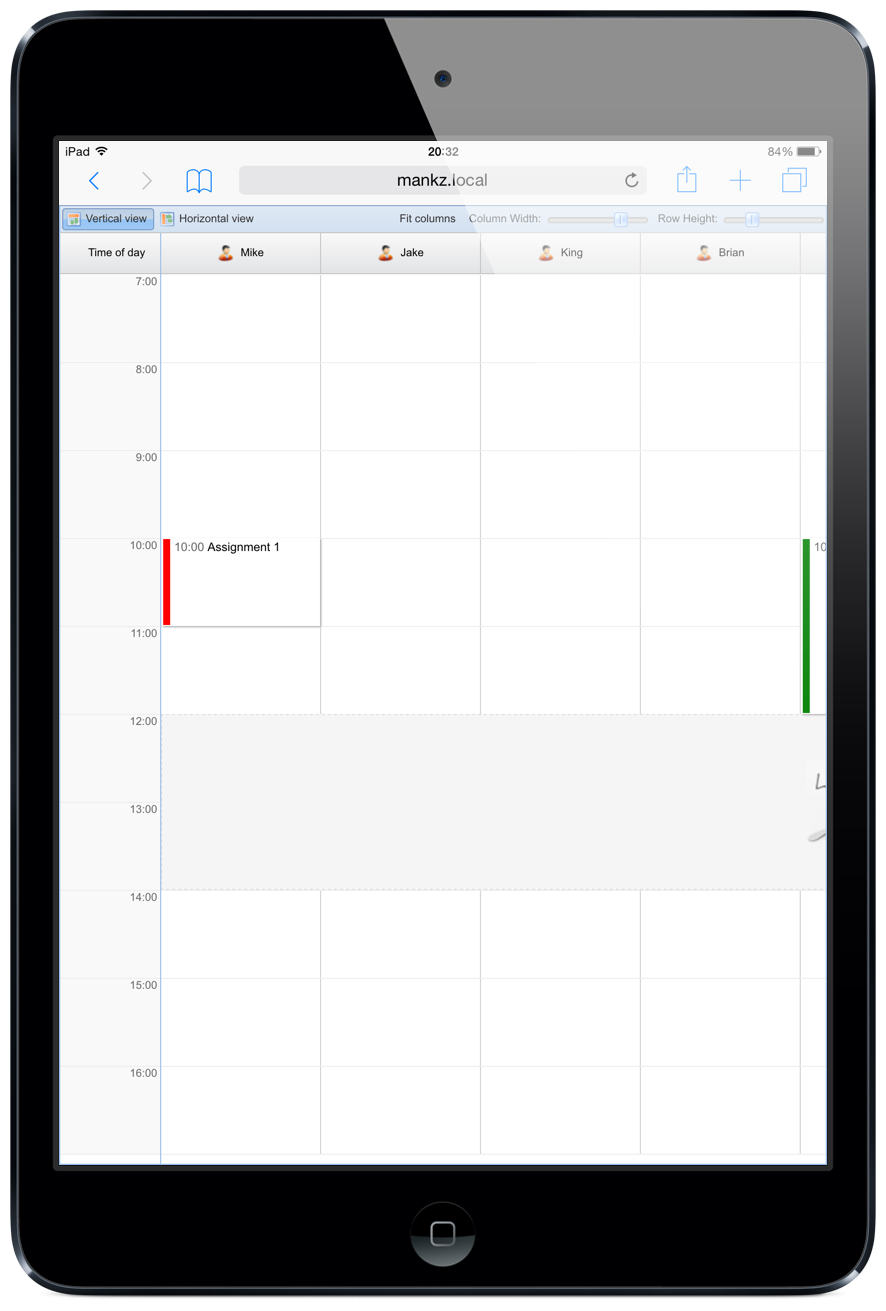
Scheduler: Calendar View

Screen Shot 2015-01-06 at 23.37.04

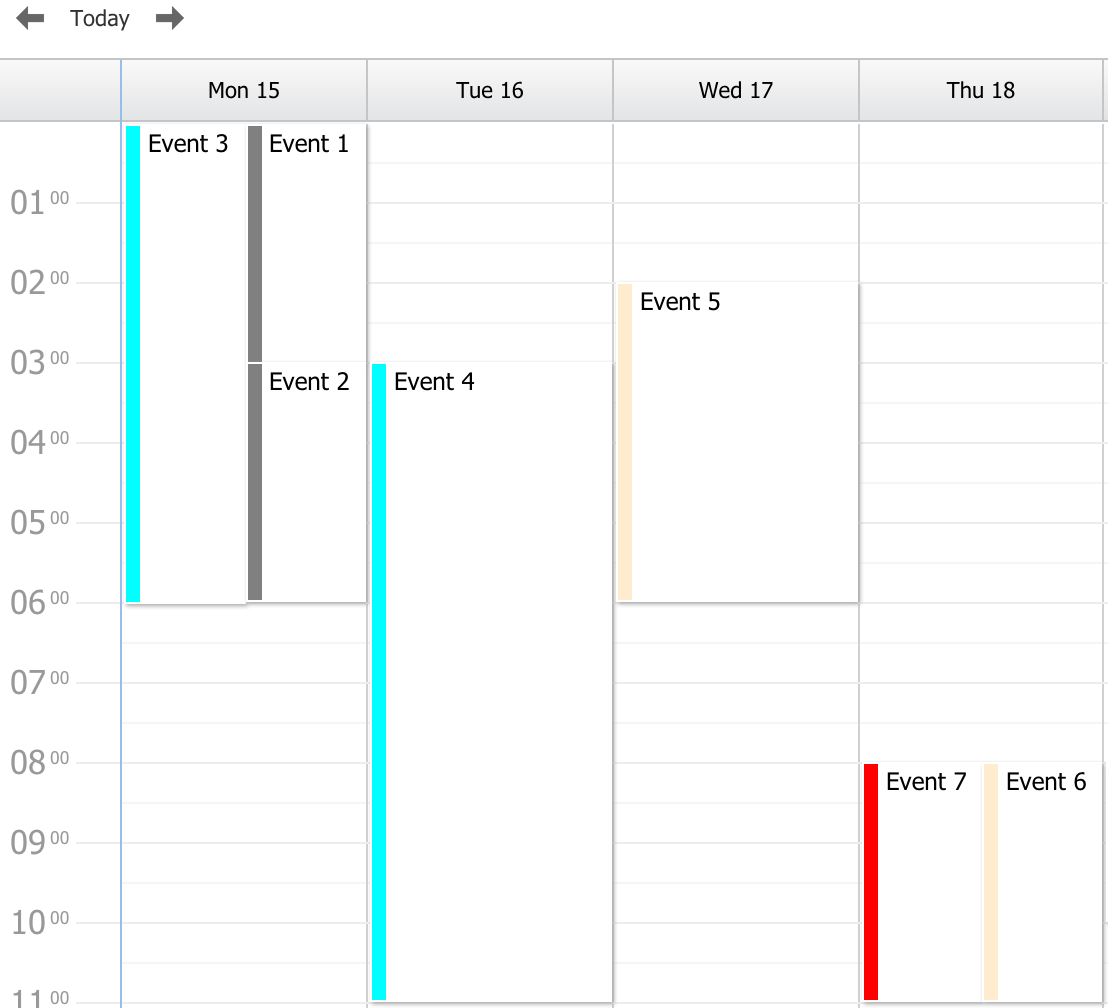
The Scheduler 3.0 has a new Calendar view which was requested a lot the past years. This view can be configured to show various resolutions, but typically shows hours vertically and days horizontally. We’ve built a new weekview sample that you can try out right now.

Scheduler: Responsive Configuration

In Ext JS 5, components can be configured to react and adjust their appearance after a size change. You have full control of how the UI should look for any number of breakpoints. Below is a simple example making the Scheduler vertical if the width is less than the height of the component. This is a nice effect when using an iPad for example.

new Sch.panel.SchedulerGrid({

    plugins          : [
        'responsive'
    ],

    responsiveConfig : {
        "width=height" : { mode : "horizontal" }
    }
});

Landscape – Horizontal
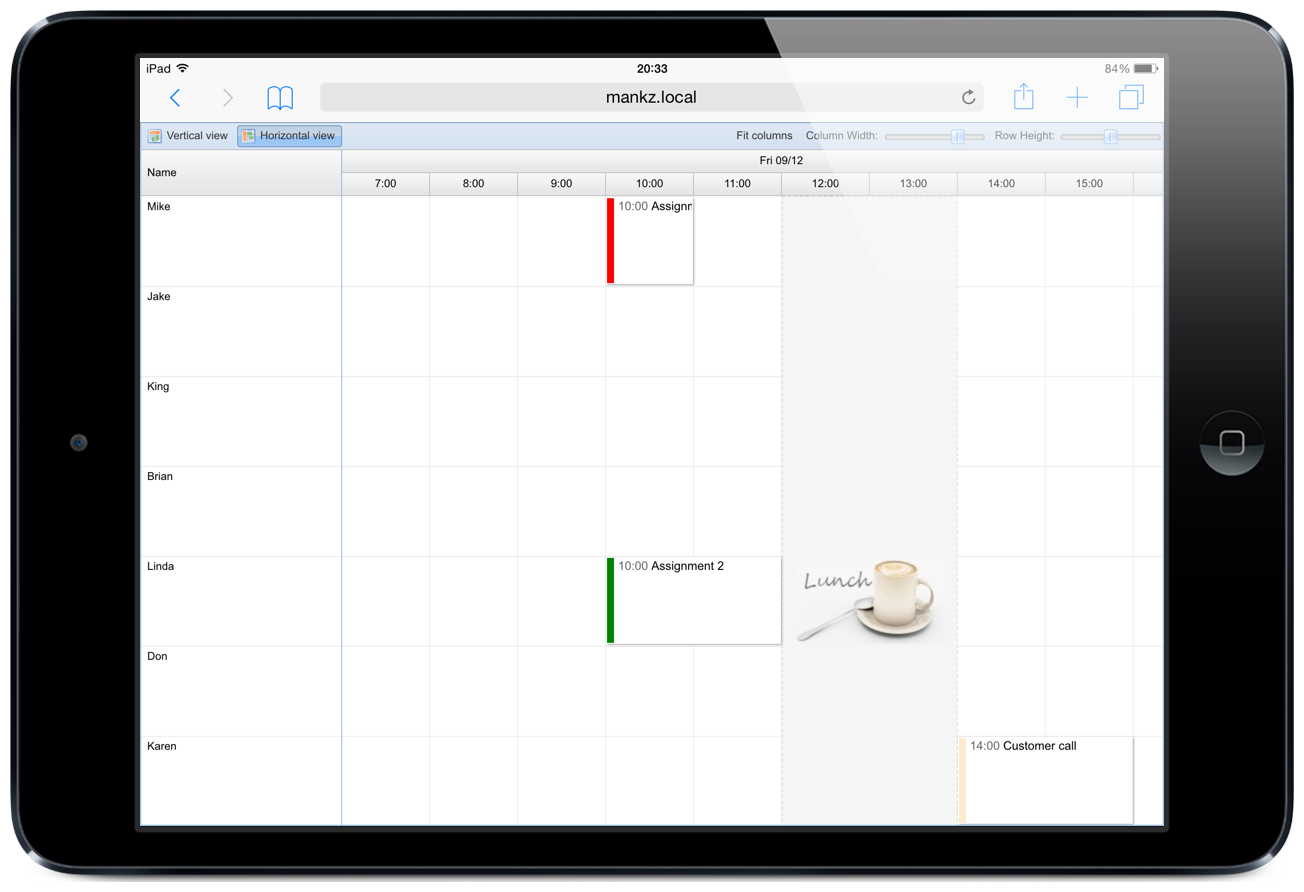
IMG_0009

Portrait – Vertical

IMG_0008

Upgrade Advice

If you are already using our 2.x line with Ext JS 4 today you essentially face two upgrades. One for your Ext JS code – upgrading to Ext JS 5.1+, and one for the Bryntum code. Don’t forget to study the general Ext JS 5 upgrade guide first. Here are a few things to think about as you start your upgrade process:

Ext JS: Browser Support

Since IE7 and below are no longer supported by Sencha you should find and remove any code or hacks involving Ext.isIE7 or CSS such as .x-ie7.

Ext JS: Quirks Mode Support Removed

Quirks mode is no longer supported by Ext JS so if you see code like Ext.isIEQuirks or CSS rules such as .x-quirks .sch-header-row { .. }, it’s time to remove those.

Ext JS: Scrolling Support

Scrolling is a bit more complex in Ext JS 5 due to the touch device support. If you want to manually scroll the grid, make sure you use the new Ext.panel.Table#scroll API instead of setting DOM values such as ‘scrollTop’ or ‘scrollLeft’.

Ext JS: Buffered Rendering

In Ext JS 5, buffered rendering is enabled by default. If you want to disable it, set ‘bufferedRenderer‘ to false.

Ext JS: Known Issues

We ship this release with a few known Ext JS patches to work around Sencha bugs. You can see them in our “Sch/patch” folder. You can also choose to run our code completely without patches (at your own risk), by setting Sch = { disableOverrides: true }; before including the Gantt script. A few other bugs remain open, such as using collapsed locked/normal sub-panels in a buffered grid. This seems still not supported by Sencha in Ext JS 5.

Bryntum: API Changes

There are also a few breaking changes in our 3.0 release but they should be very easy to work around. We have dropped support for Gnt.data.TaskStore#loadData method. This method is now available natively in the Ext.data.Store class.

The “Manual” value of the SchedulingMode field is deprecated in favor of the “ManuallyScheduled” field (so that a task can be “manually scheduled” and have a scheduling mode in the same time)

The “cascadeChanges” option on ‘Gnt.data.TaskStore’ class is now true by default.

Bryntum: Data Integration

Thanks to the new Crud Manager class, loading and saving changes is now much easier and more efficient. Instead of using one ajax request per data store, these data operations are now handled by the Crud Manager (if you decide to use it).

Please Give Feedback

In general we think the upgrade should be a very simple one for you. We have made very few (if any) changes to our 50+ examples. If we missed something, or you get stuck upgrading – we’re here to help. Please start a thread in our forums and we’ll look into it as soon as we can.


Ext JS Tip Of The Day: XTemplate Exceptions

$
0
0

If you ever worked with the Ext JS grid panel and put custom renderers on your columns, you may have fought this issue before. Deep in the XTemplate class (which powers most visual components in Ext JS), there is an evil try/catch statement that silently catches all exceptions in the template apply phase. If you use ext-all-debug.js you do get a console.log statement, which is slightly better. But when using a non-debug version of Ext JS you get a silently broken grid. This is very bad as it completely hides errors from us developers, and tests won’t easily detect this.

“Fixing” the grid rendering

To be notified when a crash happens inside a custom renderer method, you can override the ‘strict’ property globally which skips the try/catch when templates are applying their data. Now you can catch grid rendering errors regardless of which version of Ext JS you use.

Ext.define("CZ.override.XTemplate", {
    override : "Ext.XTemplate",
    strict   : true
});

Overriding the console.log method

Another way to detect this issue is to override console.log in your test suite. We already do this internally for all our tests and it works great. Please note, Ext JS only uses console log in the debug version of the library – so make sure your tests use the debug version for this to work.

Harness.on('teststart', function (ev, test) {
    var console = test.global.console;

    if (console) {
        console.error = console.warn = function () {
            test.fail([].join.apply(arguments));
        };
    }
});

Hope one of the tricks above help you with your grids, happy hacking/testing!

Taking Screenshots In A Siesta Test

$
0
0

2015 has just started and new features are already making their way into the Siesta code base. In the newly released 2.1.1 version of Siesta, we now support taking screenshots inside your tests. This can be of great value when you want to do a manual visual inspection of your web app before you release.

The new t.screenshot API method

Taking a screenshot is extremely easy as you can see below.

t.chain(
    { click : '#userMenu' },
            
    { screenshot : 'the_filename' }, // ".png" will be added as the suffix
  
    ...
);

// Or done programmatically:
t.screenshot('the_filename', function() {
   // callback called when screenshot has been captured
});

This is all it takes. Since taking a screenshot is an asynchronous operation, you should either use it in a t.chain, or capture a screenshot programmatically using a callback. The above statement would create a PNG file called ‘the_filename.png’ in the folder where you invoked the Web Driver launcher.

Screen Shot 2015-01-18 at 18.52.53

Please note: Since screenshots cannot be made using pure javascript, screenshots will only be captured when launching your tests through the Web Driver launcher. The ‘screenshot’ method has no effect when launched in a normal browser or when using PhantomJS.

Try it out now!

If you want to use this feature, please log in to our customer zone and grab our latest Siesta release. We’d very much appreciate your feedback as always.

Testing X-Domain Websites With Siesta in Chrome

$
0
0

If you ever tried testing a URL on a different domain, protocol or port, you have most likely seen some error in the browser console. The error is a result of various rules enforced by the browser as defined by the Same Origin Policy. Try to open www.google.com in one of your tests and you will see the errors yourself. These warnings are expected when using Siesta since it is a web application based on pure JavaScript. This means it’s bound by all the rules that regular web pages are. But for testing purposes, there are ways to work around these rules. We need to do (at least) two things to be able to test a site on another domain.

Disabling Web Security in Chrome

Let’s say you wanted to run a test targeting www.google.com from your own localhost. A simple Harness setup would look like this:

var Harness = Siesta.Harness.Browser

Harness.configure({
    separateContext : true
})

Harness.start(
    {
        hostPageUrl : '//google.com',
        url         : 'x-domain.t.js'
    }
)

Note that we set separateContext to true since the test will navigate between different pages. To allow Siesta to access an iframe pointing to a remote site, you can launch Chrome with a special command line switch. If you have a Mac, this is what you’d write on the console.

open /Applications/Google\ Chrome.app --args --disable-web-security

This flag tells Chrome to not enforce the Same Origin Policy. For more information about Chrome command line switches, please see this resource.

Disabling X-Frame-Options in Chrome

After opening Chrome with this flag, running the test will produce the following warning.

Screen Shot 2015-02-27 at 16.07.34

This error is a result of Google setting the X-Frame-Options response header to SAMEORIGIN. This means “The page can only be displayed in a frame on the same origin as the page itself”, and you can read more about this setting here. To bypass this security feature, we simply install the “Ignore X-Frame Headers” extension for Chrome. Now we can run the test again, and the full Google page displays normally in the Siesta iframe.

You can see a small video I made showing how this works, I hope you find these tricks useful when testing your own applications. Enjoy!


Showing Validation Messages In Ext Scheduler

$
0
0

Recently we added support for showing custom validation messages inside the drag-drop, resize, and drag-create tooltips. This makes it easier for you as developers to enhance the user experience when an action is not allowed. Instead of just showing an icon that an action is unavailable, you can inform the end users of why. Let’s say some of your resources must be booked for a minimum of two days, you could now add that check easily like this:

createValidatorFn : function (resourceRecord, start, end) {
    if (resourceRecord.get('Category') === 'Robots' && Sch.util.Date.getDurationInDays(start, end) < 2) {
        return {
            valid   : false,
            message : 'Robots must be booked for at least two days'
        };
    }
}

Now, if you try to create a new task with a duration less than two days, a message will be shown in the tooltip as seen below:

Screen Shot 2015-03-12 at 12.12.10

Previously your validator methods could only return true or false but as you see above, the new API allows for an object to be returned as well. The same concept applies to drag-drop validation and resize validation, and you can try this out right now in the ‘validation’ sample.

Happy hacking!

SenchaCon 2015 – Come Meet Us

$
0
0

We are proud to be silver sponsors of the upcoming SenchaCon in Santa Clara, April 7-9 2015. From our Bryntum team, I will attend together with Siesta co-creator and core developer Nickolay Platonov.

logo-footer

SenchaCon always provides cutting edge sessions showing all the great things you can do with the Sencha frameworks and tools. This year there are two sessions about testing with Siesta, outlined below:

Speaker:
Mats Bryntse (Bryntum)

Session title:
Siesta deep dive: How to improve the quality of your Ext JS app releases with unit & UI tests

Session summary:
Testing a large Ext JS codebase can be tricky sometimes. Running your tests across multiple platforms and browsers can also be a bit of a pain. The good news is there are many great tools out there that will make your life as a developer easier. In this presentation, I will demonstrate how we at Bryntum use Siesta to test our products and applications.

Speaker:
Gabor Puhalla (Profiq)

Session title:
Techniques to avoid regressions using Siesta Test Suite

Session summary:
Avoiding quality regressions in existing functionality is one of the fundamental challenges implied by frequent releases in agile software development. Every new development cycle brings new functionality, as well as risk to existing functionality. Test automation sounds like a straightforward answer to the issue. How do you implement frequent test execution though, if the existing functionality has to work on multiple platforms and/or browsers? Is automation worth the cost?

The session will explain and demo Siesta test automation as a way to address the issue and talk about lessons learned from real-world ExtJS projects..

Come and meet us

We are super excited to attend this conference and show you the latest and greatest features of our products. We will also have a Bryntum booth where you can come chat with us and ask questions. If you’re interested in attending and haven’t yet bought a ticket, you can get 25% off with the bryntum25 registration code (9 codes available, first come first serve). We hope to see you there next week!

Siesta 3.0 is here!

$
0
0

SenchaCon just started, and what better way to kick it off than to announce the 3.0 release of Siesta. This release contains a wide range of new features as well as stability improvements.

New user interface

Screen Shot 2015-04-04 at 09.15.32

The first thing you’ll notice about the 3.0 version is the new UI. It’s built using the latest Ext JS 5.1 version and features a customized crisp theme. Lots of improvements have been made relating to performance, stability and overall memory usage.

Jasmine support

One of the great new features of the 3.0 release is that you can run Jasmine test suites directly inside Siesta. This enables you to make a painless migration if you want to keep your old Jasmine tests while making use of the additional power in Siesta.

// Siesta can also run a Jasmine test suite
{
       name            : 'Jasmine tests',
       jasmine         : true,
       expectedGlobals : ['Player', 'Song'],
       url             : '1.unit-tests/jasmine_suite/SpecRunner.html'
}

And here’s a screenshot from a new example which ships with Siesta 3.0.

Screen Shot 2015-04-04 at 09.15.04

beforeEach/afterEach and test spies

In 3.0 you can now use popular BDD testing patterns like spies and beforeEach/afterEach hooks. These make your life a lot easier and will help you keep your test code DRY. If your tests contains lots of repeated setup code, you can use the beforeEach hooks instead:

t.beforeEach(function(){
        // Do some setup code code here
    });

    t.afterEach(function(){
        // Do some cleanup code code here
    });

Spies are useful to stub a method and monitors the number of calls to it as well as all the arguments passed. Here’s a simple sample of using spies.

var spy = t.createSpy('007');

    spy();
    spy(0, 1);
    spy(0, 1, '1');

    t.expect(spy).toHaveBeenCalled();
    t.expect(spy).toHaveBeenCalledWith(0, t.any(Number), t.any(String));

    t.is(spy.calls.any(), true);
    t.is(spy.calls.count(), 3);

Touch event support

Siesta now properly emulates touch events which means you can test your touch interfaces easily. The API has been updated and extended with a few new methods such as touchDrag, tap and more.

t.chain(
     { tap : '.someElement' },
     { touchDrag : '.x-tree-node', to : [100, 200] }
);

Try it out today

You can download Siesta Lite right away from its product page. If you have a license you can simply download the full version from our customer zone. For a full list of changes, please see our changelog.

Testing Complex Web Applications With Siesta

$
0
0

Testing large web applications can be tricky sometimes. With advanced user interfaces containing animations, expanding and collapsing sections and load masks, there are many things that can make a test break. Sporadically failing tests can be very painful to deal with, usually caused by hidden race conditions that are hard to locate. Effort needs to be put in to making sure the test always produces the same result. If a test fails a certain percentage of the time when run, it should be refactored or deleted as it’ll just produce noise which distracts you. In previous versions of Siesta, you had to take care of these race conditions yourself, and add waitFor statements where needed if a target wasn’t immediately clickable. In the latest Siesta release 3.1.0 released today, we’ve implemented a new targeting strategy which is much more tolerant of unstable DOM targets – targets that move or are temporarily inaccessible.

Dealing with an unstable DOM

We decided to add a few “pre-action” steps before DOM interactions to verify that the targeted DOM element is stable. The strategy is outlined below:

  1. 1. Wait for target to be present and visible in the DOM
  2. 2. Scroll it into view if needed
  3. 3. Move the cursor to the target, and after moving make sure that the target didn’t move.
  4. 4. Wait again for target to be present, visible and reachable, not obscured by other DOM elements above it with higher z-index.
  5. 5. If target has moved, or is not reachable, sleep for 100ms and start over.
  6. 6. All is fine – perform the click or drag operation etc.

This sequence will simplify your testing a lot and help you avoid unnecessary and tricky race conditions. To demonstrate Siesta’s new capabilities, let’s go through a few different common application scenarios.

Clicking a button that is temporarily unreachable

Typically web applications deal with a lot of data. During loading it’s a common practice to disable certain UI controls during load/save operations. Below is a sample image showing such a UI panel:

Screen Shot 2015-07-01 at 09.53.37

As you can see there is no way to click the button before the loadmask has disappeared. Siesta will now wait until the button becomes accessible and then click it. In previous versions you had to take care of this yourself and insert waitFor statements yourself before issuing the click command.

Clicking a UI element that appears after a delay

Another interesting scenario is interacting with UI elements that are not initially in the DOM. Siesta will now wait for the target to appear before interacting with it, again saving you from the pain of adding extra wait commands.

ezgif.com-crop (1)

If you’ve tried using Selenium IDE to record and play a test, this is what happens in the same scenario where you try to click something that isn’t initially in the DOM:

Screen Shot 2015-07-01 at 12.23.38

Also note that the Selenium recorder picks very bad locators for an Ext JS application. Siesta would instead pick a Component Query to activate the tab: >>tab[text=Loadmasks].

Clicking a button in an expanding panel

If you use Ext JS panels, you have definitely seen that they are collapsible by default using animations. This also impacts our testing if you intend to interact with UI elements inside the expanding panel. After clicking the expand icon, we should wait until the panel is done animating itself to its new size. See the below illustration for an explanation of the issue:

ezgif.com-crop

This is now completely handled by Siesta, since detects the target moving and retries after a short delay.

Stress test – clicking a button that appears and disappears

To illustrate just how stable Siesta targeting is now, we also built a few stress tests. The first one has a rotating UI which spins two times then stops. No normal application would ever look like this, hopefully :) . The second stress test has a button that is moved to random positions in the DOM for a while and then stops. Siesta will handle both of these crazy scenarios just fine now. To see for yourself how it looks, we made a simple demo video that you can view below.

Conclusion

We think this latest improvement will help you a lot in your application testing to ensure tests are as robust as possible. If you have additional ideas or feedback about tricky testing use cases, please let us know and we’ll try to see how you can make Siesta better.


Testing an Ext JS 6 App Generated with Sencha Cmd

$
0
0

Lately we have received a number of questions relating to testing Sencha Cmd applications. And since most applications written with the Sencha libraries (Ext JS and Sencha Touch) are generated using Sencha Cmd, we decided to write a little ‘How-to-guide’ to get you started with your javascript testing. Let’s get started!

Generating A Sencha Cmd 6 App

First of all, make sure you have the latest Cmd version installed. You can download it here. Let’s start from scratch by generating a new Sencha Cmd 6 application, this is done by running the following on the command line (from the Sencha getting started guide):

sencha -sdk /path/to/extjs/framework generate app MyApp MyApp
cd MyApp
sencha app watch

This will generate the following files in the MyApp folder in your file system.

Screen Shot 2015-07-19 at 14.19.36

As you can see we get an app folder with ‘model’, ‘store’ and ‘view’ folders along with an app.js which bootstraps the application. If you navigate to http://localhost:1841 in your browser, you’ll see the sample application with a few tabs and a grid panel.

Screen Shot 2015-07-27 at 10.58.42

Creating Your Test Harness

Now that the app is up and running, we create a tests folder in the root of the MyApp folder. Inside it we put our harness HTML page which contains the Siesta application, and a Harness JS file which contains details about the test suite:

<!DOCTYPE html>
<html>
    <head>
        <link href="//cdn.sencha.com/ext/gpl/5.1.0/packages/ext-theme-crisp/build/resources/ext-theme-crisp-all.css" rel="stylesheet" type="text/css"/>
        <link rel="stylesheet" type="text/css" href="localhost/siesta/resources/css/siesta-all.css">

        <script type="text/javascript" src="//cdn.sencha.com/ext/gpl/5.1.0/build/ext-all.js"></script>
        <script type="text/javascript" src="localhost/siesta/siesta-all.js"></script>

        <!-- The test harness -->
        <script type="text/javascript" src="index.js"></script>
    </head>
    <body>
    </body>
</html>

var Harness = Siesta.Harness.Browser.ExtJS;

Harness.configure({
    title              : 'My Tests'
});

Harness.start(
    {
        group       : 'Unit Tests',
        hostPageUrl : '../index.html?unittest',
        items       : [
            'unit-tests/unit1.t.js'
        ]
    },
    {
        group : 'Application Tests',
        items : [
        ]
    }
);

For our unit tests, we first need to make sure all our application JS classes get injected into each test. Instead of using preload for this, with Ext JS 6 we use hostPageUrl and set it to the root index.html page. By doing this, we let Ext JS choose and load the application files as it sees fit. We could’ve also selected to include only the JS classes being tested in each test, but this would require too much effort. If you run the test above, you’ll note that the application will start which is of course not desirable when doing unit tests. To fix this, we simply modify our app.js a little bit.

/*
 * This file is generated and updated by Sencha Cmd. You can edit this file as
 * needed for your application, but these edits will have to be merged by
 * Sencha Cmd when upgrading.
 */
Ext.application({
    name: 'MyApp',

    extend: 'MyApp.Application',

    requires: [
        'MyApp.view.main.Main'
    ],

    // The name of the initial view to create. With the classic toolkit this class
    // will gain a "viewport" plugin if it does not extend Ext.Viewport. With the
    // modern toolkit, the main view will be added to the Viewport.
    //
    mainView: location.search.match('unittest') ? null : 'MyApp.view.main.Main'
	
    //-------------------------------------------------------------------------
    // Most customizations should be made to MyApp.Application. If you need to
    // customize this file, doing so below this section reduces the likelihood
    // of merge conflicts when upgrading to new versions of Sencha Cmd.
    //-------------------------------------------------------------------------
});

We simply add an inline check for the presence of a ‘unittest’ string in the query string. If this string exists, we prevent the application from starting. Now lets start writing a simple unit test. If you do it this way, each Ext JS class file will be loaded on demand which makes debugging very easy (compared to having one huge xx-all-debug.js). In your nightly builds, you should consider testing against a built test version of the app for faster test execution. You can build such a version by executing this Cmd statement:

sencha app build testing

Writing a Basic Unit Test

The Personnel store for the sample application looks like this:

Ext.define('MyApp.store.Personnel', {
    extend: 'Ext.data.Store',

    alias: 'store.personnel',

    fields: [
        'name', 'email', 'phone'
    ],

    data: { items: [
        { name: 'Jean Luc', email: "jeanluc.picard@enterprise.com", phone: "555-111-1111" },
        { name: 'Worf',     email: "worf.moghsson@enterprise.com",  phone: "555-222-2222" },
        { name: 'Deanna',   email: "deanna.troi@enterprise.com",    phone: "555-333-3333" },
        { name: 'Data',     email: "mr.data@enterprise.com",        phone: "555-444-4444" }
    ]},

    proxy: {
        type: 'memory',
        reader: {
            type: 'json',
            rootProperty: 'items'
        }
    }
});

It doesn’t contain any logic yet, so let’s add a simple getUserByPhoneNumber method:

getUserByPhoneNumber : function(nbr) {
    // TODO
}

For now, we’ll just add a stub and focus on writing the test first. The test for this method will look like this:

describe('My first unit test', function(t) {

    t.ok(MyApp.view.main.Main, 'Found mainview');

    var store;

    t.beforeEach(function(t) {
        store = new MyApp.store.Personnel({
            data : [
                { name: 'Jean Luc', email: "jeanluc.picard@enterprise.com", phone: "555-111-1111" },
                { name: 'Worf',     email: "worf.moghsson@enterprise.com",  phone: "555-222-2222" }
            ]
        });
    });

    t.it('Should support getting a user by phone number lookup', function(t) {
        t.expect(store.getUserByPhoneNumber('555-111-1111').get('name')).toBe('Jean Luc');

        t.expect(store.getUserByPhoneNumber('foo')).toBe(null);
    });
});

This test asserts that we can lookup a valid phone number and get a user back, but also verifies that we get null when providing a non-existing phone number. Running this test confirms that we get failed assertions which is the first step of TDD. Now we can go ahead and write the simple implementation of the method:

getUserByPhoneNumber : function(nbr) {
   var index = this.find('phone', nbr);

   if (index < 0) return null;

   return this.getAt(index);
}

After running this in Siesta, you should a nice screen with all tests green.

Screen Shot 2015-07-23 at 12.09.15

Let’s continue looking at a more advanced type of test – application tests.

Creating an Application Smoke Test

For our application tests, we create the following test group in our Harness JS file.

{
    group       : 'Application Tests',
    hostPageUrl : '../index.html',
    items       : [
        'application-tests/smoketest.t.js'
    ]
}

We also create a file called “smoketest.t.js” in the filesystem and place it in an “application-tests” folder.

describe('My first application test', function (t) {

    t.it('Should be possible to open all tabs', function (t) {
        t.chain(
            { click : ">>tab[text=Users]" },

            { click : ">>tab[text=Groups]" },

            { click : ">>tab[text=Settings]" },

            { click : ">>tab[text=Home]" }
        );
    });
});

In this type of test we of course want the application to start normally so we just point the tests to the index.html file. The purpose of our smoke test is just to open each tab and make sure no exceptions are thrown.

Verifying Presence Of an Alert Dialog

Now let’s add one more test file, in which we assert that a popup is shown when clicking on a row in the Personnel grid:

Screen Shot 2015-07-25 at 12.04.51

describe('Personnel grid tests', function (t) {

    t.it('Should show a confirm popup when clicking grid row', function (t) {
        t.chain(
            { click : "mainlist[title=Personnel] => table.x-grid-item" },

            // Make sure we see a window with proper title on a row double click
            { waitForCQVisible : 'window[title=Confirm]' },

            { click : ">>[itemId=yes]" }
        );
    });
});

Try running the suite

We’ve put the runnable test suite online if you want to try running these tests yourself. You can inspect the sources of each test and see how easy it is.

Conclusion

Testing applications generated with Sencha Cmd is just as easy as testing any other code base. We recommend that you start with unit testing your core files such as stores, model and logic classes. Once you have good coverage there, then also invest in a few application tests covering your most common user scenarios. If you’ve encountered any issues or problems with your Sencha testing, please let us know and we’ll try to help you.

Siesta 4.0 Beta Is Now Available

$
0
0

We’re thrilled to announce the beta release of our new major Siesta version. In this release we have focused primarily on performance and stability. To achieve significant improvements in these areas we’ve redesigned how tests are launched in automation mode. With the new launchers, we can now easily run multiple tests simultaneously. We also added a number of other cool features, so let’s take a peek at what’s in the Siesta 4.0 package.

Parallelization

The major new feature introduced in 4.0 is the support for running the test suite in several parallel “workers” (or “threads”). The number of workers can be specified using the new command line argument “–max-workers”. Pairing this feature with cloud services such as Sauce or BrowserStack provides an instant performance boost. Let’s see what impact it will have on the execution time for the Siesta internal test suite:

1 worker – 15min 40sec

siesta_1_worker

10 workers – 2min 20sec

siesta_10_workers

Naturally the execution time is reduced by the number of workers available. So in this case, for 10 workers we are able to run our tests 7 times faster (the speed boost will be close to 10 for bigger suites). If you remember in Siesta 3 we introduced the “disabled sandboxing” feature, which also could give you up to 10 times performance boost. So compared to Siesta 2, for the best case scenario (non-DOM tests with sandboxing disabled) you can run your tests 100 times faster! :)

Running your tests suite in several parallel workers has certain implications. Notably the order of test execution is no longer strictly sequential as it was before. Some test positioned lower in your Harness.start() list, may start execution earlier than tests above it. This is simply because you can not run your tests in parallel and in the same time sequentially. You should not rely on your tests running sequentially anymore. Always aim to have your tests be fully isolated and not depending on execution of other tests.

The new architecture for the launcher is also much more stable and fault tolerant. If for any reason the test suite encounters some error such as WebDriver throwing an exception or temporarily losing the internet connection, the launcher will restart which doesn’t affect the overall test suite execution.

Ext JS 6 support

Siesta’s internal Ext JS layer has been updated to support the latest Ext JS 6 version, so if your application is built using Ext JS 6 – we recommend using Siesta 4 to test it.

Screenshot comparison

Another cool and frequently requested feature is the ability to compare two screenshots. The comparison can be done with either a previously taken image or with a corresponding screenshot from another set of screenshots. A diff image is then generated which highlights the areas where the two screenshots are different. A certain threshold (which is configurable) of dissimilarity is allowed.

Let’s say you have a simple application containing a list that should be centered:

foo-diff

Now let’s pretend in your next release, some conflicting CSS rule is introduced which displaces the list a bit to the left. This UI bug would be impossible to detect using regular unit or application tests.

foo-prev

When running your test in automation mode with the special --screenshot-compare-with-previous argument, Siesta will perform a comparison and assert that the screenshot looks like it did before.

>>webdriver localhost/myapp --screenshot-compare-with-previous
Launching test suite, OS: MacOS, browser: Chrome 45.0.2454.85
fail 2 - Screenshots are different
New screenshot : "/Documents/foo.png"
Previous screenshot : "/Documents/foo-prev.png"
Similarity: 0.638677
[FAIL] 4.testing-3rd-party-libraries/polymer/polymer.t.js

The generated diff image highlighting the differences can be seen below:

foo

Screenshots of single elements

In previous versions of Siesta we supported taking screenshots of the entire browser window. In v4.0, we can also capture individual DOM elements using any of our standard ActionTarget selectors such as CSS, Component Query, Ext JS Component instances etc. This feature has actually allowed us to improve our documentation a bit, since previously a few of the screenshots in the docs were outdated. The images in the Siesta 4.0 documentation are now auto-generated at each release using a special small test suite to ensure they are always up-to-date.

Meet the new launcher in the team – SlimerJS.

We are also introducing a new automation launcher in this release – SlimerJS.

slimer

One of the driving reasons for this is the poor support of the PhantomJS project, which seems no longer actively maintained (the last release with several major known issues was made Jan 23rd 2015). Another reason is that SlimerJS has much better architecture than PhantomJS – it uses the real rendering engine of the Firefox browser. So you can trust the results from this launcher as if they would be received from the “real” Firefox browser which is a quite important thing.

Recorder improvements

The event recorder is one of Siesta’s most popular features and it has received some nice improvements too. It now generates a complete test case using a tree structure with t.it statements. This helps you avoid recording a huge flat list of actions which makes the UI test hard to read and understand. Instead, select some rows in the recorder grid, then right click and logically group your UI interactions and add a descriptive name to each test section.

Screen Shot 2015-09-09 at 10.38.27

And after creating the test section, the generated complete test code will look like this – ready to run immediately.

describe("New recording...", function(t) {
    t.it("Logging in", function(t) {
        t.chain(
            { click : "textfield[name=name] => .x-form-text" },

            { action : "type", text : "mike[TAB]password" },

            { click : "button[text=Login] => .x-btn-button" }
        );
    });
});

When you have recorded your test, Siesta now also offers you to re-play not only the entire test but also individual actions (see icons in the screenshot above). This is a great help as you debug and polish your recorded tests.

Test files auto-discovery

Some users provided feedback that it’s bothersome to include the test file name to the “Harness.start()” list every time you create a test. To address this, we have created a simple command line tool that auto-discovers the test files in the provided directory list and generates a JSON file with test descriptors. You can then modify this file if needed and add some config options to groups or for individual tests. These changes will be preserved on the next run of the tool. In such a setup it may also be more convenient to specify configuration options inside the test itself:

StartTest({ waitForTimeout : 90000 }, function (t) {

})

Popup window support

If you work with legacy applications using popup window, you will be happy to know that Siesta now supports interacting with popups opened by the target test page. You can click and type on any elements inside the popup window after switching to it with the new switchTo method.

Conclusion

This release is a major evolution of Siesta and we’re determined to continue trying to make your testing life easier. As always, except for any documented API changes, we aim for 100% backward compatibility in our releases. We encourage you to give it a try and report any changes or issues compared to the previous version in our forum. Happy testing! :)

Announcing Ext Gantt And Ext Scheduler 4.0

$
0
0

We’re super excited today to announce the 4.0 version of our scheduling components: Ext Gantt and Ext Scheduler. As always with major releases, there has been a number of improvements and bug fixes made to both products. We’ve upgraded both products to use the latest version of the Ext JS platform – v6.0.0. A very cool thing in Ext JS 6 is the new imageless theme called Triton. We have added support for this and also updated some of our samples to use it. See below for a screenshot of how it looks in action.

Screen Shot 2015-10-01 at 11.55.15

Announcing Ext Gantt Pro

With this 4.0 release we have introduced a new Pro version of the Gantt chart. Since the first 1.0 version was released about 5 years ago, the product has grown immensely. Ext Gantt 1.0 totalled about 5500 lines of code, compared to the 4.0 gnt-all-debug.js which currently consists of 65k lines. With our new tiered offering we can now offer a slimmer basic version for those who don’t need all the extras. And for those who need a fully featured project management tool, the Gantt Pro will be the ideal choice. The Pro version has the following additional features compared to the Standard version (more to come):

  • Print support, with plenty of formatting options
  • MS Project import, based on MPXJ
  • Export to PDF/PNG
  • Resource Utilisation Panel
  • Timeline Component
  • Additional advanced examples

All our existing customers with Ext Gantt licenses have been upgraded to Ext Gantt pro automatically. To learn more about which features you’ll find in the two versions, please see our updated Gantt product page. If you have suggestions of advanced features you would like to see added to our Pro version, please get in touch with us. For the month of October, we’re offering an initial discount of 15% on your Gantt Pro EUL purchase. Click here to buy a Gantt Pro license.

The new resource utilization panel

One highly requested feature in the past has been a resource utilization table view where you can easily see over and under allocated resources. This is now supported in Gantt 4.0 where we introduce a new view class Gnt.panel.ResourceUtilization. This shows a list of your resources and each resource can be expanded to show the tasks assigned. Each resource time slot also gets a CSS class assigned based on the utilization level, meaning you can highlight over-allocation, under-allocation as well as optimally allocated resources.

Screen Shot 2015-09-29 at 12.25.06

Using this class is very simple and rather than describing how to use it in words, let’s just take a look the basic code required:

new Ext.Viewport({
    layout : 'fit',
    items  : [
        {
            title              : 'Resource utilization',
            xtype              : 'resourceutilizationpanel',
            taskStore          : yourTaskStore
        }
    ]
});

This component, as well as the Timeline component both build upon parts of Ext Scheduler under the hood. The Gantt now includes a stripped down basic Scheduler version to implement these features. This means you don’t need to include the full Scheduler scripts on the page to use these features.

The new Timeline component

Screen Shot 2015-09-29 at 12.28.08 copy

In previous versions of our Gantt chart, we included a timeline demo in the “advanced example”. This component has now been promoted to its own Gnt.panel.Timeline class and is fully supported as part of the Gantt Pro product. The timeline can be used to keep track of important tasks in your project. All you have to do in your Task data model is to set the “ShowInTimeline” value to true for the important tasks, and there is also a special Gnt.column.ShowInTimeline column allowing you to toggle this setting in runtime.

{
    "Id"              : 10,
    "Name"            : "Planning",
    "PercentDone"     : 50,
    "StartDate"       : "2010-01-18",
    "ShowInTimeline"  : true,
    "Duration"        : 10
}

Ext JS version support

As you probably already know, our general support policy is to support two major versions of our software. This means we currently support v3.x based on Ext JS 5 and v.4x based on Ext JS 6. This also means that the legacy 2.x version is unsupported. You can always see clearly which versions of Ext JS we support by looking in our customer zone or change log. In the coming weeks we’ll also be looking at supporting the recently released 6.0.1 version of Ext JS.

What’s coming next..?

This release marks a major milestone for us as we continue to look at features to add next. Here’s what you can expect in the coming 3-6 months:

  • Pro: Undo-redo support
  • Excel-style copy paste functionality
  • A new ReadOnly flag defined on the Task model level
  • More examples

What features are you and your end users looking for? Please send us an email or write in our forums and we’ll try to improve our products according to your needs.

Try it out now

We encourage you to download our new release and try it out. Your feedback is very important to us so please let us know your suggestions and also please report any issues you find.

Click here to buy a Gantt Pro license at 15% discount .
or
Download full version from Customer zone
or
Click here to download our 45 day trial

Finding Memory Leaks In Sencha applications

$
0
0

We recently received a bug report regarding memory leaks in our Touch Scheduler product. This was the first time we had heard of a memory issue so we decided to do a thorough investigation. Generally, debugging and finding JavaScript memory leaks can be very time consuming and tedious so it helps to know as many tricks as possible to debug efficiently. In this post I’ll share some of the techniques I used which should be useful for both anyone debugging Ext JS and Sencha Touch applications.

What is a memory leak?

A memory leak appears when a resource that’s no longer used by any part of your application still occupies memory which will never be released. This is especially bad for long running applications and for applications running on low memory devices such as phones or tablets. Determining what is a memory leak isn’t always easy since we don’t have control over the browser garbage collecting process. This prevents us from reliably knowing when the browser is done cleaning up unused JS objects, DOM nodes etc. This means we have to be extra careful and create solid test cases that can prove a memory increasing pattern over time.

Searching for memory leaks

Signs of a memory leak can be that the application is running slower over time. Also, if you’re getting reports of browsers/phones crashing, it could also be a result of an out-of-memory scenario caused by a leak. If you suspect there is a leak somewhere in your application, it’s important to first gather some evidence before starting a code review of your application. In my search for memory leaks I used the standard Chrome Dev Tools. It’s a useful tool which gives you a lot of information, but sometimes it can be hard to know what the information actually means. There’s so much information about non-leaks that finding the leak can be a very challenging task. I used the Profiles panel in the Dev Tools which looks like this:

Screen Shot 2015-11-10 at 12.42.11

After running your application and taking a snapshot, you can look at the data gathered which most likely won’t be very helpful at the first glance. In an Ext JS application for example, there are tons of classes defined, stores loaded, elements cached etc and these are not leaks. To make a potential leak more visible in this ‘background noise’, it’s important that you run your test case many many times. If you think a certain part of your application may be leaking memory then performing a simple loop should give you good information to process.

// take snapshot before

for (var i = 0; i< 100; i++){
   openSomeDialog();
   closeSomeDialog();
} 

// take snapshot after and review

The first indication of a leak is to see the memory usage go up significantly as you run your test case repeatedly.

Building a good test case

If you’re seeing something that looks like a memory leak, the next step is to create a basic test case to use. Let’s consider a simple UserList (subclassing Ext.List) in a Sencha Touch application.

Ext.define('UserList', {
    extend : 'Ext.List',
    config : {
        itemTpl    : '{name}',
        fullscreen : true
    },

    constructor : function (config) {

        var myStore = new Ext.data.Store({
            fields : ['id', 'name'],
            data   : [
                { name : 'User 1' },
                { name : 'User 2' },
                { name : 'User 3' }
            ]
        });

        this.callParent(arguments);

        this.setStore(myStore);
    }
});

An extremely simple class which actually contains a few (surprising) substantial leaks. A test case to investigate this component would look something like:

for (var i = 0; i< 100; i++){
   new UserList().destroy();
}

First we start at looking at the memory footprint when doing nothing, and again after creating and destroying the component 100 times. Tests show that memory increases 6 MB after this, which tells us we are on to something.

Making sense of the information

When studying the gathered data, I found it helpful to sort by Objects Count (since we’re creating 100 UserList objects). Now expand the Object node in the tree and hover over the top entries in search for something suspicious.

Screen Shot 2015-11-10 at 14.23.01

In this case, something in the tooltip looks very strange right away. Why would there be loads of Proxies floating around? Proxies are related to Stores normally, which points us towards our store creation inside our UserList component. The store is created but never destroyed (and this is fine in an Ext JS application). It turns out, in Sencha Touch even stores without a storeId are registered with the StoreManager. This means there is a reference to it and it will never be cleaned up and removed from memory. A quick test verifies our theory in the console:

To workaround this, our component could simply destroy its store. Updated class definition:

Ext.define('UserList', {
    extend : 'Ext.List',
    config : {
        itemTpl    : '{name}',
        fullscreen : true
    },

    constructor : function (config) {

        var myStore = new Ext.data.Store({
            fields : ['id', 'name'],
            data   : [
                { name : 'User 1' },
                { name : 'User 2' },
                { name : 'User 3' }
            ]
        });

        this.callParent(arguments);

        this.setStore(myStore);
    },

    destroy : function() {
        this.getStore().destroy();
        this.callParent(arguments);
    }
});

With this fix, no stores are leaked anymore. Are we done..? Let’s take another look at the memory snapshot. If we expand the ‘objectClass’ node in the report, we see a lot child nodes looking the same:

Screen Shot 2015-11-10 at 15.19.57

This is also very suspicious, it looks like a Model definition like the one we have specified but why so many of them? The solution is found in how the Store deals with anonymous models (using the ‘fields’ config). It defines a new Model class each time the store is created. A quick peek at Ext.ClassManager verifies this:

Screen Shot 2015-11-10 at 15.24.06

This is definitely not what we want, so it makes sense for us to create our own model which can be reused. As you can see, to find memory leaks you need good data to help you narrow down the suspects and it also helps being a good guesser.

Element cache leaks

Sencha Touch uses pretty aggressive caching of Ext.Element and you may end up leaking these without knowing. If you use code such as:

var childEl = someEl.down('.foo');

// or 

someTemplate.insertFirst('targetEl', { foo : 'bar' });

then you will generate an entry in the Ext.Element cache. Most of the Ext.Element and Ext.Template API methods allow you to return a plain DOM node instead which saves this overhead.

Ext JS and Sencha Touch specific leaks

As a Sencha developer, here are a few places specific for Sencha Touch and Ext JS applications you should be aware of.

Ext.StoreManager contains all the stores you’ve created in your application, make sure it contains only stores you expect to see and destroy any internal stores when they’re no longer used.

Ext.ClassManager contains all the classes defined in your application as well as all the Sencha classes, make sure it contains only classes you expect to see.

Ext.Element.cache contains all cached Ext.Element references. Avoid using Element.down and similar APIs unless you really need an Ext.Element instance.

Ext.ComponentManager contains all cached Component instances. If you create a component and forget to destroy it, it’ll still be kept in the cache.

Ext.event.Dispatcher.getInstance() If you forget to destroy an Observable you’ll see an entry leaked in this object.

What all of the global caches above have in common is that it’s super easy to verify leaks. Simply measure number of members in those classes prior to running your test case and assert that the value stays the same after your test case.

Locking it down with a Siesta test case

The debugging process to find the leaks in our Touch Scheduler took 8-12 hours which is quite a lot of work. We definitely need to add a detection mechanism to make sure this doesn’t sneak back in. This is easily done with a Siesta test case:

describe('Panel should not leak stores, classes, elements', function (t) {

    t.it('Should not leak memory', function (t) {
        var nbrStoresBefore      = Ext.StoreManager.getCount();
        var nbrClassesBefore     = Object.keys(Ext.ClassManager.classes).length;
        var observableBefore     = Object.keys(Ext.event.Dispatcher.getInstance().listenerStacks.observable || {}).length;
        var elementBefore        = Object.keys(Ext.event.Dispatcher.getInstance().listenerStacks.element || {}).length;
        var componentBefore      = Object.keys(Ext.event.Dispatcher.getInstance().listenerStacks.component || {}).length;
        var cachedElementsBefore = Object.keys(Ext.Element.cache).length;

        var steps = [];
        var scheduler;

        for (var i = 0; i < 10; i++) {

            steps.push([
                function (next) {
                    scheduler = t.getRenderedScheduler({
                        startDate : new Date(2016, 1, 1),
                        endDate   : new Date(2016, 1, 11),
                        plugins   : [
                            new Sch.plugin.CurrentTimeLine()
                        ]
                    });


                    t.waitForRowsVisible(scheduler, next);
                },

                function (next) {
                    scheduler.zoomIn();
                    t.waitFor(50, next);
                },
                function (next) {
                    scheduler.zoomOut();
                    t.waitFor(50, next);
                },

                function (next) {
                    scheduler.destroy();
                    scheduler.eventStore.destroy();
                    scheduler.resourceStore.destroy();
                    scheduler.timeAxis.destroy();

                    next()
                }
            ])
        }

        t.chain(
            steps,

            function () {
                t.is(Object.keys(Ext.Element.cache).length, cachedElementsBefore, 'No extra cached elements found')

                Ext.Viewport.destroy();

                t.is(Ext.StoreManager.getCount(), nbrStoresBefore, 'No leaked stores found')
                t.is(Object.keys(Ext.ClassManager.classes).length, nbrClassesBefore, 'No leaked classes found')
                t.is(Object.keys(Ext.data.Model.cache).length, 0, 'No cached models found')

                t.it('should not find any leaked listener objects', function (t) {

                    t.is(Object.keys(Ext.event.Dispatcher.getInstance().listenerStacks.observable).length, observableBefore, 'observable')
                    t.is(Object.keys(Ext.event.Dispatcher.getInstance().listenerStacks.element).length, elementBefore, 'element')
                    t.is(Object.keys(Ext.event.Dispatcher.getInstance().listenerStacks.component).length, componentBefore, 'component')
                })
            })
    })
})

Summing up

Keeping track of memory in mobile apps or web apps that should run for a very long time is important. I hope the techniques outlined above can help you manage the memory footprint in your own applications. Do you have any good tricks of your own to share? We’d be very happy to hear your own experiences when chasing memory leaks.

Detecting Application 404s with Siesta

$
0
0

Today we added a nice new feature to Siesta which makes it possible to detect loading errors of SCRIPT, IMG and LINK tags (and any other tags which fire the ErrorEvent). Detecting these kind of resource load errors when manually testing your application can be tricky and time consuming since normally we only see these 404s in the console of the browser.

How to use this feature

<!DOCTYPE html>
<html>
    <head>
        <link href="some-missing-stylesheet.css" rel="stylesheet" type="text/css"/>
        <img src="some-missing-image.png"/>
        <script src="some-missing-script.js" type="text/javascript"></script>
    </head>
    <body>
    </body>
</html>

If this was your application and you were lucky to have the console open, you would see this:

Screen Shot 2015-12-02 at 10.44.01

Having this kind of detection built into Siesta is a great new line of defense against simple mistakes that could be painful if they reach your production server. To detect this, Siesta injects a listener for the ‘error‘ event like this:

window.addEventListener('error', function(event) {
    // Optionally fail test
}, true);

Harness configuration

To activate this feature (disabled by default), just set the ‘failOnResourceLoadError‘ to true on your Harness:

var harness = new Siesta.Harness.Browser.ExtJS()

harness.configure({
    failOnResourceLoadError : true,
    ...
});

Browser support

Based on our experiments, this is only supported in the most modern browsers. This should not be a problem since detecting an invalid URL in a single browser is good enough. For further information on which browsers support Error events for scripts and link tags, please see this page.

Of course Siesta will detect any type of resource load error (500, 403 etc.) and not just 404s even though that’s probably the most common error we face. If you know any additional cool tricks you think Siesta should incorporate, please let us know!

5 Great Siesta Tips n Tricks For Your Testing Toolbelt

$
0
0

Siesta contains a lot of useful features that you may or may not be aware of. Reading the Siesta docs is a great way to learn and we also try to post about all the improvements here in the blog. If you keep track of our changelog, you might already be know some of the tips in this post but we’re pretty sure you’ll learn something new so let’s get to it!

1. Accessing the test instance in beforeEach/afterEach hooks

This is a new feature introduced in our latest release. Let’s say you have a large group of application tests in a test file where you want to assert something at the end of every test group. With access to the test instance in your test hooks, you can now easily add assertions to verify certain conditions your care about.

var dataStore = new Ext.data.Store();

t.afterEach(function(t) {
     t.expect(dataStore.getCount()).toBe(0);
     t.selectorNotExists('.form-input-invalid');
});

t.it('Should do this...', function(t) {
});

t.it('Should also do this...', function(t) {
});

t.it('Should maybe not do this...', function(t) {
});

2. Screenshot on a failed test

This has been requested a few times before and might become a supported feature in the future. Until then, here’s how easy it is to take a screenshot of a failed test:

var failCounter = 0;

yourHarness.on('testupdate', function(event, test) {
    if (test.getFailCount() > failCounter) {
        failCounter = test.getFailCount();

        test.screenshot(test.url, function() {});
    }
});

3. Using the custom :textEquals CSS selector

Support for targeting elements via exact string matching was added recently. Before this, Siesta only supported the :contains selector found in the Sizzle engine. Now it’s very easy to target elements that contain an exact string:

StartTest(function (t) {
    document.body.innerHTML = '<a href="somelink.html">foo</a>'

    t.chain(
        { click : 'a:textEquals(foo)' }
    ) 
});

4. Using t.iit to run a single test group

When debugging a single test group in a large test file, always isolate that test group using the t.iit API method.

t.it('Skipped', function (t) {
    // some assertions
});

t.iit('Only this test group will execute', function (t) {
    // some assertions
});

t.it('Skipped too', function (t) {
    // some assertions
});

5. Extending Siesta to find more bugs

Since Siesta is extensible and observable you can do some pretty cool things to find bugs earlier. You can for example override the console.error and console.warn methods to automatically fail your tests (we do this in our own test suites).

harness.on('teststart', function (ev, test) {
    var console = test.global.console;

    if (console) {
        console.error = console.warn = function (msg) {
            test.fail([].join.apply(arguments));
            console.log(msg);
        };
    }
});

You can also do global post-test sanity checks very easily. Here’s another nice snippet from our own vaults, detecting suspended layout components (in case someone forgot to call resumeLayouts):

harness.on('beforetestfinalizeearly', function () {
    var win = this.global;

    if (win.Ext) {
        var Ext = win.Ext;
        var suspendedComponents = this.cq('[isLayoutSuspended]{isLayoutSuspended()}');

        // only report in case of failure
        if (suspendedComponents.length > 0) {
            this.diag('POST TEST SANITY CHECKS');

            this.is(suspendedComponents.length, 0, 'No components found with layouts suspended');

            this.fail('Suspended layouts detected for components', {
                annotation : Ext.Array.map(suspendedComponents, function (cmp) {
                    return (cmp.id + '(' + cmp.xtype + ') ');
                }).join('\r\n')
            });
        }

        if (win.Ext.AbstractComponent.layoutSuspendCount > 0) {
            this.is(win.Ext.AbstractComponent.layoutSuspendCount, 0, 'Layouts should not be suspended globally by accident');
        }
    }
});

Share your tips

What are your favorite testing tricks which find bugs or make you more productive? Please share them with us and the Siesta community. Happy testing! :)

New Ext Gantt Features: Spreadsheet, Replicator And Copy/Paste

$
0
0

We just released Ext Gantt 4.0.3 with plenty of bug fixes and a few notable features. These new features have all been added to our advanced sample so if you’re in a hurry, you can try the updated advanced sample out right now.

Spreadsheet selection model

When the spreadsheet model was added to Ext JS, we were very happy and saw great potential. This selection class allows you to select grid cells in the left “locked” grid part of the gantt chart. Using it is as easy as:

Ext.define('App.view.Gantt', {
    extend : 'Gnt.panel.Gantt',
    
    selModel : {
        type : 'spreadsheet'
    }
});

In Ext JS 6, another cool new feature is the SelectionReplicator plugin, designed to be used together with the spreadsheet model. Now you can click and drag to copy values across cells without any typing.

After making some adaptions to it to handle our specific multi-datastore world, it’s now part of our core Gantt offering. To use it, just include it in the plugins section of your Gantt chart class:

Ext.define('App.view.Gantt', {
    extend : 'Gnt.panel.Gantt',
    
    selModel : {
        type : 'spreadsheet'
    },

    plugins : [
        'gantt_selectionreplicator'
    ]
});

Copy paste

In this new release we also support copy pasting of cell and row data. This is done by using our custom Clipboard plugin which extends the Ext JS default clipboard plugin Pasting can be done either into other gantt chart cells/rows, or into external applications such as Excel. To enable copy paste inside your Gantt chart, use the following setup (note that the grid must use the spreadsheet selection model to utilize this plugin)

Ext.define('Gnt.examples.advanced.view.Gantt', {
    extend : 'Gnt.panel.Gantt',
    plugins : [
        {
            ptype : 'gantt_clipboard',
            // data copied in raw format can be copied and pasted to other parts of the gantt
            // data in text format is copied to system clipboard and can be pasted anywhere
            source : ['raw','text']
        },
        'gantt_selectionreplicator'
    ],

The source config tells the plugin to copy either raw data, the rendered text, or both. The raw data is used when copying within the gantt chart and the text is copied to the system clipboard. Here’s a short video showing copying from the Gantt chart into a Google spreadsheet:

Check it out now

Download the latest release from our Customer Zone as usual and please let us know if you have any feedback. To view the full changelog for this release, please click here.


Introducing Bryntum Robo

$
0
0

Today we are proudly rolling out the first release of Bryntum Robo – a new undo/redo framework for the Ext JS data package.

Undo/redo is not a trivial feature to add to web applications. An application might define complex data processing rules involving data from different collections, and sometimes data can be mistakenly stored in the user interface. Being able to accurately revert the data to an earlier state can be tricky. Thankfully the task is easier for modern Ext JS MVC applications where data is kept in stores and models. In such an application, any change in the Model layer is reflected by the View (user interface) and we only need to track the state of the Model. This means Robo integration can be done with minimal code adaptations. Robo is also very extensible and will work with applications using different architectures.

To see Robo in action please click here.

How it works

Robo works by recording all changes in the data stores it knows about and keeping them in a log. Changes are recorded in batches, called “transactions” which form two queues – an undo queue and a redo queue.

Integrating Robo in your application

To prepare your application for integration with Robo, first you need to include the Robo.data.Model mixin in your data models:

Ext.define('Example.model.Branch', {
    extend      : 'Ext.data.Model',

    mixins      : { robo : 'Robo.data.Model' },
    ...
});

Next, you also need to include the Robo.data.Store mixin in your data stores. It will provide your stores with additional methods making the them aware about the current state of the application – to know whether it is doing normal processing or undo/redo processing.

Ext.define('Example.store.BranchTree', {
    extend      : 'Ext.data.TreeStore',

    mixins      : { robo : 'Robo.data.Store' },
    ...
})

Finally, to enable undo/redo support for your data stores simply create a Robo.Manager instance and configure it with your stores:

var yourStore1  = new Ext.data.Store({ ... });
var yourStore2  = new Ext.data.TreeStore({ ... });

var robo        = new Robo.Manager({
    stores : [ yourStore1, yourStore2 ]
});

// start monitoring
robo.start();

Then somewhere in your user interface, you could add two buttons to invoke undo/redo:

// some toolbar config
tbar    : [
    { xtype : 'roboundobutton', robo : robo },
    { xtype : 'roboredobutton', robo : robo }
]

That’s all! At least for simple cases where there’s no additional data processing and recalculation. For more complex cases please consult our Getting started guide, which explains the possibly required code adaptations.

Well tested

As with all our products, the Siesta test suite ships with the product. To assure Robo works in even extreme situations, we added a serious stress test which tests both flat Stores as well as TreeStores. In the test, a number of data stores are added to an Undo Manager and 30 random CRUD actions are performed on those stores. After actions are completed, the test first undoes and then redoes all the actions and verifies that all stores are in a correct state.

Whats next?

We encourage you to try the Robo examples or download a trial and give Robo a try with your application. As always, your feedback is very welcome in our forum.

We hope you will find the Robo product useful!

Using Ext Gantt & Scheduler 4.x with Sencha Cmd

$
0
0

Lately we have received a few questions from our community on how to use the shipped Bryntum packages with Sencha Cmd. For a while now, both the Gantt and Scheduler distributions ship with ready to use Sencha Cmd packages. They are located in the “packages” sub-folder inside each file archive. To use the packages in your application you need to execute two basic steps:

  1. 1. Install the packages.
  2. 2. Configure your application to use them.

Installing the packages

To do this you need to proceed to the “packages” sub-folder and install the “*.pkg” files by running the following command:

sencha package add *.pkg

Note: as an alternative, you can manually create folders for every pkg-file in the “packages” folder of the workspace the application belongs to (if you use a workspace), or in the “packages” folder of the application. Simply unzip the pkg-files into the created folder. Make sure the folder names match package names. For example, if you’re installing “bryntum-gantt-pro.pkg” you need to create a “bryntum-gantt-pro” folder and unpack “bryntum-gantt-pro.pkg” contents there.

Configure an application to use packages

After the packages are installed, you need to configure your application to use them. To do this you need to edit the application “app.json” file and add the package names to the “requires” section.

This is how it might look for the Gantt Pro:

{
            "name" : "MyApp",
            "theme": "ext-theme-neptune",

            ...

            "requires" : [
                // the gantt and its theme
                "bryntum-gantt-pro",
                // since the application uses extjs neptune theme
                // we use corresponding theme package for the gantt
                "bryntum-gantt-pro-neptune"
            ],

            ...
        }

Universal applications

Please note that if your application is universal (made to support both “classic” and “modern” Sencha toolkits), you need to add the packages to the “requires” section in the “classic” section. Since our Cmd packages only support the “classic” toolkit at the moment, this is how you should configure a universal app:

/**
     * Settings specific to classic toolkit builds.
     */
    "classic": {
        "requires": [
            // the gantt and its theme
            "bryntum-gantt-pro",
            // since the application uses extjs neptune theme
            // we use corresponding theme package for the gantt
            "bryntum-gantt-pro-neptune"
        ],
        ...

Theming note

In the above “app.json” snippets, the “bryntum-gantt-pro-neptune” package provides “Neptune” ExtJS theme support for the Gantt Pro. It is not a real Sencha Cmd theme, this is why it’s added to the “requires” and not to the “theme” option.
At the moment four ExtJS themes are supported: “Classic”, “Neptune”, “Crisp” and “Triton” – simply pick the corresponding package for the theme you want to use.

Launching the application

After the above two steps your application can be launched in development mode by running the following command from the application folder:

sencha app watch

And checking how it looks in your browser: http://localhost:1841/your-application-name/

Using a trial version with Sencha Cmd

Our trial version doesn’t include a Sencha Cmd package. So to use our trial with Sencha Cmd you need to use another approach. Here is a short description on how to turn the advanced example shipped with the Gantt Pro trial into a Sencha Cmd application.

Downloading the Bryntum trial pack

First you need to download the Bryntum trial archive from the Bryntum website. Then just unpack it to a temporary folder. The trial archive has three sub-folders:

  1. - gantt-4.*-trial
  2. - gantt-pro-4.*-trial
  3. - scheduler-4.*-trial

Note: From here on, “trial folder” refers the Gantt Pro folder (“gantt-pro-4.*-trial”).Proceed to the workspace folder and create an application:

sencha generate app -classic -ext Gnt.examples.advanced advanced

Where Gnt.examples.advanced is the real namespace used in the advanced example code.

Copying the example content

We’re almost there, now we need to copy the advanced example content into the generated app by following these steps:

  1. 1. Remove the new application “app” folder and “app.js” file (we already have them in the advanced example).
  2. 2. Copy the “app” folder and “app.js” file from the “example/advanced” folder inside the trial folder.
  3. 3. Copy the dummy example data file “load.json” from the “example/advanced/data” folder in the trial folder to the application “resources” folder.
  4. 4. Edit the “app/crud/CrudManager.js” file (in the application folder) to use the new “load.json” location:
  5. load : {
        method      : 'GET',
        paramName   : 'q',
        url         : 'resources/load.json'
    },

  6. 5. Copy the example stylesheets. To do this, copy the example “resources” folder to the application folder. And edit “app.json” and add this info to “css” section:
  7. {
        "path": "resources/app.css"
    }

Adding the Gantt chart to the application

1. In the new application folder, create a “gantt” sub-folder. Copy “gnt-all.js” and the “js” folder from the trial folder into it. The “gantt” folder will now have the following look:

code

2. In the new application folder, proceed to the “resources” folder and create a “gantt” sub-folder there. Copy “resources/css” and “resource/images” folders from the trial folder to that folder. The “resources” folder will now have the following content:

resources

3. Now we need to let Sencha Cmd know of the location of the Gantt classes. To do this edit “app.json” file and add a “gantt” sub-folder to its “classpath” section:

"classpath": [
        "app",
        "gantt"
    ],

4. We also need to let Sencha Cmd know where to get the Gantt stylesheets. To do this edit the “app.json” file. Modify its “css” section this way:

{
    "path": "resources/gantt/css/sch-gantt-triton-all.css"
}

Note: you should add this stylesheet before the example one (to make sure the application specific styles always “win”). Here is an example of how the “css” section might look:

"css": [
            {
                // this entry uses an ant variable that is the calculated
                // value of the generated output css file for the app,
                // defined in .sencha/app/defaults.properties
                "path": "${build.out.css.path}",
                "bundle": true,
                "exclude": ["fashion"]
            },
            {
                "path": "resources/gantt/css/sch-gantt-triton-all.css"
            },
            {
                "path": "resources/app.css"
            }
        ],

After the above steps the application should start working in development mode. Try it by launching this command in the application folder:

sencha app watch

Now you can open this in your browser and see how it looks by visiting http://localhost:1841/advanced/

Tips & Tricks: Animating Your Ext.DataView

$
0
0

If a data field in your Ext.data.Model has a visual representation in your View, such as the % complete of a progress bar, it is preferable to be able to do a “smart diff” of the rendered markup. By default the Ext.DataView replaces the entire DOM structure representing a Model when a Store change is detected. Doing a smart diff means traversing the DOM structure of a View item and only updating changed attributes such as style, CSS classes and text content. This opens up the door to using CSS transitions such as what you see in this animated GIF.

anim

Let’s say we have a data view rendering items consisting of DIVs of different width. To control the item width, we embed a ‘percentDone’ field found in our example Model. Now when this value changes we would like the DIV to change width using a CSS animation. To add this capability to the data view, we override the onUpdate method as seen below. Please note that it is private, and the syncContent method is too. So take into account that these methods may change or be removed completely in future Ext JS versions.

Ext.define('MyDataView', {
    extend   : 'Ext.DataView',
    
    tpl      : '
Some content here
', // Enable smart diff update of the Task HTML contents onUpdate : function (store, record, operation, modifiedFieldNames) { var fragment = document.createElement('div'); var currentNode = this.getNode(record); var selModel = this.getSelectionModel(); this.tpl.overwrite(fragment, this.collectData([record])); Ext.fly(currentNode).syncContent(fragment.firstChild); selModel.onUpdate(record); if (selModel.isSelected(record)) { this.onItemSelect(record); } } });

Anytime you update the percentDone field in the Model in the sample data view above, it will be animated by using CSS3 animations:

.myprogressbar {
    background : #ccc;
    height     : 100%;
    /* Yay CSS animations */
    transition : width 0.3s;
}

Thanks to Nige for helping, happy hacking!

Disabling Animations In Your Siesta Tests

$
0
0

While testing your web application frontend, it’s key to have stable tests producing consistent results. This means rerunning a test multiple times under varying CPU load should always give a reliable predictable outcome. Animated CSS transitions and JS based animations are two things that could introduce instability for your UI tests such as race conditions while the mouse cursor is being moved.

Below is a simple example expanding an Ext.Panel (which uses JS animations) and after that a button is clicked which trigger a DIV to change size (using CSS transitions). Notice that the cursor is first waiting for the Ext.Panel to expand before moving the mouse to the next button. After the second click, the cursor tries to target the DIV while it’s in transition. Siesta detects this and retries the action after a short delay. It’s obviously better to not rely on this ‘retargeting’ technique, and instead have a stable app running with as little asynchronicity as possible.

anim

For maximum stability (and speed) in your tests, you can easily disable your CSS transitions by adding a simple extra preload:

preload : [
    'app.js',
    'app-all.css',
    {
        type    : 'css',
        content : '* { transition: none !important; }'
    }
]

Similarly you can turn off Ext JS animations by overriding your used Ext classes like this:

Ext.dd.DragSource.override({
        animRepair : false
    });

    Ext.panel.Panel.override({
        animCollapse : false
    });

See below the same test code as above run without animations enabled.

noanim

Hope you found these tips helpful, and happy testing!

Using Ext Gantt with Ruby on Rails

$
0
0

My name is Johan and I’ve just started working at Bryntum after working with Ext JS for about 8 years at my previous job. During my first week there was a forum post requesting a Ruby on Rails demo which I decided to build. This blog post contains a guide that explains the basics of integrating Ext Gantt with RoR. The guide shows step by step how to set up an application from scratch. At the end of the guide you should have an application looking something like this:
RoR-demo

Assumptions

This guide assumes that you already have Rails installed and know how to use it. If you need help getting started with Rails, there is an excellent guide over at http://guides.rubyonrails.org/getting_started.html.

Create an application

Open a terminal and type this in the folder where you want to create your application:

$ rails new gantt

You should now have a folder named gantt containing a brand new Rails application.

Create a data layer

Add models & data

Ext Gantt has five different kinds of stores: resources, assignments, dependencies, calendars and tasks. In this guide we are creating a basic application and will only be using tasks and dependencies. We need a model representing each of these entities. Use the Rails generator (in the root of the gantt folder) to create the models with fields as shown below:

$ bin/rails generate model Task Name:string StartDate:datetime Duration:integer DurationUnit:string ParentId:integer
$ bin/rails generate model Dependency From:integer To:integer Type:integer

Now let’s create the corresponding tables in the database, by running a migration:

$ bin/rake db:migrate

And finally we seed some data by pasting the following into db/seeds.rb:

Task.create([
    {Name: 'Investigation', StartDate: DateTime.parse('2017-01-01'), Duration: 8, DurationUnit: 'd'},
    {Name: 'Meetings', StartDate: DateTime.parse('2017-01-01'), Duration: 8, DurationUnit: 'd', ParentId: 1},
    {Name: 'Meeting 1', StartDate: DateTime.parse('2017-01-01'), Duration: 2, DurationUnit: 'd', ParentId: 2},
    {Name: 'Meeting 2', StartDate: DateTime.parse('2017-01-04'), Duration: 2, DurationUnit: 'd', ParentId: 2},
    {Name: 'Specs', StartDate: DateTime.parse('2017-01-06'), Duration: 4, DurationUnit: 'd', ParentId: 1},
    {Name: 'Implementation', StartDate: DateTime.parse('2017-01-12'), Duration: 10, DurationUnit: 'd'},
    {Name: 'Database', StartDate: DateTime.parse('2017-01-12'), Duration: 3, DurationUnit: 'd', ParentId: 6},
    {Name: 'Code', StartDate: DateTime.parse('2017-01-17'), Duration: 6, DurationUnit: 'd', ParentId: 6},
    {Name: 'Docs', StartDate: DateTime.parse('2017-01-25'), Duration: 1, DurationUnit: 'd', ParentId: 6},
])

Dependency.create([
    {From: 3, To: 4, Type: 2},
    {From: 4, To: 5, Type: 2},
    {From: 7, To: 8, Type: 2},
    {From: 8, To: 9, Type: 2}
])

And then seed by running:

$ bin/rake db:seed

Add controllers

The controllers will be called using AJAX from our JavaScript code to fetch data for Ext Gantt. The application created in this guide is read only, which means that we only need index  & show actions in the controllers. Generate a controller per model by running:

$ bin/rails generate controller Tasks index show
$ bin/rails generate controller Dependencies index

Implement models and controllers

When we generated the controllers, Rails also generated corresponding views for each controller and action. We want the controllers to supply data in JSON-format directly, we do not need the views. Remove app/views/tasks and app/views/dependencies.

Now let’s implement the models, starting with app/models/task.rb:

class Task < ActiveRecord::Base
  # a task can have many subtasks (children)
  has_many :children, :class_name => 'Task', :foreign_key => 'ParentId'
  # it might also belong to a parent task (if it is a subtask)
  belongs_to :parent, :class_name => 'Task', :foreign_key => 'ParentId'

  # root nodes (ParentId is null) as json tree
  def self.get_root_tree
    roots = Task.where('"tasks"."ParentId" IS NULL')
    {
        :success => true,
        :children => Task.json_tree(tasks)
    }
  end      

  # as json tree   
  def self.json_tree(tasks)     
    tasks.map do |task|       
    {           
      :Id => task.id,
      :Name => task.Name,
      :StartDate => task.StartDate,
      :Duration => task.Duration,
      :DurationUnit => task.DurationUnit,
      :leaf => task.children.count() == 0,
      :expanded => true,
      :children => task.children.count() == 0 ? nil : Task.json_tree(task.children)
     }
   end
 end
end

And then app/models/dependencies.rb:

class Dependency < ActiveRecord::Base
  # as json with desired fields
  def self.json(deps)
    deps.map do |dep|
      {
          :Id => dep.id,
          :From => dep.From,
          :To => dep.To,
          :Type => dep.Type
      }
    end
  end
end

This goes into TasksControllers index action  (app/controllers/tasks_controller.rb):

# fetch root tasks (ParentId is null) as json-tree
tree = Task.get_root_tree
# render (send to client)
render :json => tree

And this goes into show:

# ExtJS TreeStore requests root node as 'root'
if params[:id] == 'root'
  # act as if index was called
  index
else
  # fetch single task
  task = Task.find(params[:id])
  render :json => task.to_json
end

And in the index action of DependenciesController (app/controllers/dependencies_controller.rb):

# fetch all dependencies from database
dependencies = Dependency.all
# render as json (send to client)
render :json => Dependency.json(dependencies)

Almost ready to test our data layer, the only thing missing is routes. Add the following to routes.rb:

resources :tasks
resources :dependencies

Also remove any routes to views (get ‘tasks/index’ and get ‘dependencies/index’).

Test the data layer

If you haven’t done it already, start your web server (or use the Rails internal one, run bin/rails server). If you visit /tasks you should see the following JSON response:

{"success":true,"children":[{"Id":1,"Name":"Investigation","StartDate":"2017-01-01T00:00:00.000Z","Duration":8,"DurationUnit":"d","leaf":false,"expanded":true,"children":[{"Id":2,"Name":"Meetings","StartDate":"2017-01-01T00:00:00.000Z","Duration":8,"DurationUnit":"d","leaf":false,"expanded":true,"children":[{"Id":3,"Name":"Meeting 1","StartDate":"2017-01-01T00:00:00.000Z","Duration":2,"DurationUnit":"d","leaf":true,"expanded":true,"children":null},{"Id":4,"Name":"Meeting 2","StartDate":"2017-01-04T00:00:00.000Z","Duration":2,"DurationUnit":"d","leaf":true,"expanded":true,"children":null}]},{"Id":5,"Name":"Specs","StartDate":"2017-01-06T00:00:00.000Z","Duration":4,"DurationUnit":"d","leaf":true,"expanded":true,"children":null}]},{"Id":6,"Name":"Implementation","StartDate":"2017-01-12T00:00:00.000Z","Duration":10,"DurationUnit":"d","leaf":false,"expanded":true,"children":[{"Id":7,"Name":"Database","StartDate":"2017-01-12T00:00:00.000Z","Duration":3,"DurationUnit":"d","leaf":true,"expanded":true,"children":null},{"Id":8,"Name":"Code","StartDate":"2017-01-17T00:00:00.000Z","Duration":6,"DurationUnit":"d","leaf":true,"expanded":true,"children":null},{"Id":9,"Name":"Docs","StartDate":"2017-01-25T00:00:00.000Z","Duration":1,"DurationUnit":"d","leaf":true,"expanded":true,"children":null}]}]}

And /dependencies should yield:

[{"Id":1,"From":3,"To":4,"Type":2},{"Id":2,"From":4,"To":5,"Type":2},{"Id":3,"From":7,"To":8,"Type":2},{"Id":4,"From":8,"To":9,"Type":2}]

Create and serve Ext Gantt

Time for the JavaScript part of the example. We need to setup ExtJS and Ext Gantt, create a JavaScript application and have it served through rails. Lets begin by creating a start page for the application.

Create a start page

When Rails created our application it made a default ApplicationController which we can use to serve a start page. A layout was also generated at app/views/layout/application.html.erb. Edit it to contain the following:

<!DOCTYPE html>
<html>
<head>
  <title>RoR</title>
  <!--Ext and Gantt styles (using triton theme) -->
  <link href="http://www.bryntum.com/examples/extjs-6.0.1/build/classic/theme-triton/resources/theme-triton-all.css" rel="stylesheet" type="text/css"/>
  <link href="http://www.bryntum.com/examples/gantt-latest/resources/css/sch-gantt-triton-all.css?ver=4.2.1" rel="stylesheet"/>
  <!--Ext and Gantt scripts -->
  <script src="http://www.bryntum.com/examples/extjs-6.0.1/build/ext-all.js" crossorigin="anonymous" type="text/javascript"></script>
  <script src="http://www.bryntum.com/examples/extjs-6.0.1/build/classic/theme-triton/theme-triton.js" type="text/javascript"></script>
  <script src="http://www.bryntum.com/examples/gantt-latest/gnt-all-debug.js?ver=4.2.1" type="text/javascript"></script>
  <!-- Scripts and styles injected by Rails -->
  <%= stylesheet_link_tag    'application', media: 'all', 'data-turbolinks-track' => true %>
  <%= javascript_include_tag 'application', 'data-turbolinks-track' => true %>
  <%= csrf_meta_tags %>
</head>
<body>
<%= yield %>
</body>
</html>

Add a view at app/views/application/index.html.erb. The HTML for our JavaScript application will be generated dynamically (by ExtJS and Ext Gantt), so leave the view empty :)

Now add a route (in routes.rb) to make it the start page:

root 'application#index'

Create the JavaScript application

Add a JavaScript file under app/assets/javascripts called gantt.js. Put the following code in it:

Ext.onReady(function () {
    // Create Gantt panel including stores
    var gantt = Ext.create('Gnt.panel.Gantt', {
        title           : 'Ruby on Rails',
        rowHeight       : 40,
        loadMask         : true,
        viewPreset       : 'weekAndDayLetter',
        readOnly: true,

        columns: [{ xtype: 'namecolumn', width: 200}],

        // Stores use rest-proxy to match RoR
        taskStore: Ext.create('Gnt.data.TaskStore', {
            proxy: { type: 'rest', url : '/tasks' }
        }),

        dependencyStore: Ext.create('Gnt.data.DependencyStore', {
            autoLoad: true,
            proxy   : { type: 'rest', url : '/dependencies' }
        })
    });

    // A viewport to fill the entire page
    var viewport = Ext.create('Ext.container.Viewport', {
        layout: 'fit',
        items : [ gantt ]
    });

    Ext.QuickTips.init();
});

Add some style

Almost done, we only need a tiny bit of css to make Ext Gantt look as intended. Add gantt.css to app/assets/stylesheets and enter the following:

.sch-ganttpanel .x-grid-cell {
    height : 35px;
}

That’s it

All done, visit the root of your webserver to see the example in action. You can also view the finished example here and download the source (in the Details panel to the right).

Happy hacking!

Viewing all 370 articles
Browse latest View live