At Bryntum we strongly believe in running our tests frequently. Doing so allows us to rapidly develop and debug tests without involving a real browser. As mentioned in previous posts, we use the awesome PhantomJS for this since it is really really fast. Since we don’t care at all about the Siesta UI for tests launched from the command line, we can use a simpler version of the HTML harness file. The default harness usually looks like below:
As you can see, it is loading the full Ext JS library which includes a 240 KB CSS file and a 1.3 MB JS file. This slows down the test start and consumes unnecessary memory. For our in-IDE testing we instead use this ‘index-no-ui.html‘ HTML harness file:
This is the absolute minimum for us to be able to run a test on the command line. Hopefully you can use the same trick to save a second or too each time you want to run a single test in your IDE. This trick is applicable any time you are running automated tests that should not involve the Siesta UI.
Recently Sencha released the third version of their build tools, now named ‘Sencha Cmd’. Compared to the previous editions, Sencha Cmd adds much more functionality (take notice, that Cmd works only with Ext 4.1.1a/Sencha Touch 2.1b3, or higher). For a complete list of new features and a thorough installation guide please consult Sencha’s guide. In this post we will focus on the build/refresh commands which are used to organize a JavaScript application (and its resources) in a more optimized server-suitable form.
Creating the application
Let’s start with creating a simple project. Since Sencha Cmd requires application to use MVC-architecture, first make sure you’re familiar with this concept in ExtJS.
Running this command will give us a basic MyApp application structure. The next step is to copy the Sch folder from our Scheduler SDK to your application libraries folder. Now we’ll have to add path to the sources copied a moment ago to the application config file which will tell the compiler where to look for the dependency classes. Open .sencha/app/sencha.cfg with your editor and add the correct path there (either an absolute path or path to lib folder. Note that there can’t be any spaces between the paths) :
app.classpath=${app.dir}/app,${app.dir}/lib/Sch
Then we’ll have to modify the index.html imports to help the Cmd engine to understand our setup. Open the file and modify the page header adding the following imports in x-bootstrap tags :
At this point we can start building our application, starting by defining stores, views and controllers in the app.js file or adding them from the command line with Cmd. A sample MVC project can be found in our SDK examples folder.
Building the application
When the application structure is ready we can build it with Cmd :
sencha app build
After the operation has finished we should get a new directory named after our application in the build folder. During the development phase we need to run another Cmd command – refresh – each time we add, rename or remove a class :
sencha app refresh
Refresh will update the metadata file “bootstrap” containing data for the dynamic loader and class system.
Summing it up
We hope that this post will let you get started with building applications using Sencha Cmd along with our products. Additional information and a Cmd-ready ‘mvc’ sample example can be found in our Ext Scheduler SDK.
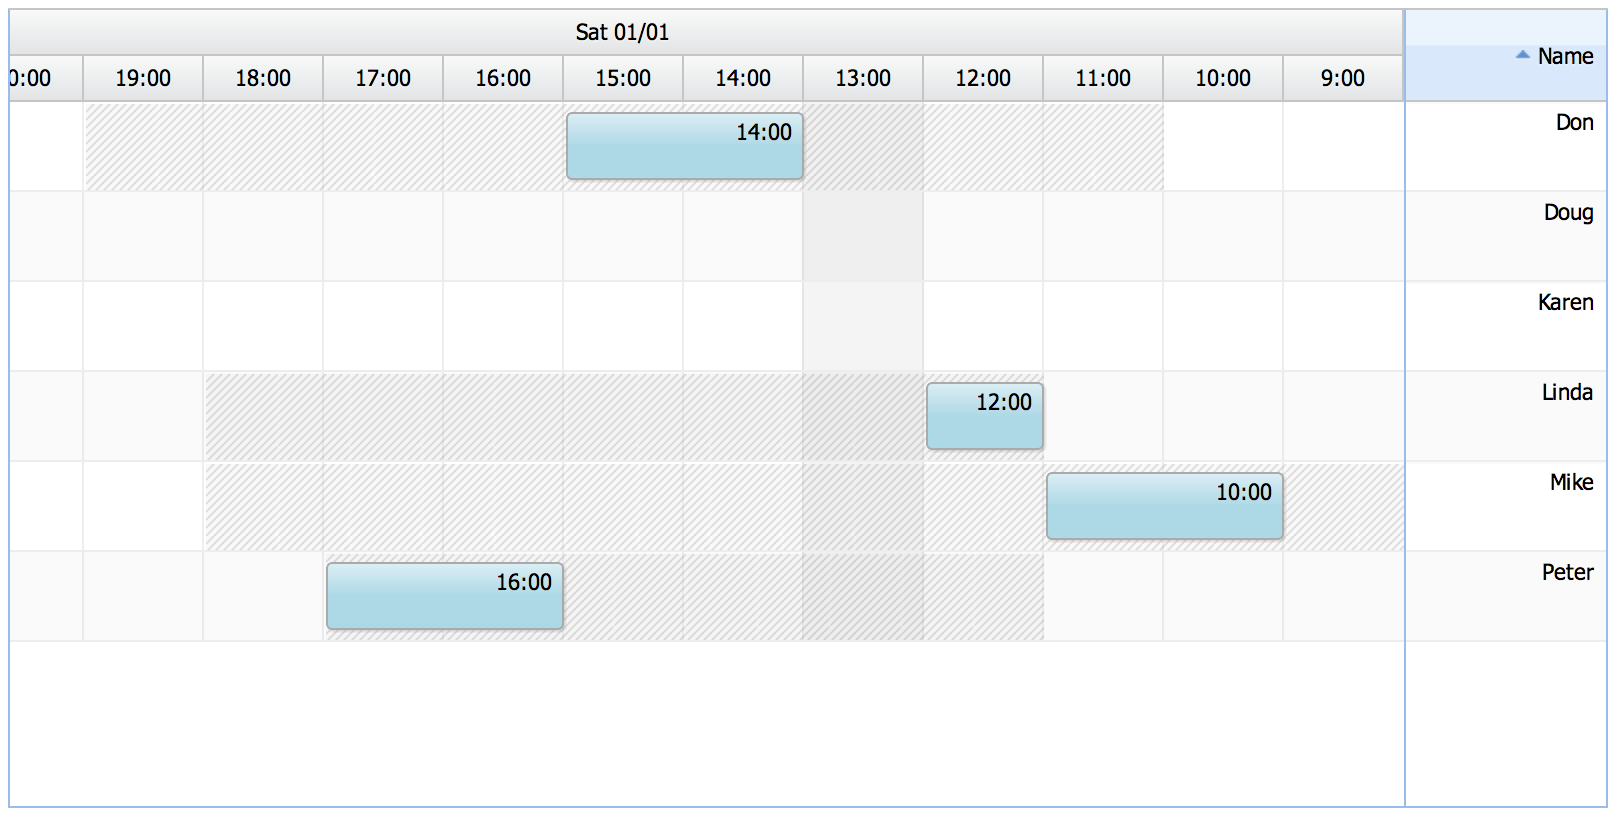
We are very happy to announce the 1.0 version of our new Touch Scheduler. The first release is based on Sencha Touch 2.1 and comes with several implementation samples and a Siesta test suite. The component is currently compatible with the same mobile browsers supported by Sencha Touch and we have tested it on iPad 1/2/3, Nexus 7, iPhone 4, BlackBerry PlayBook and Samsung Galaxy Tab. As soon as Windows Phone 8 support lands in Sencha Touch, we’ll support it as well.
Under the hood, the scheduler is built on top of a new grid panel implemented for Sencha Touch (codename UberGrid) which will be featured in an upcoming blog post soon. It supports any number of individually locked and scrollable sections, as well as sorting and buffering. Keep an eye out on our blog or Twitter account for more information of its release date.
Features
The Touch Scheduler user interaction is a bit different from the desktop version. Since there is no mouse or scroll-wheel, the UI must be driven by simple touch interactions such as tap, tap-hold, pinch and swipe. We have ported most of the core scheduling functionality over to the touch version and we think you will find quite a bit of interesting features:
Moving a task
Tap and hold still until you see it becoming slightly transparent.
Resizing a task
Use two fingers to pinch or spread.
Creating a task
Tap and hold on an empty place in the schedule.
Changing row height
Use two fingers to pinch vertically in the schedule area.
Zooming the time axis
Use two fingers to pinch horizontally in the schedule area.
Moving along the time axis
Scroll using one finger.
It is also very easy to extend the component to add new functionality. There is a rich API allowing you to control the component programmatically (much of it is shared with the Ext Scheduler). With the event driven architecture, you can easily be notified of various events happening in the schedule – ‘eventtap’, ‘timeheadertap’, ‘schedulelongpress’ etc. Additionally, since the component is built upon Sencha Touch you can make full use of its toolbars, form components and charts to build custom editors or other visualizations of the store data.
Implementation details
If you’re already familiar with the Ext Scheduler, implementing the Touch version will be very simple. Essentially, you only have to load two data stores and plug those into the component at instantiation time. Below is a simple script which renders a basic scheduler:
Ext.setup({

    onReady : function () {
        var resourceStore = new Sch.data.ResourceStore({
            data : [
                { Id : 1, Name : 'Mike' }
            ]
        })

        var eventStore = new Sch.data.EventStore({
            data : [
                {
                    Id         : 1,
                    ResourceId : 1,
                    Name       : 'Some task',
                    StartDate  : '2013-01-01',
                    EndDate    : '2013-01-03'
                }
            ]
        });

        var scheduler = new Sch.panel.SchedulerGrid({
            viewPreset      : 'hourAndDay',
            startDate       : new Date(2013, 0, 1),
            endDate         : new Date(2013, 0, 3),

            rowHeight       : 65,
            barMargin       : 3,
            resourceStore   : resourceStore,
            eventStore      : eventStore,

            eventRenderer   : function (event) {
                return event.getName();
            },

            columns : [
                {
                    header    : 'Name',
                    dataIndex : 'Name',
                    width     : 200
                }
            ]
        });

        Ext.Viewport.add(scheduler);
    }
});
If you are new to our components or Sencha Touch, don’t worry – here are some good resources to get you started:
You can download a trial version or check out some of the live examples on our new site. To try the live samples, you need to use a WebKit-based browser such as Chrome or Safari for now. We have also updated our forum with a new section for the Touch Scheduler. If you have any feedback, please leave a comment or join our community forums and let us know.
It was recently brought to our attention that Siesta performed poorly if you had a test producing several hundred assertions. We did a quick investigation and found that the Ext JS grid was doing a re-layout of the grid everytime a new assertion record was added to the store. This meant loads and loads of code was being executed for no reason. We’ve now put a fix in place, and more importantly – a test to prove this doesn’t happen again. Here’s how we did it:
First we wrote a simple test to detect this bug by counting the amount of layouts performed in the entire Siesta UI before and after manipulating the UI. You can also use tests like this one in your Sencha applications to make sure your containers aren’t doing too many expensive layout cycles. Note that we’re actually testing and rendering an entirely new and sandboxed copy of Siesta inside of Siesta.
StartTest(function(t) {
    // This starts a new Siesta instance in the test iframe
    t.getHarness([
        '601_siesta_ui_failing.t.js'
    ]);

    t.diag('Verify no layouts occur due to assertions added to a store');

    var before = 0;
    var after = 0;

    t.chain(
        { waitFor : 'rowsVisible', args : 'testgrid' },

        // Make sure UI is loaded, rendered and ready
        { waitFor : 1000 },

        function(next) {
            Ext.each(Ext.ComponentQuery.query('container'), function(c) {
                before += c.layoutCounter;
            });

            // Adding an assertion should not cause a relayout
            var grid = Ext.ComponentQuery.query('assertiongrid')[0];
            grid.store.add(new grid.store.model());

            // Updating a test record should not cause a relayout
            var testgrid = Ext.ComponentQuery.query('testgrid')[0];
            testgrid.getRootNode().firstChild.set('title', 'foo');

            Ext.each(Ext.ComponentQuery.query('container'), function(c) {
                after += c.layoutCounter;
            });

            t.is(after, before, 'No additional layouts caused');
        }
    );
});
Below is the patch added to the AssertionGrid class, which prevents an internal method from being called (ultimately triggering a relayout):
This patch will be included in the next release and should speed up your test suite when you use the Siesta UI. Thanks to Brian Moeskau at Extensible for pointing this out to us!
This is a re-blog of a great recent blog post by Brian Moeskau at Extensible.
JavaScript makes it incredibly easy to create global variables accidentally, which is inefficient and can also lead to very hard-to-debug bugs later. Simply omit the var keyword before a variable assignment, and you’ve inadvertently leaked a variable by defining it in the window scope.
Detecting Leaks with Siesta
Siesta, an awesome general-purpose unit and UI testing tool, includes a handy feature that allows you to automatically check for unexpected globals added during test runs. When setting up your test harness, you simply enable monitoring and define any expected globals like so:
If anything unexpected shows up in global scope during testing it gets flagged as a test failure — awesome!
However, tracking down the offending code can sometimes be tricky. The simple approach is to search in your project for instances of variable assignment. If you are leaking a variable named foo, a search on “foo =” will likely locate the problem code pretty quickly. In my case, I was leaking a variable named el, which is only assigned about a bazillion times in Extensible. My initial search returned a ton of matches, so it was time to think of something quicker.
Locating any Leak Instantly
A cool trick you can do in JavaScript is to override getter and setter functions (in modern browsers at least, I’m using Chrome). Thinking about it, adding a global is really the same thing as “setting a property” on the built-in window object, so I figured you should be able to do something like this:
I threw that into the top of my test case and refreshed, and instantly the browser paused in the console right on the debugger; line. Looking at the previous line in the stack trace showed me this lovely piece of code in the calendar’s Month view:
if (el = e.getTarget(this.moreSelector, 3)) {
Oy. I don’t write code like that any more, but this was a holdover from several years ago that simply never got noticed before. A simple fix that literally took seconds to find with this handy little hack.
Don’t Forget to Remove Your Hack
One gotcha that took a few minutes for me to realize… this hack itself, by defining the setter function, is effectively adding the exact same property to the global scope (you end up with a property called window.el by doing this). So Siesta will still see window.el after the test and register a failure, but if you’ve fixed the actual bug, the debugger; line will no longer be hit. This was momentarily confusing, but once I realized what was happening and simply removed my temporary setter override, everything worked with no errors.
The Ext Gantt chart deals with a lot of observable data stores: Tasks, Dependencies, Assignments, Resources etc. A typical view component will observe its data stores and react to their changes. When building a view component that consumes data from one or more stores, it’s important to remember to de-register any store listeners in the Component destructor. If you don’t, you can end up with hard-to-trace errors after creating multiple views using the same store. Another common case where this happens is if you have a view component in a window that can be destroyed/closed. Once it’s re-opened, a new component instance is created and is tied to the same original data store. Consider this simple piece of code.
var taskStore = new Gnt.data.TaskStore();

var gantt = new Gnt.panel.Gantt({
    taskStore : taskStore
});

var gantt2 = new Gnt.panel.Gantt({
    taskStore : taskStore
});

gantt.destroy();

taskStore.getById(123).set('Name', 'Foo');
If the task store listeners aren’t cleaned up properly in the Gantt chart destructor, then code may be triggered in the first Gantt panel instance by a store listener even though the panel itself is destroyed. These errors are often tricky to debug and a good idea is to test this, it’s even quite easy. This is what we use for our tests to make sure we don’t ‘leak’ any listeners.
StartTest(function(t) {
    t.diag('Gantt not rendered');

    var assignmentStore = t.getAssignmentStore();
    var resourceStore = t.getResourceStore();
    var dependencyStore = t.getDependencyStore();

    var taskStore = t.getTaskStore({
        dependencyStore : dependencyStore,
        resourceStore   : resourceStore,
        assignmentStore : assignmentStore
    });

    t.snapShotListeners(taskStore, 'taskStore');
    t.snapShotListeners(taskStore.nodeStore, 'nodeStore');
    t.snapShotListeners(dependencyStore, 'dependencyStore');
    t.snapShotListeners(resourceStore, 'resourceStore');
    t.snapShotListeners(assignmentStore, 'assignmentStore');

    var g = t.getGantt({
        taskStore       : taskStore,
        assignmentStore : assignmentStore,
        resourceStore   : resourceStore,
        dependencyStore : dependencyStore
    });

    // Should clean all listeners
    g.destroy();

    t.verifyListeners(taskStore,  'taskStore', 'Listeners cleaned up on taskStore');
    t.verifyListeners(assignmentStore,  'assignmentStore', 'Listeners cleaned up on assignmentStore');
    t.verifyListeners(dependencyStore,  'dependencyStore', 'Listeners cleaned up on dependencyStore');
    t.verifyListeners(resourceStore,  'resourceStore', 'Listeners cleaned up on resourceStore');
    t.verifyListeners(taskStore.nodeStore,  'nodeStore', 'Listeners cleaned up on nodeStore');

    t.diag('Gantt rendered then destroyed');

    g = t.getGantt({
        renderTo        : Ext.getBody(),
        columnLines     : true,
        taskStore       : taskStore,
        assignmentStore : assignmentStore,
        resourceStore   : resourceStore,
        dependencyStore : dependencyStore
    });

    g.destroy();

    t.verifyListeners(taskStore,  'taskStore', 'Rendered: Listeners cleaned up on taskStore');
    t.verifyListeners(assignmentStore,  'assignmentStore', 'Rendered: Listeners cleaned up on assignmentStore');
    t.verifyListeners(dependencyStore,  'dependencyStore', 'Rendered: Listeners cleaned up on dependencyStore');
    t.verifyListeners(resourceStore,  'resourceStore', 'Rendered: Listeners cleaned up on resourceStore');
    t.verifyListeners(taskStore.nodeStore,  'nodeStore', 'Rendered: Listeners cleaned up on nodeStore');
});
Above you can see that we verify that no listeners are left for 5 different stores, both when not rendering the panel and when rendering the panel (as we shouldn’t assume when the listeners are added). In our TestClass for Siesta we have added these two useful methods for Observables:
Class('Bryntum.Test', {

    isa: Siesta.Test.ExtJS,

    methods: {

        snapShotListeners : function(observable, name) {
            this._observableData = this._observableData || {};

            if (!name) throw 'Must provide a name for the observable';

            this._observableData[name] = this.global.Ext.apply({}, observable.hasListeners);

            // Delete new Ext JS 4.2 properties
            if ('_decr_' in this._observableData[name]) {
                delete this._observableData[name]._decr_;
                delete this._observableData[name]._incr_;
            }
        },

        verifyListeners : function(observable, name, description) {
            var needListeners = this._observableData[name];

            this.isDeeply(observable.hasListeners, needListeners, description);
        }
    }
    // eof methods
})
We’re currently busy finalizing a major refactoring of our Ext Scheduler component which will be released as v2.2. There are two major reasons for this refactoring. First of all we needed to refactor to enable certain pieces of the core functionality to be shared with our Touch Scheduler. These bits of code relate to non-UI parts of the component, such as stores, models, utility classes etc. The second reason for the refactoring, was to future proof the component a bit and clean up as many Ext JS overrides as possible. With the recent Ext JS 4.2 beta releases, too many things broke that should not break.
Global Ext JS overrides
In the latest official version of Ext Scheduler, things are pretty much under control. There’s a large unit test suite covering loads of scenarios and the component is very stable. For example, we’re testing that no global variables are leaked. We also scan the entire Ext JS source tree to find any global overrides of the Ext JS library (a bad practice we used in older versions).
// Our Siesta suite will detect this and fail
Ext.grid.View.override({
   refresh : function() {
       // Do something else
   }
});
We don’t write code like this anymore. Override code like this introduces a lot of uncertainty and is just as bad as regular global variables. As a component maker, we should not make any changes to our ‘surroundings’. Thanks to our zero-tolerance test, any attempt to make a global Ext JS override will now break our build. You can check how the test is performed in our test named /tests/sanity/012_no_overrides.t.js .
Overriding private Ext JS methods
Another aspect of overrides is when you override a private method in a subclass (see code below). When faced with a tricky problem, this can be tempting since there is nothing stopping you in the world of javascript and Ext JS. But overriding non-public and non-documented methods will likely lead to problems, maybe not tomorrow – but at some point. It happened to us quite frequently with each new version of Ext JS we had to support. At too many places we had simply overwritten private Ext JS methods, whose implementations then changed slightly in newer releases.
// Overriding a private method of the superclass
Ext.define("Sch.mixin.TimelineGridView", {
    extend : 'Ext.grid.View',

    // We don't want Ext guessing if this row should be repainted or not
    // @OVERRIDE
    shouldUpdateCell : function() { return true; }
});
The snippet above looks harmless but it could very well lead to an issue if the shouldUpdateCell method is renamed or removed from the Ext GridView class. Overrides like this should be considered as the last resort to solve a particular problem. If there is a way to solve the issue by relying on the public Ext JS API instead it is definitely preferred. In real life applications, it’s hard to completely avoid doing such overrides though, so how do you best deal with these overrides? We already tried ignoring the overrides, and it turns out that ignoring a problem doesn’t really solve it.
Dealing with overrides
In our upcoming 2.2 version, each override of a private method is annotated with a // @OVERRIDE comment to warn anyone reading the code. If unit tests start breaking when we try a new version of Ext JS, those methods are prime candidates to review. This however is not enough, we can do better. I just wrote a simple Siesta unit test that will help us identify our weak spots as we upgrade to newer versions of Ext JS. It turned out to be very easy:
StartTest(function (t) {
    t.expectGlobal('Docs'); // JsDuck

    // Ignore some symbols that should be ignore + some bugs in the Ext docs
    var ignoreRe = /Ext.dd|DragZone.destroy|DragDrop.destroy|DragSource.destroy|Ext.grid.plugin.Editing.init|afterRender|initComponent|Ext.Base.configClass|Ext.Base.destroy/;

    var isPrivate = function(fullName) {
        var priv = false;

        Ext.Array.each(Docs.data.search, function(property) {

            if (property.fullName === fullName){
                priv = property.meta.private;
                return false;
            }
        });

        return priv;
    };


    function findInSuperClasses(sourceCls, property) {
        var cls = sourceCls.superclass.self;

        while (cls && cls.prototype) {
            var name = Ext.ClassManager.getName(cls);
            var fullName = name + '.' + property;

            if (name.match(/^Ext./) &&
                !ignoreRe.test(fullName) &&
                cls.prototype.hasOwnProperty(property))
            {
                if (isPrivate(fullName)) {
                    return name;
                } else {
                    return false;
                }
            }
            cls = cls.superclass && cls.superclass.self;
        }

        return false;
    }

    var MAX_NBR_OVERRIDES = 10;
    var nbrFound = 0;

    Ext.iterate(Ext.ClassManager.classes, function (className, constr) {
        if (!className.match('Sch.')) return;

        for (var o in constr.prototype) {

            // Check only own properties, and only functions for now
            if (constr.prototype.hasOwnProperty(o) && typeof constr.prototype[o] === 'function') {
                var result = findInSuperClasses(constr, o);

                if (result) {
                    t.todo(function(t) {
                        t.fail('Class ' + className + ' overrides ' + result + ':' + o);
                    })
                    nbrFound++;
                }
            }
        }
    });

    t.isLessOrEqual(nbrFound, MAX_NBR_OVERRIDES, 'Should not introduce new overrides of private methods');
});
The test isn’t 100% fool proof, you could still override classes at run time that won’t be detected by this test (though that is a very unusual practice). Running this test against the latest official Ext Scheduler release reports 65 overrides, which is waaaay too many. This is very clear proof and it explains why we’ve been experiencing painful upgrades. After our 2.2 refactorings, the result looks a lot better:
Launching PhantomJS 1.6.0 at http://lh/ExtScheduler/tests/index-no-ui.html

fail 1 - Class Sch.mixin.Lockable overrides Ext.grid.Lockable:constructLockablePlugins
fail 2 - Class Sch.mixin.Lockable overrides Ext.grid.Lockable:injectLockable
fail 3 - Class Sch.model.Customizable overrides Ext.data.Model:afterEdit
fail 4 - Class Sch.data.FilterableNodeStore overrides Ext.data.NodeStore:onNodeExpand
fail 5 - Class Sch.selection.EventModel overrides Ext.selection.Model:bindComponent
fail 6 - Class Sch.selection.EventModel overrides Ext.selection.Model:onSelectChange
fail 7 - Class Sch.plugin.TreeCellEditing overrides Ext.grid.plugin.CellEditing:onEditComplete
fail 8 - Class Sch.view.TimelineGridView overrides Ext.view.Table:shouldUpdateCell
fail 9 - Class Sch.view.TimelineGridView overrides Ext.view.View:processUIEvent

[FAIL]  sanity/017_override_scan.t.js?Ext=external
There are failures
We have now brought it down to 9 overrides, which is a lot more manageable. For an extremely small investment (the test took me < 1hr to write) we now have a very good overview of our component weak spots when it’s time for the next upgrade. As the 2.2 version relies a lot more on the public API, upgrading to and supporting new Ext JS versions should hopefully be much easier.
How do you deal with overrides in your application? Please share any tips you have in the comments section?
We just released the first 2.2 beta version in the CustomerZone. This release has quite a few changes due to some major refactorings mentioned in my previous post. To sum up, we adapted a lot of the code to be shared with our Sencha Touch version and we have also tried hard to eliminate as many private Ext JS overrides as possible. A few of the changes in this release may break backwards compatibility, depending on how you use our components. Here is the API Changes section of the 2.2-beta-1 changelog:
[API CHANGES]
– BREAKING: forceFit now defined on Panel, it was previously on the View. Compatibility patch installed.
– BREAKING: Removed Sch.util.HeaderRenderers class (should no longer be required).
– BREAKING: Removed Sch.view.Locking class.
– BREAKING: Inner panel is no longer an instance of our Sch.panel.SchedulerXXX classes, it is whatever Ext JS decides
(normally a regular Ext.grid.Panel)
– ‘aftereventdrop’ now includes the dragged records as a new argument
– Removed ‘useDragProxy’ option of Sch.feature.DragDrop
– Removed ‘Sch.feature.DragZone’ class
Let’s walk through this list, one by one!
forceFit now defined on Panel
This one is pretty self explanatory, the forceFit config option which makes sure all the time columns fit inside the viewport is now defined on the panel level, instead of the view.
For the sake of backwards compatibility, we look for the flag on the viewConfig, so this change isn’t really breaking but you should still change your code if you use this config option.
Removed Sch.util.HeaderRenderers
This class was introduced as a performance booster in a previous version when every time column was implemented as its own Ext.grid.Column. We now only use one Ext.grid.Column for the entire schedule, meaning there is no overhead in having many cells as it previously was and the need for this class is gone. If you still require it for some reason, you can still keep the copy from the 2.1 release, though it’s no longer supported officially.
Removed Sch.view.Locking class
This class previously subclassed the Ext.grid.LockingView and relayed events from the inner ‘normal’ view to the top view. From the top view, it was then re-relayed to the top panel. In 2.2, the scheduler panel relays the SchedulerView events directly and there is no longer any need to override this private Ext JS class.
Inner panel is no longer an instance of our Sch.panel.SchedulerXXX classes
This is a quite major change, but makes it a lot easier for us maintain our product. In 2.1 we were overriding internals of the GridPanel which is never a good thing. We no longer use our own panel class for any of the child grids. In 2.1, the SchedulerPanel consisted of a top SchedulerPanel, with a locked GridPanel + a normal SchedulerPanel (which had a SchedulerView). In 2.2, there is a main SchedulerPanel, with a locked GridPanel and a normal GridPanel. The normal grid panel is using a SchedulerView. This could potentially be an issue for you if you have written your own plugins which assumes that the previously nested SchedulerPanel existed. An example:
Ext.define("MyEditor", {
    extend      : "Ext.form.FormPanel",

    lockableScope : 'normal',

    init : function (grid) {

        // => ERROR! getSchedulingView is not a property of Ext.grid.Panel
        this.schedulerView  = grid.getSchedulingView();

        this.schedulerView.on({
            afterrender     : this.onSchedulerRender,
            destroy         : this.onSchedulerDestroy,
            dragcreateend   : this.onDragCreateEnd,

            scope           : this
        });

        ...
    },
For sake of backwards compatibility, we added an inline override to make sure the ‘getScheduling’ method exists on the GridView, but you should not rely on its existence (you might get other similar errors about missing methods on the GridPanel). To update your code and fix the issue above, you have two options.
1. Register the plugin in the ‘top’ panel scope.
Ext.define("MyEditor", {
    extend      : "Ext.form.FormPanel",

    lockableScope : 'top',  // Attach this plugin the 'top' panel which is the SchedulerPanel

    init : function (grid) {

        // => Works! getSchedulingView is a method of the SchedulerPanel
        this.schedulerView  = grid.getSchedulingView();

        ...
    },
2. Change to use ‘getView’ instead.
Ext.define("MyEditor", {
    extend      : "Ext.form.FormPanel",

    lockableScope : 'normal',

    init : function (grid) {

        // => Works! getView is a method of the GridPanel
        this.schedulerView  = grid.getView();

        ...
    },
Removed ‘useDragProxy’ option of Sch.feature.DragDrop
This option was introduced in the early days before we started using document.elementFromPoint for the drag drop implementation. All browsers support this reliably and this option should no longer be required.
Removed ‘Sch.feature.DragZone’ class
This class was introduced in the early days before we started using document.elementFromPoint for the drag drop implementation. If you rely on this class, you can still keep the source code from the previous version and maintain it – though it is no longer supported by us.
Please give us feedback
The refactorings we made for 2.2 will make a huge difference as we support newer Ext JS releases. We’re no longer overriding lots of private Ext JS internals and we have new unit tests to prove it. We have listed the breaking changes above and we hope we did not miss anything, if we did please let us know as soon as possible. We’re eager to hear about your experience and to get your feedback after you have upgraded to the new version. If you stumble upon any issues, please let us know by starting a thread in our forums.
You might have seen one of the sneak preview videos on YouTube about a collaborative demo app using our scheduler with Ext JS and Sencha Touch. With our recent release of the first 2.2 beta version of Ext Scheduler, it’s now time to look under the hood of this demo application. When we were about to release the Touch Scheduler, we thought we should really put it to the test before releasing it. A few days later, we had written a collaborative app where changes are being broadcasted immediately when a task is modified. The live aspect of the application is not something you see often in web apps today but with tools like Express and Socket.IO it’s now very easy to accomplish. This post is quite long and contains lots of code, but here’s how we did it:
Setting up an Express web server
First of all, we had to setup a simple Express web server which runs on Node (you need at least Node 0.6+). Download Node.js here. We also need socket.io which you can find here. To avoid having to involve a database on the server, we simply created an in-memory array “DB” of tasks to serve as the database. It also has add/remove/update methods to support all CRUD operations. Below is the script which launches a simple Express instance on port 3000.
We then created a basic HTML index.html page which includes Ext JS, Ext Scheduler, Socket.IO and our application JS file (in the example there is also a touch version including Sencha Touch instead). Contents below:
index.html
Node/Express/Socket.IO demo
Now to the application bootstrap part, which means adding an app.js which should work for both Ext JS and Sencha Touch. This required a little bit of normalization code but nothing really difficult.
app.js
Ext.Loader.setConfig({
enabled : true,
disableCaching : true
});
Ext.require([
'App.view.SchedulerGrid'
]);
// Limit the resolution, to avoid putting too much data on the wire.
Sch.preset.Manager.getPreset('hourAndDay').timeResolution.increment = 15;
Ext.application({
name : 'App',
viewport : {
layout : {
type : 'vbox',
align : 'stretch'
}
},
// Initialize application
launch : function() {
var field = new Ext.form.Text({
fieldLabel : 'User ',
height : 30,
label : 'User ',
value : 'John Doe',
labelWidth: 115,
listeners : {
change : function(field, value) {
scheduler.userName = value;
}
}
});
var scheduler = Ext.create('App.view.SchedulerGrid', {
title : 'Node + socket.io example',
startDate : new Date(2010, 11, 9, 8),
endDate : new Date(2010, 11, 9, 20),
flex : 1,
userName : field.getValue()
});
var vp;
if (Ext.versions.touch) {
vp = Ext.Viewport;
} else {
// Ext JS
vp = new Ext.Viewport(this.viewport);
// Uncomment this to see what's happening in the EventStore
//Ext.util.Observable.capture(scheduler.eventStore, function() { console.log(arguments); });
scheduler.on('eventcontextmenu', this.onEventContextMenu, this);
Ext.QuickTips.init();
}
vp.add([
new Ext.form.Panel({
region: 'north',
hidden : Ext.os && Ext.os.is.phone,
padding: 5,
border : false,
height : 55,
items : field
}),
scheduler
]);
},
onEventContextMenu : function(scheduler, rec, e) {
e.stopEvent();
if (!scheduler.gCtx) {
scheduler.gCtx = new Ext.menu.Menu({
items : [
{
text : 'Delete event',
iconCls : 'icon-delete',
handler : function() {
scheduler.eventStore.remove(scheduler.gCtx.rec);
}
}
]
});
}
scheduler.gCtx.rec = rec;
scheduler.gCtx.showAt(e.getXY());
}
});
This creates a simple Viewport and puts a scheduler inside it together with a form where you can enter your name. Let’s move on to take a peek at the App.view.SchedulerGrid class.
UI classes
As with the app.js file, we had to make sure this class could be used regardless of the underlying Sencha framework. For this view class, we had to use the constructor instead of relying on the initComponent hook since this hook doesn’t exist in Sencha Touch (instead there is an init hook). By relying on the constructor, we saved us a bit of normalization code.
',
constructor : function() {
var me = this;
//create a WebSocket and connect to the server running at host domain
var socket = me.socket = io.connect(me.socketHost);
Ext.apply(me, {
viewConfig : {
onEventUpdate: function (store, model, operation) {
// Skip local paints of the record currently being dragged
if (model !== me.draggingRecord) {
this.horizontal.onEventUpdate(store, model, operation);
}
}
},
columns : [
{ header : 'Name', width : 120, dataIndex : 'Name', sortable : true}
],
eventRenderer : function(event, resource, tplData) {
tplData.cls = '';
if (event.data.Done) {
tplData.cls += ' sch-event-done ';
}
if (event.data.Blocked) {
tplData.cls += ' sch-event-blocked ';
if (event === me.draggingRecord) {
tplData.cls += ' x-hidden ';
}
};
return event.data;
},
resourceStore : new App.store.ResourceStore({ /* Extra configs here */}),
eventStore : new App.store.EventStore({
socket : socket
})
});
this.callParent(arguments);
// Change default drag drop behavior to update the dragged record 'live'
me.on({
eventdragstart : me.onDragStart,
eventdrag : me.onEventDrag,
aftereventdrop : me.onDragEnd,
scope : me
});
},
onEventCreated : function(record) {
record.set('Name', 'New task');
},
// Block a record when it is being dragged
onDragStart : function(view, records) {
var rec = records[0];
this.draggingRecord = rec;
rec.block(this.userName);
},
// Update underlying record as it is moved around in the schedule
onEventDrag : function(sch, draggedRecords, startDate, newResource) {
if (newResource && startDate) {
var task = draggedRecords[0];
task.beginEdit();
task.setStartDate(startDate, true);
task.assign(newResource);
task.endEdit();
}
},
// Unblock a record after dragging it
onDragEnd : function(view, records) {
this.draggingRecord = null;
records[0].unblock();
}
});
There are basically just two special things about the scheduler above: When a drag operation starts, the dragged Model is marked as blocked and as the cursor is moved, the model is continuously updated until the drag operation is finished. Since we don’t want our own ‘local’ view to repaint itself on such model updates, we override the onEventUpdate method to prevent it.
Data classes
So far we have only presented the UI and the application classes. Let’s move on to where the real magic happens. First, let’s look at the underlying App.model.CustomEvent, its sources can be seen below. To have this class support both Sencha frameworks, we needed a bit of normalization code since ST uses its config system to define class members.
This model is consumed by the App.store.EventStore which is just a plain store consuming a special mixin we wrote. It defines the model to use and also initializes the socket its bound to.
If you have worked with regular Sencha data stores before, you’ll note we are doing things a bit different here. We’re not using any of the load/save capabilities of the data package. We’re instead letting socket.io handle all the CRUD traffic to and from the server. The contract for this mixin class can be summarized as this statement:
Observe the socket to know what others are doing, and let the others know what I’m doing
The socket API allows you to observe it using the on method, and you can use the emit to broadcast local changes.
App.store.mixin.SocketIO
Ext.define('App.store.mixin.SocketIO', {
socket : null,
getSocket : function () {
return this.socket;
},
initSocket : function () {
var that = this;
var socket = this.getSocket();
socket.on('server-doInitialLoad', function (data) {
that.onInitialLoad(data);
});
socket.on('server-doUpdate', function (data) {
that.onRemoteUpdate(data);
});
socket.on('server-doAdd', function (data) {
that.onRemoteAdd(data);
});
socket.on('server-syncId', function (data) {
that.onRemoteSyncId(data);
});
socket.on('server-doRemove', function (data) {
that.onRemoteRemove(data);
});
this.myListeners = {
add : this.onLocalAdd,
update : this.onLocalUpdate,
remove : this.onLocalRemove,
addrecords : this.onLocalAdd,
updaterecord : this.onLocalUpdate,
removerecords : this.onLocalRemove
};
this.addMyListeners();
//Load initial data to Store from Server
this.doInitialLoad();
},
addMyListeners : function () {
//Add event listeners to store operations
this.on(this.myListeners);
},
removeMyListeners : function () {
//Add event listeners to store operations
this.un(this.myListeners);
},
/**
* Emit event to server in order to receive initial data for store from the DB.
*/
doInitialLoad : function () {
this.getSocket().emit('client-doInitialLoad');
},
/* BEGIN REMOTE LISTENER METHODS */
/**
* New records were added remotely, add them to our local client store
*/
onRemoteAdd : function (data) {
var records = data.records,
record,
current,
model = this.getModel();
this.removeMyListeners();
for (var i = 0, l = records.length; i < l; i += 1) {
current = records[i].data;
//change dates from JSON form to Date
current.startDate = new Date(current.StartDate);
current.endDate = new Date(current.EndDate);
// Work around a bug in ST when adding new records (internalId not set correctly)
this.add(new model(current, current.Id));
}
this.addMyListeners();
},
onRemoteSyncId : function (data) {
var records = data.records,
model = this.getModel();
this.removeMyListeners();
Ext.Array.each(records, function(updatedRecord) {
var internalId = updatedRecord.internalId;
this.each(function (rec, idx) {
if (rec.internalId == internalId) {
this.remove(rec);
this.add(new model(updatedRecord.data, updatedRecord.data.Id))
return false;
}
}, this);
}, this);
this.addMyListeners();
},
/**
* Records were updated remotely, update them in our local client store
*/
onRemoteUpdate : function (data) {
var localRecord;
// Only one record updated at a time
data = data.record.data;
this.removeMyListeners();
localRecord = this.getById(data.Id);
if (localRecord) {
data.StartDate && (data.StartDate = new Date(data.StartDate));
data.EndDate && (data.EndDate = new Date(data.EndDate));
localRecord.set(data);
}
this.addMyListeners();
},
/**
* Records were removed remotely, remove them from our local client store
*/
onRemoteRemove : function (data) {
var ids = data.data,
record,
current;
this.removeMyListeners();
for (var i = 0, l = ids.length; i < l; i += 1) {
current = ids[i];
record = this.getById(current);
this.remove(record);
}
this.addMyListeners();
},
/**
* Initial data loaded from server.
*/
onInitialLoad : function (data) {
var data = data.data;
(this.loadData || this.setData).call(this, data);
},
/* EOF REMOTE LISTENER METHODS */
/* BEGIN LOCAL STORE LISTENER METHODS */
/**
* On adding records to client store, send event to server and add items to DB.
*/
onLocalAdd : function (store, records, index, opts) {
var recordsData = [];
records = records.length ? records : [records];
for (var i = 0, l = records.length; i < l; i += 1) {
records[i].data.Name = 'New Assignment';
recordsData.push({
data : records[i].data,
internalId : records[i].internalId
});
}
this.getSocket().emit('client-doAdd', { records : recordsData });
},
/**
* On updating records in client store, send event to server and update items in DB.
*/
onLocalUpdate : function (store, record) {
var data = { Id : record.getId() };
for (var prop in record.previous) {
data[prop] = record.data[prop];
}
this.getSocket().emit('client-doUpdate', { record : { data : data } });
},
/**
* On adding removing records from client store, send event to server and remove items from DB.
*/
onLocalRemove : function (store, records, index, opts) {
records = records.length ? records : [records];
var ids = Ext.Array.map(records, function (rec) {
return rec.get('Id');
});
this.getSocket().emit('client-doRemove', { ids : ids });
}
/* EOF LOCAL STORE LISTENER METHODS */
});
If you read the code above, you’ll also notice a few framework normalization snippets, but all in all it’s a trivial data mixin class. The final piece of this application is the socket.io integration on the server side.
Socket.IO – server side
This is a quite straight forward piece of code. Once the socket connection is available we observe it for actions invoked on the client side (load/update/add/remove). Using the emit method of the broadcast property of the socket, we can reach all connected clients.
node_backend.js
// WEBSOCKETS COMMUNICATION
io.sockets.on('connection', function (socket) {
//Load initial data to client Store
socket.on('client-doInitialLoad', function(data){
socket.emit('server-doInitialLoad', { data : DB.getEventsData()});
});
//Update records in DB and inform other clients about the change
socket.on('client-doUpdate', function(data){
var record = data.record;
DB.update(record);
socket.broadcast.emit('server-doUpdate', data);
});
//Add record to DB and inform other clients about the change
socket.on('client-doAdd', function(data){
var records = data.records;
DB.add(records);
socket.broadcast.emit('server-doAdd', { records : records });
//Sync ID of new record with client Store
socket.emit('server-syncId', { records : records });
});
//Remove record from DB and inform other clients about the change
socket.on('client-doRemove', function(data){
var ids = data.ids;
DB.remove(ids);
socket.broadcast.emit('server-doRemove', { data : data.ids });
});
});
Styling
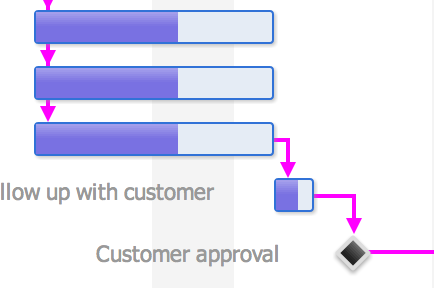
Finally, to visualize that someone else is moving a task bar on your screen, we placed a hand cursor for tasks that are in the ‘Blocked’ state. Next to the cursor, we also show the name of the user moving the task. This gives any observing users an extra clue about what is going on.
Summing up…
By combining our products with Ext JS, Sencha Touch, Express and Socket.IO we were able to write a cool collaborative application with realtime updates. We were also able to reuse the application code for both Sencha frameworks with only a very tiny amount of normalization code. If you like this example and find it useful (or if you have suggestions of how it can be improved), please let us know in the comments. To try it out, you need to download the Ext Scheduler 2.2 version and look in the ‘/examples/nodejs’ folder. There is an ‘index.html’ file for desktop and an ‘index_touch.html’ for touch devices.
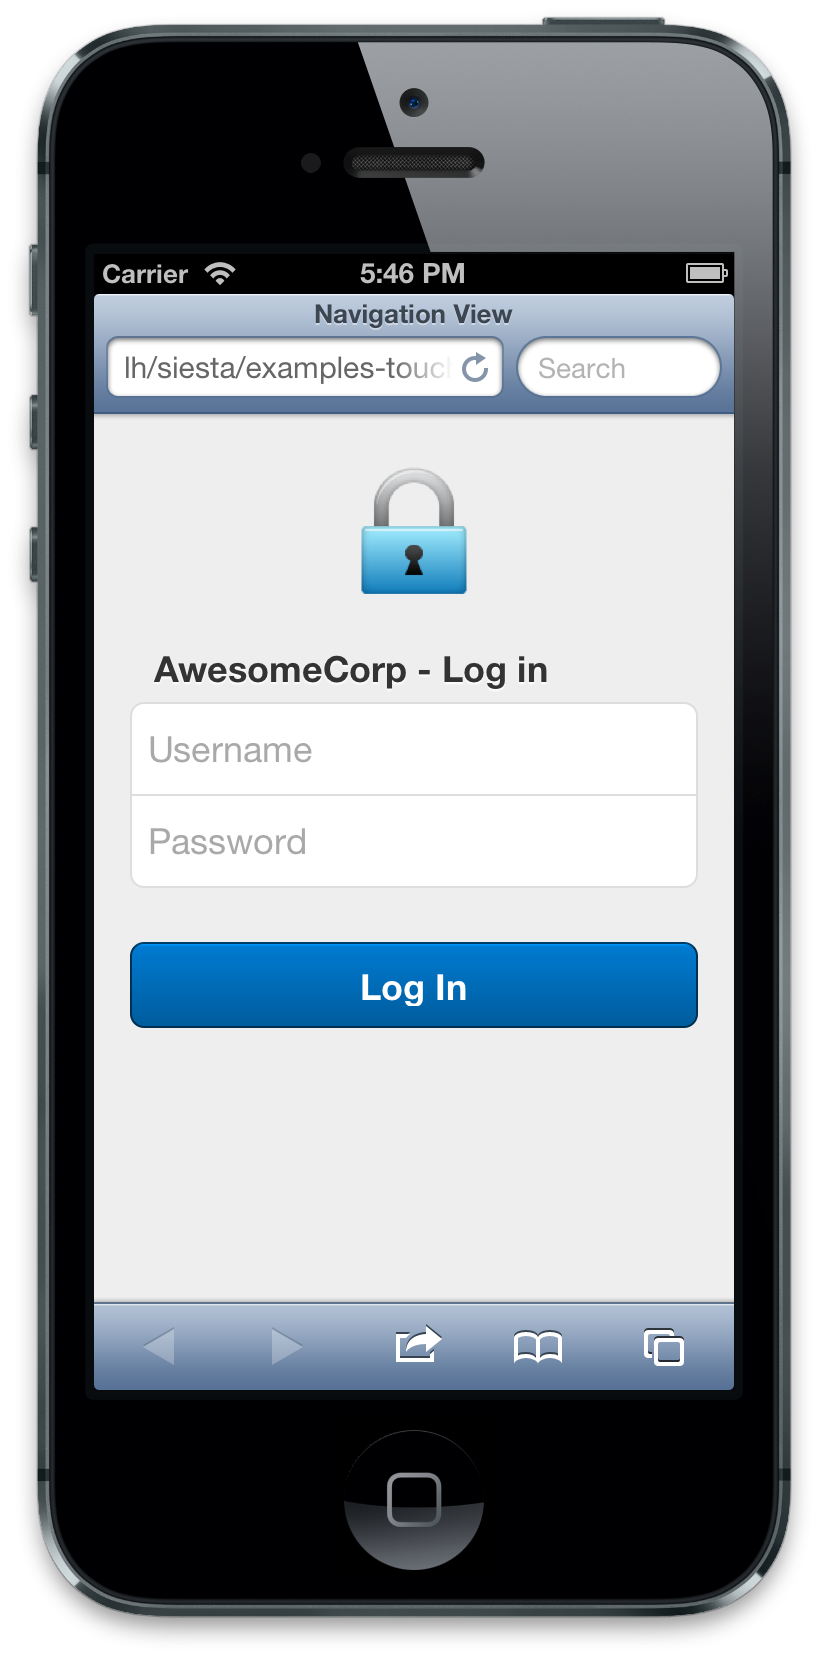
I recently joined Arthur Kay for an online webinar about writing tests for Sencha applications. As a follow up to the webinar, I thought we should really have a basic sample showing how to write application level tests with Siesta. Note that application tests are very different from unit tests, where you typically take one class and focus on testing its API. For an application test, we typically just point Siesta to a hostPageUrl and perform actions on the page. The sample in this blog post has been added to the Siesta examples folder. I picked one of the samples in the Sencha Touch 2.1.1 examples folder and used it as my demo app. I also added a login screen, since this is a very common use case in apps built with Sencha Touch. Overall, the demo application is very simple and features these screens:
First, a user has to login and after logging in, an address list is shown. You can then click a contact in the list and see his or her details. To test this app, I wrote three basic application tests.
1. A sanity test to assert that upon visiting the app page, the login screen is shown
2. A basic login test, which navigates to one of the contacts in the list.
3. A basic logout test which makes sure we can log out ok.
The Harness code can be seen below:
var Harness = Siesta.Harness.Browser.SenchaTouch;

Harness.configure({
    title     : 'Sencha Touch 2 samples'
});

Harness.start(
    {
        group       : 'Application tests',
        hostPageUrl : 'DemoApp/',
        preload     : [],
        performSetup : false,       // This is done by the app itself
        items       : [
            'application_tests/100_sanity.t.js',
            'application_tests/101_login.t.js',
            'application_tests/102_logout.t.js'
        ]
    }
);
// eof Harness.start
1. The ‘sanity’ test
A sanity test is a just a nice simple way of knowing the health of a test subject. For a typical application, that might mean to load up the start page and assure the login window can be seen. No errors should be found, and no globals leaked etc. Here’s the Siesta test code for the ‘sanity’ test.
The test waits for a known Ext.ComponentQuery, the ‘loginview’ xtype. Once it’s detected, we consider that a green light and just check that the login button is also created. This is very simplistic, but still tells us that the landing page is healthy.
2. The ‘login’ test
This test starts by waiting for the login button to be visible. Since we want to tap
the button, it’s not enough just to wait for it to exist – it also has to be visible so we can ‘reach’ it (during rendering, components are often rendered off-screen). After this step, we simply set some values in the login fields. We’re not simulating typing, since there is no reason to test this – it’s a lot faster and more robust to just use the public Field API. After logging in, we wait for a CompositeQuery – a component query combined with a CSS query. Once we find a contact item in the DOM, we tap it to show the contact details.
StartTest(function(t) {

    t.chain(
        { waitFor : 'componentVisible', args : '#logInButton' },

        function(next) {
            t.cq1('#userNameField').setValue('John Doe');
            t.cq1('#passwordField').setValue('SecretUnhackablePW');
            next();
        },

        { action : 'tap', target : '>> #logInButton' },

        // We'd like to find a headshot icon the DOM, that's proof the main app has been launched ok
        { waitFor : 'compositeQuery', args : 'contacts => .headshot' },

        function(next) {
            t.pass('Should be able login login and see contact list');
            next();
        },

        { action : 'tap', target : 'contacts => .headshot' },

        { waitFor : 'componentVisible', args : 'map' },

        function(next) {
            t.pass('Should see a detail view with map after tapping a contact');
        }
    );
});
3. The ‘logout’ test
This logout test just logs in, and immediately logs out again. This should take the user back to the login dialog, and this is exactly what’s being assured in the test code below.
StartTest(function(t) {

    t.chain(
        { waitFor : 'componentVisible', args : '#logInButton' },

        function(next) {
            t.cq1('#userNameField').setValue('John Doe');
            t.cq1('#passwordField').setValue('SecretUnhackablePW');
            next();
        },

        { action : 'tap', target : '>> #logInButton' },

        // We'd like to find a headshot icon the DOM, that's proof the main app has been launched ok
        { waitFor : 'compositeQuery', args : 'contacts => .headshot' },

        function(next) {
            t.willFireNTimes(App, 'logout', 1);
            next();
        },

        { action : 'tap', target : '>>#logoutButton' },

        { waitFor : 'componentVisible', args : 'loginview' },

        function(next) {
            t.pass('Should be able to log out and see login view');
        }
    );
});
Refactoring
As you can see in the logout test, we’re duplicating the login process code. If we want to perform a login in many tests, it makes sense to break this behavior out to its own Test method. You do this by creating your own Test class.
To plug this test class into your Siesta test suite, you simply configure the testClass property of the harness.
I hope this gives you some inspiration on how to write application level tests for your Sencha Touch applications. Don’t forget to write unit tests too
We’re proud to present the new UberGrid component – a grid with super powers for Sencha Touch! UberGrid aims to support as many grid features as possible while also providing excellent performance on a wide range of mobile devices.
The UberGrid is the latest member of our product family. It already serves as the base component for another of our products – the Touch Scheduler. We decided that the two products would benefit from a clean separation of logic – the scheduler just uses the grid API and doesn’t need to worry about the underlying grid implementation. The grid on the other hand – will not “know” anything about scheduling, thus remaining an isolated and general-purpose grid.
The UberGrid is mainly targeted at tablet devices and ‘phablets’, since grids normally display a lot of information. There is of course nothing preventing you from using it on a supported smartphone though.
Features
For the initial 1.0 release, the UberGrid supports:
Grouped column headers
The columns in the UberGrid can have sub-columns and form groups. There is no limit on the number of nesting levels.
Buffered rendering
UberGrid supports a special rendering mode in which only the rows visible in the viewport are included in the DOM. In this mode, the UberGrid offers a flat performance for any number of rows in the data set. For small data sets, you can just use the default non-buffered rendering mode which provides the best possible scrolling experience. See the below DOM footprint for a grid with a viewport fitting 5 rows, while having 100s of records in its store.
Unlimited number of locked sections
The UberGrid can have several “locked” sections on the left or the right side of the main content area. In the image below, there is a scrollable section on both sides.
Code stability is a feature. The UberGrid is covered with unit and functional tests and the test suite is included in the package. We run the test suite nightly and before every release. This makes sure we won’t accidentally break old features in new releases and any bugs found should only be reported once – as each bug introduces a new test case. You can count on the public (documented) API to remain stable in future releases.
And there’s more…
UberGrid also supports variable row height, column sorting, customizable data rendering, customizable header rendering and more. We’ll cover these features in a more technical blog post coming soon.
Getting started
The component provides an API which is very similar to the Ext JS grid panel. UberGrid is a subclass of the Ext.Container class and can participate in any Sencha Touch layout. To create a grid you simply instantiate the UberGrid.Panel class:
This example should be pretty self-explanatory. The required configs are columns and store. To dive deeper into the details, please see the getting started guide in the docs.
Roadmap
This is only the initial 1.0.0 release. We’ll keep adding new features with every new version. Among the nearest ones will be grouping, data index, columns resizing and later tree support. If a particular feature is important for you, let us know and we’ll try our best to add it!
Today we’re happy to announce the new 2.2 release of Ext Scheduler and Ext Gantt. Both products have been upgraded to support Ext JS 4.2 (v4.2 GA is required). A lot of effort went into this release, to clean up and remove old Ext JS overrides, so supporting future versions of Ext JS will require much less work. You can also read about some of the internal changes for 2.2 in a few previous blog posts.
Main changes for Ext Scheduler
For the Scheduler, this release includes a number of new goodies:
RTL support
Since Ext JS 4.2 supports RTL we also added support for this, and you can try this in the new ‘RTL’ demo.
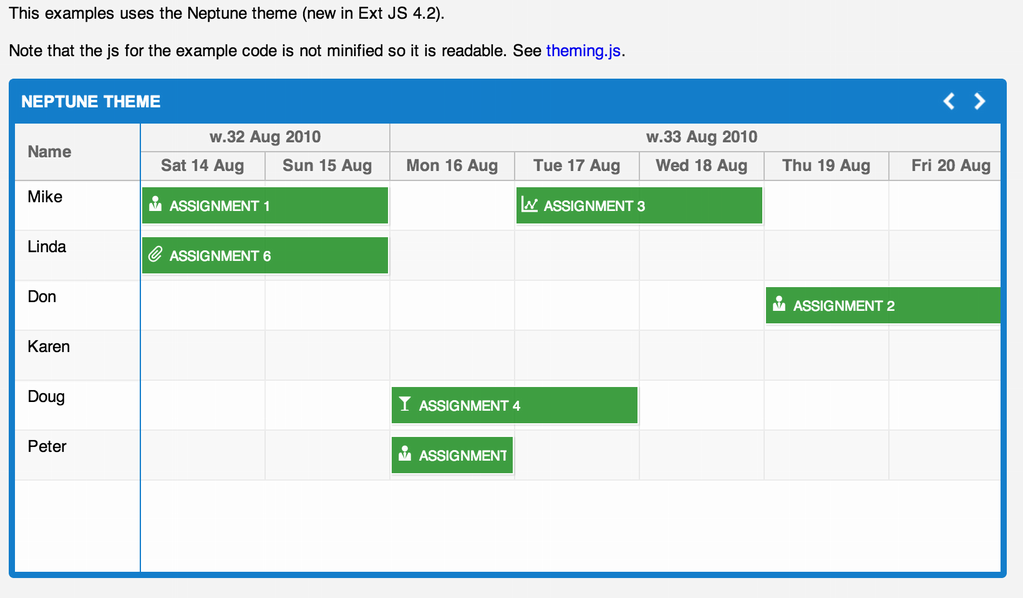
Neptune demo
We now support a “no-theme” version, where no styling is applied to the rendered event bars. This made it easy to support the new Neptune theme too. Open the new ‘theming’ demo to try it out.
IE 10 support
Ext JS 4.2 adds support for IE 10, and we have updated our components to support it too. We also added a new IE10 VM to our test farm. In Ext JS 4.2, there is no “.x-ie” tag added to the body, instead there is a “.x-ie10″ tag. Make sure you review all your uses of ‘Ext.isIE’ too.
Gantt
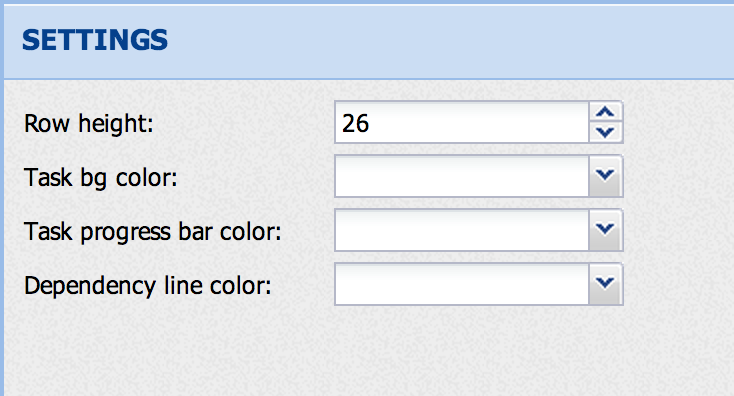
Ext Gantt also received a lot of refactoring love in this release. We removed a lot of the hard coded CSS used for setting dimensions to the rendered elements. As a result, we now support setting a custom row height on the Gantt panel which can be useful to fit more content vertically. In the updated ‘gantt-scheduler’ demo, we added a settings panel where you can try this feature out.
Easier styling
We also removed most of the images used in the Gantt chart so now you can style pretty much every aspect of the chart without using images (using images makes it harder to theme). The milestones are now rendered using pure HTML (the HTML produced varies slightly between legacy IE and good browsers).
Task editor widget
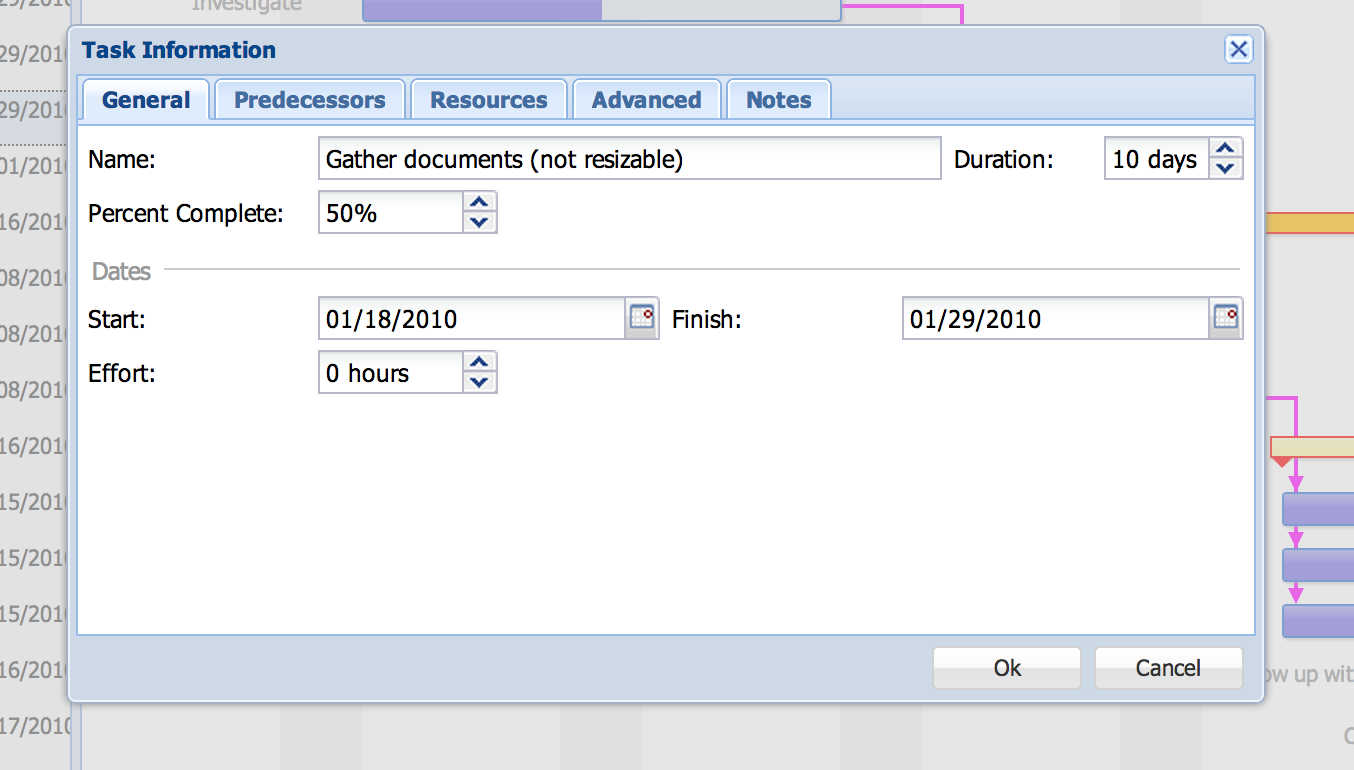
Similar to the popular ‘EventEditor’ widget in Ext Scheduler, we have now added a task editing plugin to Ext Gantt.
Using this plugin, you can edit all data related to a task (task data fields, duration, assignments, dependencies etc). You can try double clicking a task in the ‘advanced’ demo to try it out.
Go give it a try
The new release is available in the customer zone, where you can find all our new releases as well as nightly builds. We’d really like to hear your feedback on this release, and how we can continue to improve our products. Please raise your voice in our forums if you have any ideas or feedback.
We’ve been asked quite a lot how to use our components inside Sencha Architect. With the recent release of Sencha Architect 2.2, this is now very easy to solve. Please note that third party components still aren’t fully supported by Architect and they won’t render in the canvas (but it’s still very useful). If you’re in a rush and just want to see how this is done, you can see me do it in this simple YouTube video.
If you prefer reading, let’s get started.
Launching Architect 2.2
First of all, we create a new Architect project using Ext JS 4.2. We then drag a simple Ext.Panel onto the canvas to serve as our example container for this demo. Remember to set the ‘layout’ property of this panel to ‘fit’. The Architect UI should look something like this:
We then continue to add another Ext.Panel to the top panel. Then we select the child panel in the canvas so we can add some config properties to it, like setting its title to My Scheduler. Now it’s time for the first trick to get this working: createAlias.
The ‘createAlias’ option allows us to set a custom xtype for a component which is actually just what we need. We can now set this value to ‘schedulergrid‘ which maps to our Sch.panel.SchedulerGrid constructor. If we were to save this, build and run it now, we’d get a cryptic error saying
“Uncaught TypeError: Cannot call method ‘substring’ of undefined”.
This is the Ext JS way of saying “I don’t understand”. And while the error message is cryptic, once we know what Ext JS is trying to tell us – it makes sense since we haven’t added any references to the Ext Scheduler resources.
Importing the Ext Scheduler resources
In the Project Inspector panel, locate and select the Resources node and then hit the + symbol in the toolbar above. Add one JS resource and one CSS resource. Point the JS resource to your local copy of sch-all-debug.js and do the same for the CSS resource (resources/css/sch-all.css). The Project Inspector panel should now look like this:
Adding Ext Scheduler config properties
If you build and publish the project and try to run it at this point, you’ll see this error in the console.
Uncaught Sch.mixin.AbstractSchedulerPanel.initStores(): You must specify a resourceStore config
Don’t worry – this is also expected since we haven’t yet configured the Scheduler properly (it requires a resource store and an event store). To add simple custom config properties, we can just use the textbox seen at the top of the Config panel (try adding ‘startDate’, ‘endDate’ and ‘viewPreset’). To provide the Scheduler with complex config properties such as the custom stores it needs, we open the Config panel and locate the ‘processMyScheduler’ function hook. Click the + symbol next to it to add this hook to the component. You should now see it located in Project Inspector above, go ahead and double click it. This opens the code editor:
As you can see, the default implementation receives the scheduler config object and simply returns it as is. We can now apply our own config code easily:
processMyScheduler: function (config) {
    var startDate = config.startDate || new Date();

    return Ext.applyIf(config, {
        colums: [{
                header: 'Name',
                dataIndex: 'Name'
            }
        ],

        resourceStore: new Sch.data.ResourceStore({
            // Here you'll configure your resource store properties
            // for now we use dummy data
            data: [{
                    Id: 1,
                    Name: 'Mike'
                }, {
                    Id: 2,
                    Name: 'Kate'
                }
            ]
        }),
        eventStore: new Sch.data.EventStore({
            // Here you'll configure your event store properties
            // for now we use dummy data
            data: [{
                    ResourceId: 1,
                    Name: 'Bake the cake',
                    StartDate: startDate,
                    EndDate: Ext.Date.add(startDate, Ext.Date.DAY, 5)
                }, {
                    ResourceId: 2,
                    Name: 'Brew some coffee',
                    StartDate: startDate,
                    EndDate: Ext.Date.add(startDate, Ext.Date.DAY, 5)
                }
            ]
        })
    });
}
We simply create a grid column and 2 stores and fill them with some basic dummy data to make sure all is working fine. If you try to run it now, you should see something like this:
…and the mission is accomplished! To understand what was actually generated behind the scenes, let’s open the generated source file in MyPanel.js.
/*
 * File: app/view/MyPanel.js
 *
 * This file was generated by Sencha Architect version 2.2.0.
 * http://www.sencha.com/products/architect/
 *
 * This file requires use of the Ext JS 4.2.x library, under independent license.
 * License of Sencha Architect does not include license for Ext JS 4.2.x. For more
 * details see http://www.sencha.com/license or contact license@sencha.com.
 *
 * This file will be auto-generated each and everytime you save your project.
 *
 * Do NOT hand edit this file.
 */
Ext.define('MyApp.view.MyPanel', {
    extend: 'Ext.panel.Panel',

    height: 250,
    width: 400,
    layout: {
        type: 'fit'
    },
    title: 'My Panel',

    initComponent: function () {
        var me = this;

        Ext.applyIf(me, {
            items: [
                    me.processMyScheduler({
                    xtype: 'schedulergrid',
                    title: 'My Scheduler'
                })
            ]
        });

        me.callParent(arguments);
    },

    processMyScheduler: function (config) {
        var startDate = config.startDate || new Date();

        return Ext.applyIf(config, {
            columns: [{
                    header: 'Name',
                    dataIndex: 'Name'
                }
            ],

            resourceStore: new Sch.data.ResourceStore({
                // Here you'll configure your resource store properties
                // for now we use dummy data
                data: [{
                        Id: 1,
                        Name: 'Mike'
                    }, {
                        Id: 2,
                        Name: 'Kate'
                    }
                ]
            }),
            eventStore: new Sch.data.EventStore({
                // Here you'll configure your event store properties
                // for now we use dummy data
                data: [{
                        ResourceId: 1,
                        Name: 'Bake the cake',
                        StartDate: startDate,
                        EndDate: Ext.Date.add(startDate, Ext.Date.DAY, 5)
                    }, {
                        ResourceId: 2,
                        Name: 'Brew some coffee',
                        StartDate: startDate,
                        EndDate: Ext.Date.add(startDate, Ext.Date.DAY, 5)
                    }
                ]
            })
        });
    }
});
BDD, or Behavior Driven Development has been all the hype for a while now when it comes to JavaScript development. One of the most known JavaScript BDD test tools is Jasmine, and it does a great job of producing readable tests. We’ve received lots of feedback from the Siesta community to add support for writing BDD tests in Siesta. Since we’re getting close to releasing the 1.2 version of Siesta (which is a pretty big release) – let’s take a look at the new BDD support in this version.
Hello BDD world
To make tests better describe what is being tested we use 3 new methods to arrange our test code. At the top level, to describe a “suite” of tests we can call t.describe, and pass it a string describing the suite and as the second argument we’ll pass a function having the test instance as its only argument.
describe("My test suite", function (t) {
    t.pass('BDD FTW')
});
Inside the suite, we can have other sub-suites or any valid Siesta test assertion statements. To divide a suite into logical blocks, we use what’s called a spec. As in Jasmine, inside a spec you typically have sub-specs or one or more expect statements to verify your assumptions. An expect statement begins with the value to assert, followed by the matcher. See the code below for a simple demonstration.
describe("My test suite", function (t) {
    var doc = document,
        body = doc.body;

    t.it('Should be possible to set a CSS class on body', function(t) {
        body.className = 'foo';

        t.expect(doc.getElementsByClassName('foo')).toContain(body);
    });
});
The full list of matchers can be seen below (and they will also be described in the docs):
toBe
toEqual
toBeNull
toBeNan
toBeDefined
toBeUndefined
toBeTruthy
toBeFalsy
toMatch
toContain
toBeLessThan
toBeMoreThan
toBeCloseTo
toThrow
BDD UI tests
If you want to write more complex tests using chains of UI actions, those commands will be queued and executed in sequence. Let’s look at how this could be done. In the test case below, a simple input field is rendered together with a button. If the text is not a number, the field should receive an ‘invalid’ CSS class. The code below verifies the two cases, of valid vs invalid input. Note that we are using the not property to alter the meaning of the toContain expectation in the second spec.
describe("My test suite", function (t) {
function prepareBody(next) {
document.body.innerHTML = '
Input your age
' +
'' +
'';
// Simple click handler
t.$('.submit-button').click(function(){
if (isNaN(parseInt(t.$(".input-age").val(), 10))){
t.$(".input-age").addClass('invalid');
} else {
t.$(".input-age").removeClass('invalid');
}
});
next();
}
t.it('Should find an "invalid" CSS class on the age input for invalid input', function(t) {
t.chain(
prepareBody,
{ action : 'type', text : 'a', target : '.input-age' },
{ action : 'click', target : '.submit-button' },
function() {
t.expect(document.getElementsByClassName('input-age')[0].className).toContain('invalid');
}
)
});
t.it('Should not see the "invalid" CSS class on the age input for proper input', function(t) {
t.chain(
prepareBody,
{ action : 'type', text : '25', target : '.input-age' },
{ action : 'click', target : '.submit-button' },
function() {
t.expect(document.getElementsByClassName('input-age')[0].className).not.toContain('invalid');
}
)
});
});
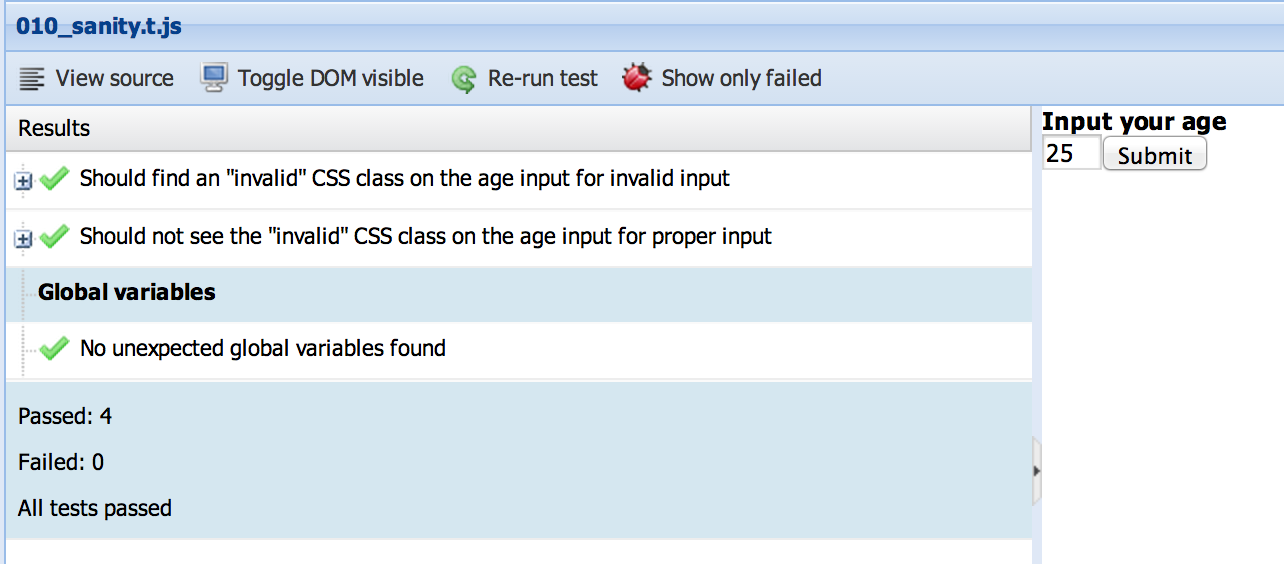
In the Siesta UI, this is what we see:
Passed specs are collapsed by default, and if a spec fails it’s automatically rendered in expanded state so you can see the failed expectation easily.
By using the BDD syntax above, the test becomes very readable as each sub-section of the test is decorated with its purpose up front. But, since code readability is quite subjective by nature, you may or not not prefer this syntax over plain simple JS code in your tests.
What you do you think, will you be using this BDD syntax in your test suite after v1.2 is released? Let us know what’s on your mind!
In the past couple of months we’ve received a few requests for mocking capabilities when it comes to Ajax requests with Siesta. We are actually quite interested in this feature ourself so we we’re very happy when we realized how easy it was to accomplish. The solution: Ext.ux.ajax.SimManager, is found in the Ext JS examples/ux folder.
Introducing the Ext.ux.ajax.SimManager
This class (docs here) has actually been around for quite a while, and it is even well documented in the public Sencha docs though we didn’t really notice it until recently. Originally written by the Ext JS mastermind Don Griffin, this class provides very easy mocking support. The static SimManager class allows you to easily mount a simulated Ajax response referred to as a simlet, mapped to a given URL. To mount a dataset for a specific URL returning a basic JSON object, you call the init method as seen below:
Ext.ux.ajax.SimManager.init({
        delay : 300
    }).register(
        {
            '/app/data/url' : {
                stype : 'json',  // use JsonSimlet (stype is like xtype for components)
                data  : [
                    { id : 1, name : 'user1', age : 25 },
                    { id : 2, name : 'user2', age : 35 },
                    { id : 3, name : 'user3', age : 45 }
                ]
            }
        }
    );
We can specify the delay to use, and just pass in the data we’d like the mocked response to contain. Later in your test when your store (or plain Ajax call) requests the ‘/app/data/url’ URL, this will be handled automatically by the SimManager. To make use of the SimManager class in a Siesta test, simply configure the ‘loaderPath’ to be able to require it inside the test.
{
        url : '051_ext-ajax-mock.t.js',

        // Setup the path to the 'ux' folder on the Sencha CDN
        loaderPath  : { 'Ext.ux' : 'http://cdn.sencha.io/ext-4.2.0-gpl/examples/ux' }
    }
I just created a basic Siesta test (included in the next release) to the Ext JS examples folder of the Siesta SDK to prove how easy it is to get started. All we have to do is to ‘require’ the SimManager class first.
StartTest(function (t) {

    t.requireOk('Ext.ux.ajax.SimManager', function () {
        Ext.define('MyModel', {
            extend : 'Ext.data.Model',
            fields : [
                'id',
                'name',
                'age'
            ]
        });

        Ext.ux.ajax.SimManager.init({
            delay : 300
        }).register(
            {
                '/app/data/url' : {
                    stype : 'json',  // use JsonSimlet (stype is like xtype for components)
                    data  : [
                        { id : 1, name : 'user1', age : 25 },
                        { id : 2, name : 'user2', age : 35 },
                        { id : 3, name : 'user3', age : 45 }
                    ]
                }
            }
        );

        var store = new Ext.data.Store({
            model : 'MyModel',

            proxy : {
                type : 'ajax',
                url  : '/app/data/url' // doesn't exist
            }
        });

        t.willFireNTimes(store, 'load', 1);

        t.it('should be possible to load mock data', function (t) {
            t.loadStoresAndThen(store, function () {
                t.expect(store.first().get('id')).toBe(1);
                t.expect(store.first().get('name')).toBe('user1');
                t.expect(store.getAt(1).get('id')).toBe(2);
                t.expect(store.getAt(1).get('name')).toBe('user2');
                t.expect(store.getAt(2).get('id')).toBe(3);
                t.expect(store.getAt(2).get('name')).toBe('user3');
            });
        });
    });
});
You can simulate any number of URL’s and associate them with an Ext.ux.ajax.Simlet. To make non-simulated Ajax requests after the SimManager class is initialized, add a nosim : true option to your Ajax call config.
Summing up
Using mocked Ajax calls are a great way to simplify your testing and speed it up at the same time. We hope you will find this Ext JS feature useful in your test suite. Do you have any other mocking tips & tricks? Please let us know in the comments or our support forums.
An airport is a very busy place and the Copenhagen Airport (“CPH”) is no exception. With 250,000 flights and over 20 million passengers flying in and out of it every year, it’s easy to see that it must involve loads of different staff and machines to function properly. In the many companies involved in providing the service to operate CPH, there are in total over 22,000 employees. Since an airport is so resource intensive, using these resources efficiently is key. Good thing then, that CPH has been ranked as the most efficient airport in Europe seven times in the last nine years.
Last year, we were thrilled when the Planning Operations team at the airport contacted us about using Ext Scheduler to schedule the many check-in desks at the airport. Here is their story:
USING THE EXT SCHEDULER AT COPENHAGEN AIRPORT
by Esben Kolind, Business Analyst at Copenhagen Airports.
In Copenhagen Airport (CPH), we are responsible for the daily allocation of check-in counters to the many airlines operating from CPH. In peak hours, all counters are in use, and mathematical optimisation methods are used to “solve the puzzle” and generate a plan that fulfils the needs and wishes of the airlines. In addition, it is often necessary to make manual adjustments to the plan on the day of operation due to delays, cancellations and aircraft changes.
Previously, the planning was done in Excel and a graphical visualisation of the daily plan (Gantt chart) was saved as a PDF. This PDF was then made accessible to the airlines and handling agents (who perform the check-in on behalf of the airlines) through a link on a website. Any later change to the plan was done manually in Excel through copy/paste of cells (prone to errors!) and the entire plan was then re-published.
Since summer 2012, CPH has used the Ext Scheduler to publish, visualise and modify the daily check-in allocation plans. The initial plan is saved in a database and can be modified through drag and drop functionality by selected CPH employees, directly in the browser. Airlines and handling agents can access the same website to see the allocation, which is also displayed on a big screen in the operation desk near the check-in counters (see images below). Furthermore, the new setup provides a lot of new functionality such as browsing between dates, zooming, data validation and undo.
Below are a few images of the overview TV screen located in the check-in desk area in Terminal 3.
Implementation details
With a little help from the Bryntum dev. team, we implemented our own subclass of the Ext Scheduler component. We use the grouping view to group all our counters (which are the “resources” in the scheduler terminology) by their Terminal. Since airlines always allocate a group of adjacent check-in counters, being able to drag and drop these groups rather than individual allocations, was crucial to us. We implemented this feature quite easily and also added support for constraining the dragging to either the x or y-axis by holding the shift key. Other than that, we found pretty much all other features we required to be supported by the Scheduler, like validation, zooming and export to PDF.
To keep the displayed data fresh on the screen for the observing users, we reload the store every 10 minutes using a simple setTimeout timer. Since the Scheduler supports variable row height, it was easy to add a birds eye view where all the rows have been sized to fit the screen size.
// Fits the rows to the available vertical space
fitRows : function () {
    …

    var containerEl       = this.getSchedulingView().el,
        containerHeight   = containerEl.getHeight(),
        groupHeaderHeight = containerEl.down('.x-grid-group-hd').getHeight(),
        availableHeight   = containerHeight - groupHeaderHeight,
        fittedRowHeight   = Math.floor(availableHeight / nbrTerminalDesks);

    this.getSchedulingView().setRowHeight(fittedRowHeight);
}
Our corporate IT policy mandates the use of IE9 and the scheduler supports it just fine with good performance. A screenshot of our implementation can be seen below:
THE RESULT
Using the Scheduler, we have saved about two hours per week on planning the check-in allocation. A manual change to the plan which used to take 5-10 minutes, can now be performed in a few seconds by the duty managers, who are not very computer savvy. On top of that, the easy-to-use code of the component has allowed us to quickly make adjustments to the setup when needed.
Summing up, the use of Ext Scheduler for the check-in allocation in CPH has been a major success that has been very well received by all users within and outside the airport.
LOOKING TO THE FUTURE…
There is still a bit of room for optimization even when we use the Ext Scheduler. The floor staff (responsible for setting up the check-in desks) still need to go back to the office to make changes to the day plan. In 2014, we plan to provide iPads to the floor managers, allowing them to update the schedule on-the-go without having to sit behind a desk. We plan to use the Touch Scheduler for this job, with live updates pushed to each connected iPad using WebSockets. Perhaps material for a follow-up blog post…?
Today we are very glad to announce the Siesta 1.2.0 “GA” release. This is a quite major release, with many improvements in terms of features and stability, and we advise all Siesta users to upgrade to this version.
This release introduces a few API changes, mostly in the default values of some settings and behavior of the “hostPageUrl” option. You can still use the previous behavior by setting the old default values explicitly in your harness configuration. Please read through the changelog (including the sections for Siesta 1.2.0-beta1 and beta-2) and the updated documentation.
In terms of new features, the biggest one is the support for sub-tests – an isolated test executed inside of the main test. These are useful when you want to test several asynchronous processes simultaneously – since each test will have now maintain its own set of assertions:
StartTest(function (t) {
    t.subTest('Load 1st store', function (t) {
        var async = t.beginAsync()

        store1.load({
            callback: function () {
                t.endAsync(async);
                t.isGreater(store1.getCount(), 0, "Store1 has been loaded")
            }
        })
    })

    t.subTest('Load 2nd store', function (t) {
        var async = t.beginAsync()

        store2.load({
            callback: function () {
                t.endAsync(async);
                t.isGreater(store2.getCount(), 0, "Store2 has been loaded")
            }
        })
    })
})
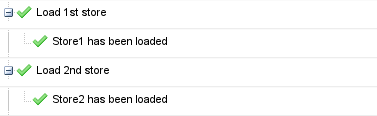
To visualize this, the assertion list in the Siesta UI is now a tree panel:
Sub-tests also made it easy for us to add support for the very popular BDD style (as seen in Jasmine) – this is another major feature in the 1.2.0 release. BDD tests are very readable and encourages splitting your tests in small and maintainable parts with a clear purpose of each part, making the intent of the test author much clearer:
describe('Simulating a click does not trigger blur automatically', function (t) {

    t.it('should trigger focus/blur when clicking inside/outside of the text input', function (t) {
            ...

        t.expect(numberOfClicks).toBe(1)
    });

    t.it('should not trigger extra blur event when clicking on another text input', function (t) {
            ...

        t.expect(numberOfClicks).toBeLessThan(2)
    });
});
The user interface got some love in this release too. We upgraded the UI to use Ext JS 4.2.0 which is more stable and has better performance. The big new feature in the interface is our brand new Component Inspector which allows you to quickly find components and their xtypes on the test page and interact with it through a new console line scoped to the test iframe. When you hover over a component you can also click the found xtype to go straight to the Sencha docs to learn more.
In the test tree panel, the filter field now accepts “|” for separating multiple filter values combined with “OR”.
Under the hood, we’ve improved the event simulation when targeting elements in the nested iframes, Siesta now supports all types of interactions even when having multiple versions of Ext JS running in different iframes. Also, the simulation of “blur/focus” events has been improved. A few issues regarding the launching of the tests and many other smaller ones were resolved, resulting in better stability.
We really hope you will like this release. As always your feedback is very welcome.
Siesta 2.0 was released last week during SenchaCon 2013 in Florida. The main features of this release are the brand new UI (based on Ext JS 4.2) and the ability to generate code coverage reports. Code coverage is a big and exciting addition that was frequently requested in the past year, and we already use it ourselves internally. Since we think there might a few additional features left to be implemented to further improve the coverage support, we’ve marked the coverage feature as “experimental” for another couple of releases. We reserve the right to slightly change the API if required, strictly based on your feedback. Please give it a try and let us know what you think, and how we can improve it even further!
What is code coverage?
Code coverage is a metric, measuring what parts of your codebase are exercised when running your test suite. In other words it highlights code that has never been executed by the test suite and therefore should be treated as unsafe and a potential source of bugs.
At the same time, code coverage by itself does not guarantee that your code actually works. “Covered” code can still produce wrong results, such as logical or algorithmic errors. The only real assumption you can make about covered code is that it won’t throw unexpected exceptions. The main point of interest is actually the absense of coverage. That is a much more valuable piece of information, as it tells you where you should focus your testing efforts and write additional unit tests. If a core class in your model layer is not exercised by any test, it should be a clear call to action!
How does it work?
To be able to collect code coverage data, your codebase first has to be instrumented. This means it’s transformed, and additional code statements are injected that count which statements are actually executed. Siesta is using the awesome Istanbul library for this purpose.
For example, if your file contains only one simple assignment:
var a = 1;
After being instrumented, it will look like this:
if (typeof __coverage__ === 'undefined') { __coverage__ = {}; }
if (!__coverage__['filename.js']) {
__coverage__['filename.js'] = {"path":"filename.js","s":{"1":0},"b":{},"f":{},"fnMap":{},"statementMap":{"1":{"start":{"line":1,"column":0},"end":{"line":1,"column":10}}},"branchMap":{}};
}
var __cov_1 = __coverage__['filename.js'];

__cov_1.s['1']++;var a=1;
As you can see the amount of code increases and naturally instrumented code will take longer to execute. But don’t worry, the instrumentation is unobtrusive and does not change the semantic of your code.
Enabling code coverage in Siesta
To enable the code coverage module, simply set the enableCodeCoverage : true config option in your harness:
Harness.configure({
    enableCodeCoverage      : true
})
Additionally, you need to include the “siesta-coverage-all.js” file on your harness page after the regular Siesta JS file:
You can find a sample setup in the “/examples/code_coverage.html” file inside the Siesta package.
Siesta will instrument only files marked explicitly in the preload config. To tell Siesta to instrument a JS file, provide a instrument : true config in the file’s preload descriptor:
Harness.configure({
        preload         : [
            {
                type        : 'js',  // optional if file ends with ".js"
                url         : 'some_file.js',
                instrument  : true
            }
        ],
        ...
    })
Additionally when using the Ext JS testing layer, Siesta will install an on-the-fly instrumentation hook into the Ext.Loader code.
Coverage per class
Normally code coverage information is collected on a per-file basis. However, in web development it’s common to concatenate several JavaScript files (each containing one class) into one big bundle file. Getting file based coverage for such a “bundle” file will not be very useful, as it can be huge and if you want to check the coverage for one specific class in the bundle you will have to search and scroll a lot.
For the Ext JS testing layer, Siesta can collect coverage information on a per class basis. In this mode Siesta looks for Ext.define() calls in the source files, and instruments only the detected classes (which is normally what you want). The resulting report in this mode will contain information about Ext JS classes, not files. As you can see in the image below, when clicking a covered class you can immediately see any source code missing coverage (highlighted in red).
Reports and Continuous Integration
Code coverage metrics should naturally be part of your Continuous Integration process. You can easily generate code coverage reports using our Phantom JS or WebDriver launcher scripts. To generate a coverage report, simply add --coverage-report-format when launching your test suite. Recognized values are html, lcov or raw.
“html” generates coverage data in the form of a plain web page (as seen in the screen shots).
“lcov” is a format which can be consumed by the lcov tool
“raw” is a format that can be consumed by Siesta itself when several reports need to be combined.
Conclusion
Code coverage information is an important metric measuring one aspect of your test suite health. It indicates clearly where additional unit tests are required. The core classes of your application should definitely have a high level of code coverage.
We’re hoping Siesta will make it really easy for you to gather coverage information. Please give the Siesta 2.0 release a try and let us know how it works for you!
Lately we’ve been hard at work at getting the new Siesta event recorder ready for release. So far it’s looking pretty darn good and in this blog post I want to share some details of how it works and how you can use it to save time writing your UI tests.
What is the Siesta event recorder?
The event recorder is a new part of Siesta that can record user interactions with the test UI. As you click, drag and type in your application or component UI, it will record the events and allow you to play them back. Once you’re happy with the result, the recorder can output Siesta test code that you can easily copy paste into your test file. Creating UI tests this way you will save lots of time compared to coding each test manually. We see two main use cases for the recorder and we’ll cover both in blog posts coming shortly. Here’s the UI of the recorder:
For the UI developer
First we start with the UI developer perspective, i.e. if you’re developing Ext JS components or any component that’s a part of a bigger application. You should of course first aim to cover as much of your UI component code with unit tests, but you should also make sure your UI component actually can be rendered and interacted with. This is easily done by creating and rendering your UI component in a test and then simulating the events that prove that it actually works. As part of writing the recorder, we’ve used our own components as test subjects and thereby gained a nice test coverage boost of our Scheduler/Gantt code bases and even the Siesta UI.
For the QA engineer
This is a quite different perspective. Usually one or more QA engineers are responsible for assuring that an application works before a release can be made. When doing this type of “black box” testing in Siesta, we first visit the application URL (e.g. ‘index.html’) and wait for it to render. Then we record interactions with the application UI, exercising the most vital parts of it. This is of course a lot more complex compared to just testing an isolated UI component. First of all, a lot more code is executed than in the previous scenario and you also need to worry about things like login/logout, session state and restoring the database to a known testable state. The value of these tests is of course huge, since we can prove that the application as a whole actually works. Certainly nice to know prior to a big release. Though keep in mind, this type of testing should not be used to find low hanging fruit. Simple bugs that can be caught much earlier in the development process, such as code syntax errors or simple logic errors should be caught by unit tests (having a QA team find such bugs is very expensive).
Below is a video showing how easily we can test one of the Ext Scheduler examples that we ship as part of the Ext Scheduler SDK. It would be embarrassing for us to ship a broken sample to our customers, so why not simply make a smoke test for it? You’ll note that the entire test is produced in just a few minutes.
Here is the code generated by the recorder, which is ready to be pasted into your test suite. You can see that Siesta has used multiple Composite Queries (Component Query + DOM Query) to target the buttons clicked.
This is just the beginning and there will be more blog posts about the recorder coming shortly. The recorder is currently in a beta phase, and if your company is interested in helping us test it out and report bugs to us, please send us a note. Please note that recorder will only be available in the Standard version of Siesta. If you have any ideas or feedback of what features should be part of the recorder, please make your voice heard in the comments or our forums.
As we’re getting closer to releasing the event recorder feature, we have prepared the following Getting Started guide to show you how to use the it.
What is the event recorder?
The event recorder will help you save lots of time as you author your UI tests for your application or UI components. After hitting the record button, it will record your interactions with the user interface and help you target the components in your application. This means it will detect Sencha components such as grids, form fields and checkboxes etc. without you having to manually type in each target in manually. Please note that the recorder will most likely not produce a perfect test case at once, in reality you will need to tweak its output to be as stable as possible for your test scenario. Regardless, it’ll definitely save you time!
Getting started
First of all you should prepare a test case which will produce the UI that you want the test to interact with. Either you load an HTML page from your application (using the hostPageUrl config) or you create a test which creates and renders a UI component. After creating your test skeleton, run it and make sure the rendering completes without errors.
At this point, your test skeleton produces the UI you want to start testing. Now you need to instruct the test to wait for a condition that proves the UI is ready to be interacted with. This might be the presence of some CSS selector, or that a couple of Ext JS stores have been loaded. Below is a simple sample test skeleton:
StartTest(function (t) {

    var customerGrid = new App.grid.Customer({
        width : 600,
        height : 200,
        renderTo : document.body,
        cls : 'myGrid'
    });

    t.chain(
        // Make sure some dummy test rows are rendered before test starts
        { waitFor : 'rowsVisible', args : customerGrid }
    );
});
Now that we’ve instructed the test to wait for a stable condition, we can go back to the Siesta UI and activate the recorder panel by clicking the recorder icon.
The event recorder interface
The empty recorder looks like the below image. In the top left, the buttons are quite self explanatory: ‘Record’, ‘Stop’, ‘Play’ and ‘Clear’ allow you to capture and playback the recorded actions. In the top right section, you can ‘Generate code’, add a custom step and ‘Close’ the recorder panel.
The grid has 3 columns:
The ‘Action’ column is the type of action.
The ‘Target/Value’ column contains the either the target of a UI action, the value
(when typing text) or source code for the special function step.
The ‘Offset’ column allows you to set an offset for your action so you can click
at a precise point on your button or text field for example.
Below the grid you also can find a cheat sheet of the most common targets types (CSS query, Component Query and Composite Query).
Try hitting the record button and click somewhere in your application UI. You should see an entry show up in the recorder grid. The first thing to do now is to verify that the recorder understood your intention. This means reading the target description and possibly adjusting it. The recorder tries to understand your intention but it’s not a mind reader (yet). Make sure to optimize the target to be the most stable. Having stable targets is very important to keep tests passing as you modify your UI or upgrade to newer versions of the Sencha framework.
A simple example: Let’s say you record a click on an Ext JS button, Siesta will suggest the following:
This is a Composite Query, left side is a regular Sencha Component Query, and the part after => is a simple CSS selector. How do we make this the most stable target selector? First of all, if all you wanted was to click anywhere on the button then the offset has no value so let’s delete it. This makes sure that if the button dimensions change later (e.g. width lowered to 25px), the test will still work fine. The second thing to look at is the target itself. Unless you want to click at a specific HTML element inside the button, we don’t really need the right side of the expression. This also protects you against the case where in a future Ext JS version, the .x-btn-inner class is renamed to something else (or removed). Converting the target to a Component Query is our best bet:
Now, Siesta will always click at the center of the Button component which normally is what you want for buttons anyway. When you’re done adjusting the target, try playing back the test to make sure all works fine. When playing back a recording, Siesta will first execute the entire test (the skeleton you prepared) and after the test has finalized, the recorder actions will be played back.
Editing the target locator
The fields in the grid are all editable, so it’s easy for you to adjust the values inline. Clicking a Target cell allows you to either choose one of the alternatives gathered by the recorder, or you can type any value you like. As you type, Siesta will try to highlight the target. You need to make sure that you only target one thing on the screen, and make uour target selector specific to that target. If you have 5 Ext JS buttons on the page, just typing “>> button” won’t work because it’s a too generic target locator (Siesta will warn you in this case).
Waiting for async operations
As you will see, just naively recording some clicks on the screen and playing them back won’t always work. A lot of the times, a UI will contain asynchronous behavior. A window might animate as it closes or a panel is collapsed with an animation etc. To make your tests aren’t sensitive to these async flows, you will need to wait – a lot. Siesta tries to help you as much as it can, by always waiting for a target to appear, and also for any ongoing Ext JS animation to complete. So, in theory you should not need to worry about these two cases.
Let’s look at a simple example:
StartTest(function (t) {
    Ext.getBody().update('');

    var btn = new Ext.Button({
        text        : 'Load data',
        renderTo    : document.body,
        handler     : function() {

            // This Ajax request is obviously async
            Ext.Ajax.request({
                url     : 'Customers/Get',
                success : function(response) {
                    // Assuming an array is returned by server
                    var clients = Ext.decode(response.responseText);

                    Ext.get('client_list').update(clients.join('

Let’s say the test scenario is to click the button, and after the Ajax request is done we also click on the rendered client list. A naive attempt would be some thing like:
// Click the button using a Component Query
    { click : ">> button[text=Load data]" },

    // Then click the populated client list
    { click : "#client_list" }
This might actually work if the Ajax request finishes really fast. But if it does, it’s just luck and in any situation you should always wait to be sure. For a situation like this, we can try using the waitForElementNotVisible method. Click the ‘+’ button to add a new custom step, and drag it in between the two click steps.

After adding the wait step, this test sequence is now robust and it doesn’t matter if the ajax request takes 5ms or 10 seconds.
The function step
As you interact with your application UI you most likely want to perform some assertions along the way. While this is easier to do in your own IDE, we’ve added a simple code editor to the recorder too. If we continue on the previous sample, it would be nice to assert that a certain text exists after the loading is completed. To add such a function step, select the ‘fn’ action in the list and hit TAB. Now we can execute any regular JS, and of course use any of the Siesta.Test assertion methods.

When you feel done with the recorded events, you can simply hit the Generate code button and copy-paste the contents into your test skeleton.

Recording a move-cursor-to step
Sometimes you want to simply move the cursor to certain place on the screen without doing any further action. Since the recorder doesn’t record every mouse movement, there is a special way to signal to Siesta that you want to move the cursor somewhere. Simply move the mouse to where it should be and leave it for 3 seconds, you’ll then see a moveCursorTo action added to the list. This is useful in lots of scenarios, for example when triggering

a grid column menu to show. You cannot click the menu icon right away, since it’s hidden until you move the cursor over the grid column header.
Happy recording everyone and let us know if you have any feedback on the recorder or this guide.